The good news is that laying wood floors isn't rocket science. The bad news is that when you take shortcuts, there's plenty that can go wrong. Fortunately, most of the problems are easily preventable with a little diligence on the part of the installer. Following are five of the most common mistakes contractors make when installing wood floors.
See if you are guilty of any of these installation sins, and find out how to reform your ways.
1) Not Checking Moisture
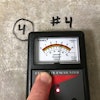
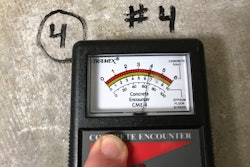
Moisture (or sometimes the lack of it) is indisputably the No. 1 cause of wood flooring problems. Moisture by itself doesn't always have to be a problem—if the wood flooring installer takes the right steps to handle it.

Unfortunately, many installers don't. A common scenario might look like this: A contractor in Michigan has solid strip flooring delivered to the job site in the middle of winter. It came from a reputable distributor, who kept the flooring in a climate-controlled warehouse. Due to job-site delays, the flooring sits on the job site, where the heat is running, for a month. The contractor installs it, the floor looks great, and he gets paid. The next winter, he gets a phone call from the unhappy customer: The flooring has big gaps between the boards.
RELATED: A Guide to Subfloors Used Under Wood Flooring
The likely cause is that while on the job site, the flooring acclimated to the extreme dry conditions of winter. When it then acclimated to the other extreme, an especially humid Michigan summer, it swelled, crushing the edges of the boards. The next winter, when the flooring dried again, the gaps were bigger than typical seasonal gaps.
How could this have been prevented? When possible, the goal should be to install the flooring at a moisture content (MC) between the two extremes. Lacking that, allowing for some expansion by not nailing the flooring as tightly as possible and also perhaps including occasional "washer rows"—where washers help space out the rows—would have given this floor a little more room to expand (see "Room to Grow" below).
There are endless other examples. Maybe the flooring was installed during a sticky Georgia summer before the HVAC was running, and when the air conditioning was turned on, large gaps appeared between the boards. Perhaps a floor was installed over a slab that hadn't cured, and the boards cupped. Moisture problems are too varied to deal with in detail here, but following are some basic steps to avoid the cardinal sins of moisture (for more detailed information, see the "NWFA Technical Manual Chapter A100: Water and Wood"):
- Take MC readings of the flooring and subflooring before you start installation—they should be within 4 percentage points of each other (2 percent for flooring wider than 3 inches).
- Make sure all windows and doors are installed, all wet trades such as drywall and painting are completed, and the HVAC system is operating.
- Measure the temperature and relative humidity (RH) at the job site. They should be at "normal living conditions" (typically between 30 and 50 percent RH and between 60 and 80 degrees Fahrenheit), or whatever the normal living conditions are in your particular region.
- Inspect the exterior of the house to make sure that gutters and downspouts are in place and that the grading around the house drains water away from the foundation (the minimum slope is 6 inches over 10 feet).
- Use the recommended moisture retarder for the flooring you're installing.
- When you're concerned about moisture, engineered flooring is a wise choice—it isn't impervious to moisture, but it's much more stable.
Perhaps the most important step of all is educating the customer that wood is a natural material. It will swell and shrink as it gains and loses moisture with the seasons. Seasonal gaps are normal (giant gaps in which you could lose small pets are not).
2) Not Preparing the Subfloor
What do the following problems have in common?
1) a floating floor that has so much deflection, things on the end table shake when you walk by
2) a prefinished solid floor that has overwood only in a few spots
3) a glue-down floor that has loose areas
4) a solid strip floor that squeaks in one or more places.
As it says in the headline above, these can all be caused by not preparing the subfloor. Likely causes include (in the same order):
- not flattening the subfloor
- not cleaning blobs of drywall compound off the floor
- not cleaning a contaminant off the slab
- not checking the plywood for flatness, or installing over an inappropriate subfloor, such as particleboard.
RELATED: How to Rack a Wood Floor for Installation
The industry mantra for subfloors is that they should be clean, flat and dry. The "dry" part goes with the moisture discussion above. "Clean" means that all job-site debris is swept or scraped off, and also, for slabs, that there isn't anything on the slab that will interfere with adhesion (if there is, an old buffer with a hard-plate and a low-grade sandpaper, like 30 grit, can be used to abrade the surface). "Flat" (not "level") means that the subfloor is within the most recent industry standards: for floors with mechanical fasteners 1 1/2 inches or longer, 1/4 inch in 10 feet or 3/16 inch in 6 feet. For floors with mechanical fasteners less than 1 1/2 inches or glue-down floors, it's 3/16 inch in 10 feet or 1/8 inch in 6 feet. Subfloors that aren't flat enough must be fixed before floor installation. For plywood subfloors, that might mean using asphalt shingles or layers of plywood to fill in the low spots. For slabs, that usually means using an approved leveling compound and/or grinding down the high spots.
A word that should probably be added to "clean, dry and flat" is "appropriate." Many problems happen because the subfloor is inappropriate for the wood flooring installed. For example, in North America, most solid floors aren't recommended for installation directly to slabs. Particleboard is inappropriate for almost any wood flooring (except floating floors) because it has no holding power. When in doubt about the type of subfloor, ask the wood flooring manufacturer.
For more on subfloor prep, see the Hardwood Floors articles "Be Prepared" (on subfloor prep for slabs) from the February/March 2003 issue.
RELATED: Understanding How to Measure Moisture Can Avert Job-Site Disasters
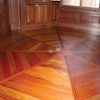
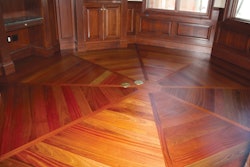
3) Lazy Layout
How familiar is the following? The crew arrive to install flooring throughout the first floor, measure an equal distance off two ends of one wall of the foyer, snap a line and start banging the flooring in. They go off that line to start in the adjoining kitchen. It's standard practice for many crews, but it might cause big headaches as they keep installing. The kitchen flooring runs into the dining room and a long hallway, and the flooring is now crooked to the entire hallway. In front of the large patio doors, it's a full 2 inches off. At the doorways to the bedrooms, the flooring has to be cut at 87 degrees instead of 90. Not only is that a hassle for the installer, it also looks bad.
Everyone knows that most rooms in a house aren't perfectly square. Wise installers find out ahead of time and plan ahead so their floor will look the best in the places where it matters the most. Oftentimes they'll snap their starting lines along the longest, most continuous run of flooring in the house. Then they'll use trammel points, 3-4-5 triangles or lasers to transfer their lines into adjoining rooms, seeing how the flooring will line up at focal points and adjusting the lines if necessary. (See "Quick and Easy Layout" below.
Great installers also plan to avoid awkward partial boards, like an extremely narrow piece, at the top of the stairs, next to a wood vent or where the field butts up against the picture-framing around the fireplace. They plan the layout for the entire project before one backer board is hammered down. It may seem time-consuming, but it results in a more professional job without any nasty moments—the kind where you get to a certain area while installing and say, "Uh-oh."
Finally, another layout mistake happens when a contractor has a large room and just starts installing at one wall, covering the whole room in that same direction. Since solid wood flooring expands in the direction of the tongue, it's a better idea to start installing in the middle of the room, using spline to change the direction of the flooring. That way, the expansion travels evenly in both directions.
4) Bad Racking
Once you know how to rack a floor correctly, you see bad racking jobs all over the place, from your friends' houses to the stores at the mall. H-joints and too-close end joints seem to jump right out at you. Racking a floor correctly isn't difficult; it just takes awareness of the right way to do it. When a floor is racked well, no one spot in the floor should catch your attention (or, more importantly, your customer's attention).
Here are the most common racking sins (see the sidebar "Rack it Right"):
- End joints too close together: For standard strip flooring, the latest guideline is the distance between end joints in adjoining rows should be at least three times the width of the flooring when the grade and the material allow.
- H-joints: These happen when end joints line up with one row between them.
- Lightning bolts/stair steps: Whatever you call them, the name describes them—joints that fall evenly spaced in a series of rows such that they have the appearance of a flight of stairs or a lightning bolt. Oftentimes they repeat in a floor when there are the same fixed lengths in a box or a bundle.
There's more to racking than simply where you put the boards. Another common mistake is laying out the floor without paying attention to the overall look. For example, you may see an area where all the boards are light-colored except for one dark board. Even if that board does fit within the grade, it will look out of place. Sometimes you may even come across a board of the wrong species while you're racking. Other times, you'll see a floor that has primarily longer boards, but has one area that is full of shorts. As you rack, keep in mind the appearance of the entire floor. It's wise to open a few bundles or boxes and mix the boards together to help disguise any variations between them and evenly distribute the lengths.
Another racking mistake is not paying attention to focal points. In front of fireplaces, in doorways and at the top of stair landings are places where you'll want a clean appearance to the floor, not a bunch of shorts or a board with a huge mineral streak. So plan ahead to make those areas as attractive as possible.
5) Not Nailing Enough
Maybe the installers don't know any better, or maybe they are trying to cut corners, but not putting enough fasteners in the floor is a common problem. They might put only a couple nails in a board, only nail every other board, or even nail only every other row. They think they're getting away with something—after all, you can't see it—but they put themselves at risk. If anything goes wrong with the floor, their shortcut will be discovered by the most basic inspection, and their lack of fasteners might be blamed for any multitude of problems.
Floors without enough fasteners will be loose, which will cause them to move and make noise. They also are more prone to gaps between boards. Far less common is the problem of too many fasteners, which can crack the tongues and also create a loose floor.
The basic rules for fasteners include:
- Every board must have at least two fasteners.
- There should be a fastener 1 to 3 inches from each board end.
- For standard strip flooring, the preferred fastener spacing is every 8 to 10 inches (up to 12 inches is considered acceptable).
- For plank flooring 4 inches and wider, nailing every 6 to 8 inches is the standard.
- Always follow the directions of the flooring manufacturer.
If you find you don't commit any of these five sins, you've got a good start to a successful wood flooring installation. If you do commit them, it's likely that you'll get sent to contractor purgatory—back on the job site, redoing the floor that you should have installed correctly to begin with.
Additional sources for this article included Frank Kroupa, NWFA; and Mickey Moore, NOFMA: The Wood Flooring Manufacturers Association.
Quick and Easy Layout
The 3-4-5 triangle is a tried-and-true method for snapping a perpendicular line on a subfloor, but trammel points are also a great option and are even easier than measuring the 3-4-5 (for techies, a laser is probably the easiest option of all). All you need are trammel points, some kind of straightedge to attach them to (here, a scrap piece of baseboard ripped down), a pencil and your chalk line. Here are the steps:

1 Snap your line and pick a point on the line (A). From A, scribe an arc in each direction on the line creating two equidistant points. The bigger you make the distances, the better (we're making them small so they're visible in the photo).

2 Move the trammel points farther apart. Then, from one of the points you just marked, scribe an arc on one side of the line roughly where you think your perpendicular line will fall. Then, move to the other point and do the same.

3 At this point, you could snap a line between A and the new point where your arcs intersect (B) and get a perpendicular line. If you have room, though, you can repeat Step 2 on the other side of your line to get another perpendicular point (C).

4 Snapping a line that crosses A, B and C will give you a perfectly perpendicular line.
Room to Grow


Periodically using "washer rows" when you're installing in very low moisture conditions and you expect the floor to expand later (for example, when installing in the middle of winter in the Northeast) can give your floor room to expand without problems. Just be sure to protect the floor when you remove them.
Rack it Right
If you avoid the following three problems, you've got a good handle on racking a wood floor:

Too-Close End Joints

H-Joints

Stairsteps/Lightning Bolts
RELATED: Step by Step: Fixing an Uneven Wood Subfloor Before Wood Floors