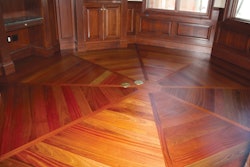
Hello all, Keith Long here with Thunderheart Flooring to wrap up the installation of flush-mount vents and the double-picture-frame border on the project we’ve been working on (see Part 1, Part 2, Part 3 and Part 4).

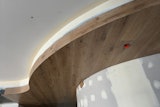
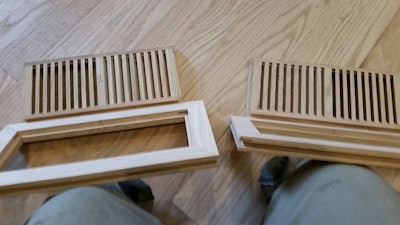
Since different areas of a home may be sanded a bit more or a bit less, I number the inside of each flush-mount vent frame and the back of each wooden insert. That way, after staining and finishing, I can be certain each insert goes back where it was when it was sanded.

Just like hardwood flooring, the bottom side of the grooves on these flush mount vents are recessed in a bit from the top side. To get an accurate measurement of where to cut out for the vents, I turn them upside down to mark them. A couple flooring scraps under the vent while marking kept it level. I squared it up and traced the perimeter to know what to cut out of the field.

I cut everything I can with the track saw. Then, I use an oscillating saw to cut the two inside corners per vent.

I use urethane adhesive and blind-nail with 15-gauge finish nails to secure the vent frames in place. If there’s any glue that can be seen on the subfloor at this point, I take it up right away. I typically leave the inserts out overnight, in case any adhesive finds its way out onto the subfloor while I’m working on getting the border in. Early on in my career, I had one job site where I put the inserts in right away, and played heck trying to get a couple of them up before stain and finish. One time of going through that was enough for me.

I grew up in a “work first, then play” environment. I’m in the habit of getting the most mentally taxing portions of a project out of the way early in the day. That way, as I’m more physically tired toward the end of the day, easier tasks can be performed.
Many contractors I know prefer to undercut stone faces such as this. Most times, I scribe to them. By my way of thinking, it eliminates the risk of chipping out pieces above the level of the hardwood, and then having to figure out how to remedy it. Also, I was working by myself on this job and didn’t have enough hands to cut and contain the masonry dust at the same time. Properly acclimated floors in stable indoor environments in my area, such as this one, don’t expand and contract enough to cause an issue against this stone, so I scribed to it.

It took three trips to the jigsaw and back to get the fit just so. After I was satisfied, I put urethane adhesive on the subfloor and Titebond on the tongue of the previous border board, and I set it in place.


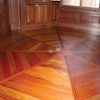
One of my favorite parts of doing border work is figuring out which boards will go best where from the standpoints of length, color and grain pattern. I prefer racking out all rows of the border loose. Then I number them and take them off the floor to be clear for routering in a groove in the perimeter of the field, which will accept spline.
Apologies, working by myself on this one, it was not possible to both router and take pictures of the action. Please refer to the footage my wife and I captured and blogged about on a similar project a couple years ago here.

Now that the border is in, let’s meet up again next week to go through the specifics of my sanding techniques.
Stay sharp!