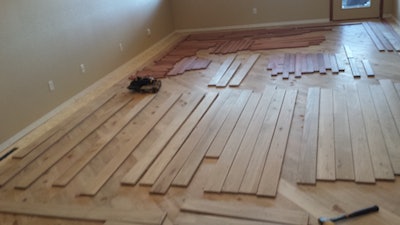
 The loose border pieces.
As I was installing the field, I kept back enough long, straight boards to meet the needs for the border. I took care to make sure they were fairly uniform from a color and grain standpoint, as I wanted the border to flow visually. Boards with large knots, dark mineral streaks, or really light sapwood boards I did not select for the border, but rather installed in the field under where the formal dining room table or couch sections would go.

For the third tier, another row of white oak, I labeled them “A,” “B,” “C,” and so on, to avoid confusion with the first tier labeled “1,” “2,” “3.” For the fifth tier of white oak that would remain 5 inches wide, I labeled them “P1,” “P2,” “P3”… for “perimeter,” and set them in another room until I got to that final picture frame portion of the project. I then ripped down tiers one and three of 5-inch white oak to 4 inches, and the santos mahogany to two 1.25-inch-wide pieces per board.
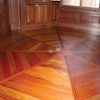
I like to dry fit it all out like this for a few reasons. For one, I am then 100 percent certain I have enough border material. Two, I can be sure the butt joints are spaced out in ways that are pleasing to the eye. Three, I can be sure pieces in high visibility or short areas are done with full pieces that look good visually. Four, I can group boards with certain hues and grain patterns together, the most pleasing being in the highest visibility areas, with the most variation and butt joint seams going under furniture or lower traffic pattern areas.

For the second tier, I did something different from the way I posted years ago on this floor with a similar border. In lieu of running the second tier wild through the French knot pattern and having to cut it off at the correct spot later, this time I mocked up the border, then ran a board up to show the correct end point for the tier two santos mahogany. This way, no cut-off of an over-length piece is necessary. The other advantage of this is that tiers two and four (the santos mahogany ones) start at different points, which make the butt joints of these two rows not line up exactly.
After running the first four tiers of border, I then dry-fit the santos mahogany portions of the French knot. When I mocked out the white oak border pieces, I ran one of these pieces in each French knot corner overlength, so that the white oak in the French knot contains the same coloring and grain pattern as the border around it. (I did the same thing for the santos mahogany in the French knot corners). I cut the 4-inch-by-4-inch white oak block for the French knot out first, then ripped the rest down to 2.75 inches to make the cuts for the other three oak pieces in the knot.

Speaking of not right, I used to use Liquid Nails to glue down hardwood flooring to the subfloor. A couple fellows brought to my attention that urethane adhesive is a better choice because of its properties. It costs a bit more but is readily available, and that’s what I now use. I have claimed that I’ll learn as much from all of you as you do from me (note: I did not claim that I would like to be used as a piñata. If you have a suggestion or something helpful you do that’s different than what you see here, feel free to comment (politely) below).
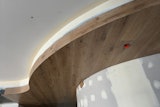
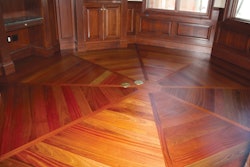
I picture-framed the final tier of 5-inch white oak to the wall by marking for width, then ripping the excess off at a 15-degree angle to allow the board to go into place without scuffing the wall. I mitered the corners of this perimeter row at 45-degree angles. I sanded, stained and finished this floor, including preparing for and applying a maintenance coat over the existing wood flooring I installed seven years ago.

Speaking of which, as this posts I am currently 700 miles (1,120 kilometers) east of my Colorado home consulting with Kimminau Wood Floors in Kansas City, Mo. Ben Kimminau, the owner, and I met four years ago while we were both in Dallas. Ben ought to be the poster child for plugging in and succeeding—let’s meet up next week to go through some of the decisions he is making to grow his business while still striving to keep their quality of work up, and to keep their customers satisfied and referring his company.
If you like these sorts of posts, and feel so compelled to place your name and a comment below, I would be glad to read it. Stay sharp, fellow craftsmen!