We constantly hear of jobs gone wrong and how to do them right in the future. We read about people who were financially hurt by jobs that went wrong due to unscrupulous contractors, and we've all had to come behind another contractor to clean up the mess he left behind. To top it off, we hear comments about the customers like, "They deserved it," or "Maybe next time they will hire a pro." We seem to be fascinated more by the bad than the good, but for this article, let's talk about the good things we can do on the job. I will walk you through scenarios from actual wood floor jobs that could have gone wrong … but did not. As we'll see, the right thing is not that hard to do.
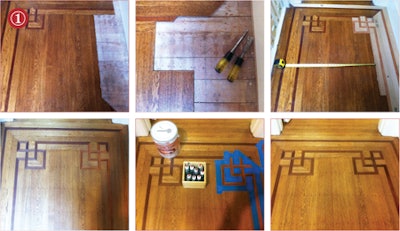
1. Tricky Decorative Corner Repair

What Could Have Happened: The contractor just used the stain straight from the can, so the overall hue was different. He used the available feature strip from the supplier, so it was not a match to the existing one. He had leftover flatsawn white oak in the van, so he used that instead of buying a new bundle of quartered oak. He also pin-nailed the decorative corner pieces instead of gluing them.
What Really Happened: The contractor did some research trying to find the right wood for the feature strip, with no luck. He talked to suppliers and installers, and he read through all his wood identification books without getting a clear answer. He ended up deciding to use quartered white oak for the floor and genuine mahogany, which was a grain match but not a color match, for the feature strip, and he glued in the repairs. Then, he sanded and stained the floor to match the new oak to the old. He added some tints to the stain to get it right. He then applied one coat of clear poly and stopped. At that point, the oak matched the existing oak, but he still needed to match the mahogany color (applying more polyurethane would not have changed the color of the mahogany). So that was a perfect time to tone the mahogany-he used a technique he had practiced before involving finish coats with tint in them-to get the perfect color.
2. Leveling Compound (Lots of It)

What Could Have Happened: He removed the carpet and glued down an engineered wood floor to the subfloor. It all looked great, and the client was happy. A few months later, the client called him to see if he could come over. He had some squeaks in the floor. He showed up to discover the entire floor was squeaking and moving underfoot.
What Really Happened: A simple investigation during the estimate revealed that what looked like lightweight concrete was actually leveling compound. The contractor recommended tearing out the leveling compound and re-sheathing the entire subfloor with ¾-inch plywood. A week later, the contractor got the job and started work. He removed the carpet and leveling compound, which ranged from 1 to 13?4 inch in thickness. It took misting the compound with water and one hit with a hammer to crack a 3-foot diameter area in the compound. Then he used a bar to pull it up off the subfloor. It took four days to remove the leveling compound, spraying it with water as he worked his way through it. Misting also helped in keeping the dust down.
Then he had to completely wash the subfloor so he could see it, finding a very out-of-flat OSB subfloor. The joists were running in different directions throughout. He leveled it with OSB carpet ramps, screwed the new plywood to the joists on a diagonal and then installed the new wood floors.
3. The Post-Tension Slab

What Could Have Happened: The contractor glued the floor right on the slab. The concrete looked pretty clean, so he did not want to spend the time to grind it. It would have only raised his bid, and he wanted to get the job. He nailed the floor over the wood subfloor area, because it was cheaper and faster. He also hammer-drilled right into one of the tandems in the slab. A few months later the client called to complain about cupping and squeaking. Later on they also had to repair the foundation and the slab.
What Really Happened: In his initial investigation, the contractor discovered this was a post-tension slab, so he decided to educate himself about post-tension slabs. He read some literature and talked to the GC, who knew that area very well. Then he picked up the phone and called a friend in the industry to get an expert opinion. After all that, he decided to not drill and screw blocks into the slab but to use concrete nails and only drive them in about ¼ inch. He took the time to grind the slab down, scrape off any contaminations or other leveling compounds and moisture test the slab. He then sealed it with an epoxy-type primer.
Regarding the wood subfloor, the wood flooring contractor was questioning himself: Should he nail the floor over the wood area or glue the floor throughout? He picked up the phone and called two more colleagues in the industry. They validated what he thought: Use the same method of installation throughout, so glue down the entire floor. The installation went fine, and at the end of each day, he blocked the floor in place. Only this time he didn't drill into the slab-he used his metal detector to find the metal in the slab and nailed the blocks away from it.
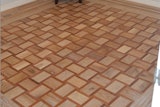
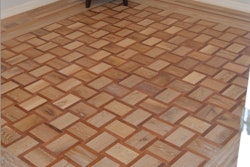
4. Water-Damaged Parquet

What Could Have Happened: From knowing the area, the contractor assumed the floor was oak, so he installed white oak. He glued the replacement parquet tiles right on the existing slab with no prep. Then, he sanded the rest of the floor, only to discover his repair was with the wrong species. So, he used his stain to try to blend it in, and it looked better. He didn't know how to roll the finish, because he had never gone to a school offered by the NWFA, the finish manufacturer or his distributor, and he ended up with streaks all over the floor. The hickory looked uneven in color and lighter than the oak repair. The owner would not pay until the repair was done right.
What Really Happened: He tested the rest of the floor for moisture to get a reference as to what the normal level was for that house. He told the owner it would take a few weeks for the floor to dry, and that he would only be willing to repair it then. She was really unhappy to hear that but agreed to wait. He pulled up a few tiles, sanded them down and took one to his supplier, who sent it to the mill. The mill confirmed it was a ¾-inch-thick hickory. So he put in the order (with a few extra tiles) and in the meantime, he attended to other jobs. He came back after the slab was dry, scraped off the old glue, sealed the slab and glued down the new tiles. Then he sanded and finished the rest of the floor. The contractor had made color samples for the owner before he sanded the floor. After he sanded the entire floor, he followed the exact same process he had followed on the samples: sand to 150 grit, water pop, stain with tints, and then roll on two coats of waterborne finish.
5. New Maple, Old Subfloor

What Could Have Happened: He delivered the wood and installed it the next day with no moisture testing. Then he sanded and finished the floor. A few weeks later the customer called to complain about some cupping, and to report that there was a squeak in the center of the room.
What Actually Happened: A routine investigation around the house revealed a wet crawl space. He covered the ground with 6-mil poly and left a carpet blower there for a couple of weeks. Then he delivered the wood. While preparing the subfloor, he noticed the cracked 1x8, so he replaced that section with plywood and blocked that area with an extra 2x6. He installed the floor, rough-sanded it and left for a few weeks. The GC then installed the cabinets. The contractor then came back to finish the floor.
6. A Squeak While Sanding
The Situation: The contractor had just finished installing a ¾-inch strip oak floor. While sanding, he heard a squeak he hadn't noticed before at the entry to one of the bedrooms.
What Could Have Happened: The contractor did not know if the squeak had been there before he installed the new floor. It was an old house, so it was not his problem. He bid the job low, so he did not have any time to spare to fix this. He didn't even have leftover boards he could use, for that matter. He finished the job and the owner called the following week to complain about a squeak in one of the bedrooms.
What Really Happened: When he noticed the squeak, he let it go and decided to check it again the next day, when he found it was still there. He pulled out a few floorboards, screwed the squeaky area and installed new boards. The owner showed up and was surprised to see his new floor being taken apart. The contractor explained, and the owner was very thankful and impressed. The contractor ended up receiving a tip from the owner.
7. A Surprise Lurking in the Vent

What Could Have Happened: The contractor never vacuums the inside of the floor vents, so when the heater kicked on while the finish was drying, it blew debris onto the finish. The contractor showed up the next day to find the debris stuck on top of his finish coat.
What Really Happened: Before the contractor applied the first coat, he vacuumed everywhere, including the floor vents. He discovered a few pounds of debris in one of the vents. He had never seen anything like that before. He had to scoop it out by hand, and then he could vacuum the remainder of the dust. He turned on the heat to make sure nothing was blowing out of the vent anymore. Then, he applied the last coat.
You see now how you can make your life easier by doing things just a little differently. It is up to you-the person doing the work-to decide which path to take when you encounter challenges on each job. How many times have we heard, "My client won't pay for all this"? Too many times. How do you know they won't pay? Have you asked? Have you educated them about your product? Have you told them what could happen if you did it the other way? When you take shortcuts and things go wrong, don't blame it on anyone else but yourself. There is always a choice. You make the choice; you call the shots. Now go out there, make the right choice and call the shots. Try it-it is fun!-and you're a lot more likely to get paid at the end of the job.