Whether you're a seasoned wood flooring installer or new to the business, working with adhesives can be tricky. Reading the ingredient list on the back of the bucket may be enough to make your head spin but, fortunately, using the product is a much easier task. You don't need a doctorate in chemistry to spread adhesive correctly. A successful glue-down wood flooring installation is as simple as reading instructions and following basic job-site procedures.
Here are the ABCs you need to know when using wood flooring adhesive for your next installation.
A is for Application
Using adhesives in the correct wood flooring application is a key to success. Certain wood flooring products and substrates work best with a glue-down method of installation.
Adhesives are most commonly used with engineered wood flooring installed over concrete, as well as parquet installed over a slab or plywood. With the advanced vapor barriers on the market today that reduce vapor transmission through concrete slabs, more adhesives are being used to glue down solid wood flooring. Keep in mind, however, that gluing solid wood flooring directly to the slab is not a commonly recommended procedure. Also keep in mind that adhesives with a high water content may not be suitable for certain species of solid or engineered wood flooring. Some adhesives are also compatible over radiant heating. Check with the wood flooring manufacturer and the adhesive manufacturer to see which products are recommended.
B is for Bond
Understanding your adhesive technology helps ensure a successful installation. Adhesives work by creating a bond between the substrate and the flooring through a chemical reaction.
The product comes in a thick liquid consistency, and after it is spread and exposed to the air for a specified period of time it cures to become a flexible solid, bonding to the substrate and the wood flooring. Water-based and solvent-based adhesives are called "evaporatives"-moisture or the solvent evaporates out of the adhesives, which then dry to a solid state. Moisture-cure urethanes and polymer adhesives are called "reactives"- they carry inert ingredients while in the container but react when exposed to atmospheric moisture to change them to a solid.
Many adhesives have a recommended "flash time"- they must be down for a certain amount of time before the wood flooring is installed. Other adhesives are "wet-lay," which don't need flash time, and you can lay the wood flooring into them immediately. The technology and chemicals in each manufacturer's adhesive vary, so always refer to the manufacturer's guidelines for how much, if any, flash time is required. A general rule of thumb for any adhesive is not to spread more than you can cover in 15 to 20 minutes. This is your window of opportunity to bond the flooring to the adhesive. If the adhesive is exposed longer, it may start to dry out and not transfer to the flooring surface. Other factors such as relative humidity may also affect open times for some adhesives, so it's a good idea to check job-site conditions and document all of your findings before you install.
To ensure a proper bond between the adhesive and floor, some manufacturers recommend rolling the wood floor in all four directions with a 100-pound roller. Whether you roll or not, check that you are achieving adequate transfer by picking up a piece of flooring and looking at the adhesive on the bottom of the board.
C is for Carrying Agent
While all adhesives work on the same principle of changing from a liquid to a solid state, they differ by the carrying agent or catalyst that activates them. The most common types of wood flooring adhesives include water-based, urethanes/moisture-cure adhesives, solvents and polymers.
Knowing which type of adhesive to use depends on personal preference, cost and the type of floor you are installing. Water-based adhesives tend to be lower in cost and easier to clean up. Because of their high water content, some manufacturers don't recommend water-based adhesives for flooring that may be susceptible to cupping, such as bamboo or 3/4 -inch solid wood. Urethanes/moisture-cure adhesives work with just about every type of installation, but they tend to be more costly than other adhesives, and they require a solvent for clean-up. Solvent-based adhesives are relatively inexpensive and easy to clean up, however, they contain VOCs and are flammable. With stricter VOC regulations and the advent of more environmentally friendly technology, these products are becoming less common.
Polymer adhesives can also be used with many products and are easy to clean up, however, they are not as common and tend to be more costly.
RELATED: Engineered 101: Understand the Fundamentals of Engineered Wood Flooring
P is for Preparation
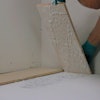
Many failed glue-down floors are caused by contractors not taking the time to properly check and prepare the subfloor. A concrete slab should be clean, dry and flat. If a slab isn't clean, the adhesive will form a bond with the debris, not the slab.
Contaminants such as paint overspray, plaster or adhesive from an old floor covering may interfere with adhesion, so the slab may have to be abraded with a heavy-grit sandpaper and hard-disc plate. Thoroughly vacuum, and if necessary, wet-mop the slab to remove all dirt and debris.
In new construction, the slab should have cured at least 60 to 90 days before testing and installation. Take several readings with a concrete moisture meter, or perform a calcium chloride test or a phenolphthalein test according to instructions. If necessary, use the recommended moisture barrier, such as 6-mil poly. A high pH level can also adversely affect the performance of an adhesive, so some manufacturers also recommend performing an alkalinity test.
Installing a floor over an uneven slab can cause the adhesive to adhere to some spots in the flooring and not others.
This creates a common customer callback of hollow spots in the floor that make a popping sound when walked on. For glue-down installations, a flat slab has a tolerance of 3/16 of an inch over a 10-foot span or 1/8 of an inch over a 6-foot span. To even out a slab, high spots can be ground down, or low spots can be filled with an approved leveling compound.
The subfloor should be compatible with the adhesive and product you're installing. Super-slick concrete slabs can interfere with the adhesive's bonding ability, so the surface of the slab may need to be abraded. Other surfaces, such as lightweight concrete, may not be compatible with certain adhesives, so always double-check with the manufacturer before you install. For a glue-down installation, the plywood subfloor should be at least 5/8 inch thick in 4-by-8-foot sheets.
Always check with the adhesive and flooring manufacturers for subfloor requirements.
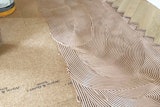
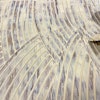
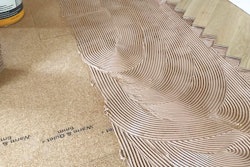
S is for Spread Rate
The spread rate is how many square feet of flooring a gallon of adhesive should cover. For example, a typical spread rate is 40 to 60 square feet per gallon of adhesive for engineered wood plank. Spread rates vary by the manufacturer and the products you're installing. The adhesive's spread rate is controlled by the shape and the size of the trowel's notches.
RELATED: Step by Step: How to Get a Concrete Slab Ready for Wood Floors
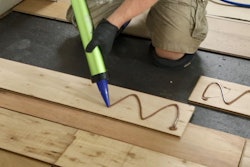
Think of a trowel as both a measuring device and a spreading device. Adhesive manufacturers have done extensive testing with their products to determine the correct trowel to use with different thicknesses and widths of wood flooring to achieve the best results. Always apply adhesive according to the manufacturer's recommendations following its specified trowel chart.
Using a trowel that is worn out or dirty can change the adhesive's spread rate. Clean your trowel after every application, and replace it regularly. One tip when using adhesives to help make cleanup easier is to cover the flat part of the trowel except for the notches with duct tape. At the end of the day, all you have to do is remove the tape and clean the notches.
Another factor that affects an adhesive's spread rate is the environment in which it's stored. Prolonged exposure to extremely high or low temperatures can change its viscosity. Always store adhesives at room temperature, whether in a warehouse or the job site, not in the back of your truck.
T is for Ten Minutes
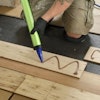
It may seem like a simple step, but many contractors make mistakes by not taking 10 minutes to read the directions on the label of the product they are using. These directions specify how to apply the product. If you are familiar with one product and switch to another, don't assume you can use the same application method. Even different products from the same manufacturer may have varying application methods, so a perusal of the label is time well spent. Once an adhesive is bonded to the flooring, a tear-out may be the only remedy if there's a problem. And the cost will come out of your pocket if you didn't follow instructions.
Now that you've increased your adhesive vocabulary, you should have a good start on tackling your next glue-down installation with confidence. Once you become proficient in your adhesive knowledge, you can work on the math of adding dollars to your bottom line.
Sources for this article included David Ford, Stauf USA; Robert McNamara, Bostik Inc.; Larry Scott, DriTac Adhesives Group; and Dwayne Smith, Advanced Adhesive Technologies Inc.