
In some regions of the world, it's rarely considered. In others, it's almost a given. Some areas prefer light browns and others tend to dark colors; while some consumers still go for a pastel look. Preferences are always changing as new trends move in. Regardless, staining a wood floor is a skill that every wood flooring contractor needs to master.
Stains are made of either pigments, dyes, or a combination of both. They change the color of the wood and also may seal it. Colors range from neutral to light browns, dark browns and pastels. Options include products that are oil based, water-based, or anilines.
Oil-based stains are the most widely used today. Contractors use them because they are a "forgiving" product — they take a relatively long time to dry, which helps prevent lap marks. Fast-dry oil-based stains contain some solvent other than mineral spirits, such as alcohol. Such solvents have a faster evaporation time and thus dry more quickly. Some oil-based stains on the market are referred to as "penetrating" stains. These stains also seal the floor, and tend to give floors the appearance of more depth.
Another option is waterborne stains. They also dry through evaporation of a solvent — in this case, water. These stains are fast-drying. Because they are fast-drying, you may be able to coat over water-based stains in a few hours, depending on conditions and the finish to be used.
When vivid colors are required for applications such as inlay accents or other special uses, contractors sometimes turn to aniline dyes. These colors are made from aniline oils or coal tar derivatives. Aniline dyes are made in different grades to be soluble in water, alcohol or oil-based solvents. They provide intense color but tend to fade quickly, and are difficult to apply because of their extremely fast dry times.
Application
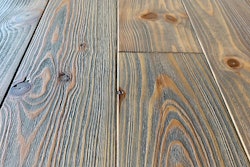
The beginning of a good staining job is the floor preparation. A stain is only as good as the sanding job underneath it — stain will emphasize irregularities such as edger marks, chatter marks, picture framing, scraping marks and scratch patterns. It will also highlight problems caused by skipping too many sandpaper grits. Also note that the final grit of sandpaper used on the floor will affect how the stain will take: A finer grit of sandpaper used before staining will leave the wood surface smoother, making the stain color appear lighter than if a coarser sandpaper grit is used.
A technique that is frequently used before staining is "popping the grain." Moistening the wood and letting it dry (confirm dryness with a moisture meter) before the stain is applied allows the stain to penetrate deeper, making the stain appear more intense or darker.
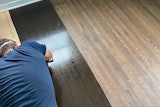
Before you begin application, make sure the floor is clean by sweeping, vacuuming and tacking the floor. To apply oil based stains, use a recommended applicator (typically 100 percent cotton rags, lambswool applicators, or brushes). Apply the stain in the direction of the wood, cutting in at walls to avoid staining walls or moldings. Allow the stain to penetrate for the recommended amount of time — to some degree, the length of time the stain is left on will determine the degree of color. As you apply the stain, take care to prevent drops of water or sweat from coming in contact with the floor, as they will leave marks in the stain. As you move into unstained areas, remember to overlap slightly into the still-wet stained areas to prevent lap marks, which appear as darker areas.
Remove the excess stain by hand wiping with rags. Some manufacturers recommend burnishing the floor with fine steel wool, a white pad, 100 percent cotton rags or towels. (Never use steel wool if you are planning on coating the floor with a water-based finish — small particles left behind will rust.) Burnishing can help in drying process and may help reduce bleed back.
Typical dry time for oil-based stains is 8 to 12 hours, depending on job site conditions. Highly pigmented stains, such as white, pastel, mahogany or ebony, can take substantially longer to dry than other stains.
One safety note: It is vital that rags and steel wool soaked with oil-based stain be disposed of properly. Wood floor finishers have lost their livelihood when their stain-soaked rags spontaneously combusted. Such rags need no ignition source to burn: As they dry, the oxidation gives off heat. If that heat cannot escape, the rags can reach their flash point and burn. Rags tossed into a garbage can or even left in a pile can ignite. Check with your local fire department to find out what disposal methods are safe and legal in your area. Also check MSDS sheets and product labels for instructions. Common instructions are to place the rags in a non-combustible container with an airtight lid (such as an empty finish can), and/or to submerge the rags under water.
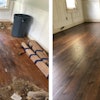
Stains take differently with different species of wood — make samples to ensure the desired color. Some contractors also try the stain on the actual job site. Either way, have customers sign off on their stain selections.
Some wood species such as maple and pine are difficult to stain because they do not accept stain uniformly. Many contractors simply avoid staining these species altogether. Others have developed their own methods for staining these problem woods. One method is to apply a penetrating sealer to the floor, then lightly screen the floor before applying stain. A similar solution is to treat the wood with a wood conditioner (no screening is required) before applying stain. These methods seal the open grain, preventing the stain from penetrating more than it does in areas of closed grain. When using a sealer, there is one possible problem: The sealer may prevent the stain from adhering to the wood properly. Another method is to pop the grain by lightly wiping the floor with a damp cloth, opening the pores of the wood to allow a more even penetration. Some contractors combine both methods.
In addition to problems with different species, some contractors encounter difficulties with "bleed back." This occurs when excess stain seeps out from the grain or from the spaces between boards. The most obvious cause is excessive stain application, but low-viscosity stain may also be the culprit. In addition, high temperatures due to factors such as sunlight hitting the floor may cause bleed back. The solution is to wipe off the excess stain and let it dry thoroughly before applying another coat. If finish has already been applied over bleed back, a complete resand is required.
Bleaching
Although not technically staining,bleaching a wood floor also changes the color of the wood — red oak will lighten to a pink cast, while white oak will take on a greenish cast. (Bleaching will not turn a floor white.) Bleach reduces variations in the wood color without obscuring the grain pattern. Because the process damages the fiber of the wood and makes a floor difficult to maintain, it is not recommended. Note that many water-based finishes are not compatible with a previously bleached wood floor.
If you do choose to bleach a wood floor, use only bleach specifically for wood flooring. Because bleaching raises the grain of the wood, sanding with fine paper or buffing may be necessary to restore a smooth surface. Most manufacturers recommend using a system of compatible bleach, stain and finish. Before you use different products, make sure you check with the manufacturers for compatibility, and do a test area in an inconspicuous place. Always use nonambering products, and be aware that most wood fillers cannot be bleached.
The bleach must dry completely and the wood must return to an acceptable moisture content before a white stain or other finish is applied.
Finishing Touches
Once the staining process is complete, the next step is to apply a coat of sealer or finish. Note that stains must be completely dry before the next coat is applied. Paying attention to the necessary relative humidity, temperature and air flow can minimize the dry time. When they think the floor is dry,most contractors use a dry, clean, white cloth to rub the stain, detecting any stain transfer onto the cloth. Also, some manufacturers recommend burnishing with a white pad before applying finish — if the pad stains, the floor obviously isn't dry yet. Once the stain is truly dry, it is possible to coat over an oil-based stain with most wood floor finishes.