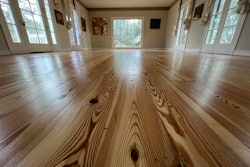
Beautiful, flat floors begin with the big machine. (Photo courtesy of Newport, Ky.-based Schumacher & Co.)
The big machine is the vital first step to getting a floor flat. The rules for running a big machine are simple, but important—if you don't do it right, you'll have little chance of getting a good final result.
There are a few things to take care of before you start sanding the floor. First, to run a professional big machine, you need a 220-volt power source. Outlets for appliances and air conditioners are common sources. Sometimes you have to go right into the box or, in new developments, directly to a common pole (use an electrician in either case).
Next, determine what the condition of the floor is, looking at such things as how much over wood there is. This helps you decide which grit you will use to begin.
Also, don't forget to visually inspect the floor before you start, setting nail heads where necessary. Then, you're ready to begin.
Necessary tools/equipment:
- Big machine
- Broom
- Putty knife
- Hearing protection
- Respirator
Necessary materials/supplies:
- Abrasives
- Spot or trowel filler
RELATED: Sanding 101: Wood Floor Sanding Basics
Step 1:

Most belt machines are set up to work from left to right. On this new red oak floor, I'm using a 50-grit belt and starting at the left wall. For the first cut, I move forward and back on the same path, working on a slight angle, which helps flatten the end joints and over wood.
Remember to wear hearing protection and a respirator, and don't wrap the cord around your neck.
Step 2:

Before your next pass, move the machine over the width of about 1 1/2 boards (for a strip floor).
Step 3:

After sanding about half the width of this small square room, I now switch my angle so I'll be able to get closer to the wall on my right. I follow the same procedure, walking forward and back on the same path and then moving over only the width of a couple boards.
Step 4:

Now, I turn the machine in the opposite direction to get the other side of the room. Again, I sand on a slight angle working from left to right, changing the angle about halfway across the room as I work toward the far wall.
Step 5:

As you can see, I haven't stopped and started in the same place on every pass with the sanding machine. Having worked at an angle, my cuts vary from about 6 to 8 inches from the wall. Likewise, don't start and stop at the someplace in the center of the room, which would create a noticeable line in the floor.
Step 6:

Next, using the same grit, I cut the floor straight. I cut the whole floor this way, working left to right. I'm careful to feather my cuts as I approach the wall so I don't leave deep gouges.
Step 7:

Cutting the floor straight gets me closer to the wall line, but I've still varied exactly how close I cut so there won't be a noticeable line. Remember, the closer you come to the wall with the big machine, the less you'll have to cut with the edger.
Step 8:

Between grits, sweep the floor. Extra dust and other dirt left on the floor can damage the abrasive, making it less effective and leaving streaks in the floor.
Step 9:

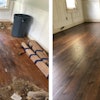
Before sanding, I go over the floor and spot-fill any holes. Or, you can trowel-fill the whole floor.
After wards, I repeat the same sanding process, cutting the whole floor from left to right, going straight with the direction of the flooring. Be sure to check your bag periodically. When the dust fills up to the line on the bag that says "full" (about halfway up the bag), empty it out. Never leave wood dust in the bag—it could spontaneously combust.
Step 10:

Now I switch to an 80-grit belt. Never skip more than one grit in a sequence. If you do, the finer paper can't remove the deep cuts left in the floor by the rougher abrasive.
Step 11:

On your final pass with the sander, you want to cut the floor as flat as possible. Here I'm using a hand scraper to clean the big machine's wheels, removing dirt and filler residue. Then, follow the same cutting pattern with the final grit—on this floor, 100-grit abrasive.
The dreaded drum mark

You don’t have to look very hard at this photo to see one of the worst big machine mistakes—a drum mark. They happen when the drum contacts the floor while you’re standing still or when it is let down too abruptly. Bringing the drum up and down as you move forward and back should be like an airplane landing and taking off. As you begin a pass, slowly walk forward and let the drum down while you are in motion. As you approach the wall, gently lift the drum off the floor—again, while you are walking. Then, do the same thing as you walk backwards on the same path.
The pattern

Not long ago, the standard for sanding strip floors was to cut straight with the direction of the flooring. In recent years, however, most people have come to agree that cutting at a slight angle (about 7 to 10 degrees) helps flatten the floor better. Here’s the pattern I’m following on my first cut with this small floor. Remember, never stop and start in the same place, and overlap where you cut in the middle of the floor.
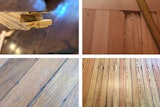
Applying filler

There is a right way and a wrong way to work with filler, and you see the wrong way lots of times. What’s wrong with the photo on the left? There’s a big glob of filler left above the surface of the boards. This is a waste of filler, and it sticks to the big machine’s wheels. The filler on the right has been scraped clean to the surface of the floor, eliminating those issues. Also, when applying filler, be sure you press it down all the way to the bottom of the hole or void. If you don’t, the filler is likely to pop out during sanding.