The Problem

The Procedure
The floor in this case was ¾-by-2¼-inch factory-finished solid red oak that was nailed to a 19/32-inch spruce plywood subfloor on the main floor. The homeowners had completed a pre-delivery inspection, and the squeakiness and movement were first noticed at that point.
The Cause
As I walked across this floor, I could hear creaking with almost every step, and lots of movement. First I determined the fastening schedule by using spherical magnets. The manufacturer's guideline called for a maximum spacing of 10 to 12 inches, with fasteners 1 to 3 inches from the end of each board. I tested eight boards at random, and found 20 examples where the installer was out of spec. Some cleats were as much as 22 inches apart, and there were two boards with no fasteners at all.
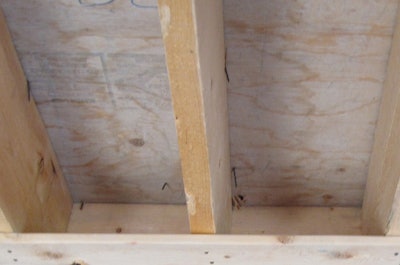
Then I moved down to the basement, which luckily had an unfinished ceiling. This allowed me to view the nailing pattern from below, and what I saw there was quite alarming. For every 10 square feet or so, there were only five or six cleat tips showing through the bottom of the subfloor, when I should have been able to see at least 50. Those that I could see only had an exposure of about 18 inch. It appeared to me that the installer had used nails that were too short. But where did the rest of them wind up? I could find them with the magnets but couldn't see them from below.
I asked to be present when the floor was ripped out. Afterwards, I laid an armload of material face-down on the driveway. The first surprise was that the length of fastener was actually 2 inches (in compliance with the manufacturer's spec). The second surprise was the angle of the cleats. I determined that this installer had a tendency to lean forward on his nailing machine, such that the heel of the shoe at the bottom of the machine was angled upwards. This caused the fasteners to fire at an angle that was closer to parallel to the surface. Many of the cleats came out at an angle much greater than 45 degrees and, as a result, were too shallow. Some of the fasteners had an exit point beyond the midpoint of the board width. These nails didn't penetrate the subfloor. The nails that did penetrate the subfloor were buried inside the plywood. There were three boards from the ripout samples that had no fasteners whatsoever.
How to Fix the Floor
In this case the floor was pulled up and replaced with new material installed by a different installation contractor.
In the Future
Tract builders like this often find themselves in the middle of an ugly, costly repair scenario after the fact. Just because an installation company has the best price doesn't mean they can deliver a decent finished product. Sometimes, even reputable large scale installers will sub-contract their work out to smaller crews without checking them out first. At that point, things generally fall off the rails.
See more photos from this inspection:
 Magnets were used to determine fastener spacing from above.
 Reassembling the removed wood flooring on the driveway revealed many problems with the fasteners.