Mixing wood with other materials adds a distinct look to your floor, setting it apart from the rest. Many contractors are intimidated by adding new materials to the mix, but by mastering a few techniques, you can create floors that spice up your portfolio and differentiate you from the competition. Any non-ferrous metal such as brass, copper, aluminum, lead, silver or gold can be used. Metals of this type won't throw sparks when sanded.
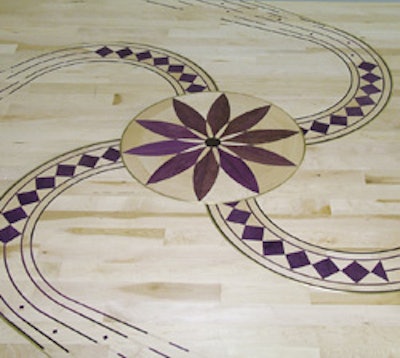
In this example, we show 1/4 -inch-square brass, however, for metals with different profiles, you can get cast pieces to match the diameter of the material you are using. Metal inlays can be in either a straight line or in a circle or arc shape. They also can be used in creative ways throughout the floor. In this example, brass inlays are installed around a circular medallion in the center of the floor and alongside arcs of a round border that was cut into four quarter circles. As with any other custom installations, be sure to charge accordingly for the increased time, materials and level of expertise involved with these floors.
Necessary tools and supplies:
- Plunge router (1.5 to 2-hp)
- Router bit
- Brass or other metal strip
- Two-part epoxy and mixing nozzles
- Solid brass (or other matching metal) nails
- Chisel
- Small drill bit (for nails)
- Small drill press
- Hammer
- Gear-driven ring roller (optional)
- Hacksaw
- Old purple abrasive pad
- Base tool for router
- Safety glasses
Step 1:

Create a rough sketch of the floor layout. Then, draw lines on the floor where you want the metal to go. Here, because brass is going to be laid in a circular arc pattern, guides can be created using trammel points.
Step 2:

Once your lines are drawn, secure the guide or tracking system with nails or double-faced tape. For this circle around the medallion, a base tool acts as the guide for cutting the radius with the router. If you don't have this tool, you can cut a similar contraption out of a piece of wood. Remember to wear safety glasses while routing.
Step 3:

In order for the brass to lie flat, choose your depth carefully. If the floor has already been sanded, the router depth should be set to the exact depth of the material. If the surface of the floor will be sanded after the brass installation, the material should lie 1/32 inch below the surface. Be sure to cut in only one direction—don't move the router back and forth. Rather than cutting the wood all at once, make the cut in two passes. Vacuum out the area between passes and after your final cut.
Step 4:

If the metal is going to be in the shape of a circle, the circumference, which is calculated by using the equation 2 p r 2 , tells you approximately how much material you need. If installing an arc or circle, bend the metal using a geardriven ring roller. Run the material through two or three times, tightening the tension after each pass, until it reaches the correct shape.
Step 5:

Fit the metal in place to make sure it fits into the groove you cut with the router and guide. Here, the metal is being fit into one of the radiating arcs.
Step 6:

Once the metal is set in the groove, mark where to cut the excess.
Step 7:

To prevent damage to the floor, remove the metal and cut it to size with a hacksaw.
Step 8:

Once the metal is cut, square off the ends with a file, sanding block or sanding belt. The ends should be smooth and square, allowing for a seamless union.
Step 9:

Place the metal back into the groove and mark drill holes that are approximately 6 to 8 inches apart.
Step 10:

Drill the holes using a drill press with a bit that is the same width as the nails that will secure the metal to the wood floor. Remember to clean the metal using an old purple pad.
Step 11:

Apply a bead of two-part epoxy in the groove. Because the epoxy dries quickly, apply only the amount that you can install and nail in five minutes. Don't be too liberal with the epoxy— apply just enough to seep through the predrilled holes. If too much epoxy is below, the metal won't lie flat, and you'll need to re-drill the holes.
Step 12:

Secure the metal inlay with nails of the same material. Here, we are using solid brass nails. A small amount of epoxy should seep through the hole.
Step 13:

For a shiny look, hand-scrape the metal; for a matte appearance, skim over the metal with a sander or edger. The nail heads should disappear when abraded. Don't abrade too much—excessive sanding could burn the wood, melt and/or release the adhesive bond, cause the metal to expand and pop out, or turn the metal a different color. Once it's sanded, it's ready for whatever finish you choose.