 Tony Lutz went through 48 tubes of adhesive to install a juniper cordwood floor in his family's home.
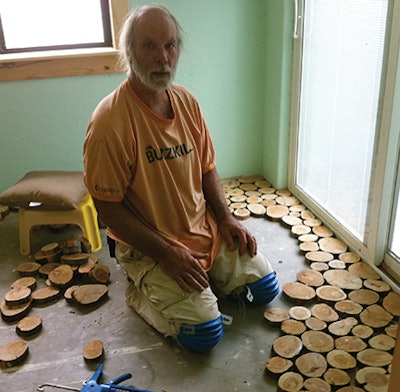
A cordwood floor that went viral on Facebook earlier this year began as an idea that developed in Tony Lutz's mind while he foraged for firewood in a national park near his home. Lutz is not a floor guy by training, but he is, he says, a "Why not?" guy, so he began collecting fallen juniper logs—he admired the tree's end grain pattern. When he had enough material to span his kitchen, he started cutting the juniper into 1-inch-thick disks. He cut many, many disks and "beat the hell out of" a new 12-inch chop saw in the process. After he removed most of the bark, his wife began arranging the disks onto the concrete floor in the kitchen. She worked in 2- or 3-square-foot sections at a time. Once the layout was finalized, Lutz glued down each disk using a urethane-based adhesive that he'd tested against other glues in the previous weeks. He used 48 large tubes of adhesive in all. He realized the floor was going to cost him more money than he'd envisioned. "But the wood was free!" he kept repeating to his wife (and to himself). Lutz let the glue set for a week, then cut the floor flat with a drum sander. The gaps between each disk were filled with a mixture of sawdust and polyurethane—a solution he found after an exhaustive research effort online. Then he sealed the floor with a few coats of poly. The Lutzes love the finished product and see the cordwood floor as a reflection of their personalities. Would Lutz ever do it again? "Probably not, but that is what most people say after giving birth," he says.
Below, read Lutz's hilarious 2,000-plus word description of the cordwood floor installation.
Cordwood Floor by Tony Lutz
 Lutz used a mixture of sawdust and poly to fill the gaps between disks.
If you have looked at the pictures, which most people do before reading an article, you may think to yourself, hey, I can do that. And I say to you, yes you can. And so I write this article to share the things I have learned. I also want to say that I am very well pleased as to how it turned out. Not something I could have said all during the process of making this floor happen. It is a unique style; some people love it a lot and some not so much.
How It Started
Sunny and I bought this house better than two years ago knowing that there would need to be some modifications to the existing structure. I fell in love with the house and it setting immediately. Sunny wanted new cabinets. OK we have a deal, so we bought the house. Fortunately there was a guesthouse on the property in good shape that we could move into instead of our 28 foot RV while modifications took place.
One rainy weekend, a rare commodity in this part of Arizona, not being able to work outside, I began to tweak the kitchen by removing the cabinets, sinks, countertops, tile floor and the wall that separated the kitchen from a bedroom. Destruction is so much easier than construction. Sunny and I have always had houses that we have remodeled or updated with the idea of resale. Is what we are doing going to get us more money when we sell? Not this house. This was and is to be our house built to what we want. In a way, it is an extension of us. My wife and I are tall people so one of our first decisions was to make sure all countertops would be raised 4 inches. Great decision, no longer do we have neck and back pain from bending over a too low sink.
So as we made these modifications to our house we ended up with the underlying concrete with its cracks, nail holes, and its tendency to fluctuate in altitude. This led us to a discussion of how and what to cover it. Another minor point we needed to keep in mind was our living in a flood zone. Carpet, tile, laminate and engineered flooring as well as solid oak flooring were debated. I personally like wood and I like working with it. Tile, concrete and stone are not me. The most appealing was the oak flooring, but it is costly and labor intensive. I don't care for laminate. One nice thing about having a few modifications to be done on a house is that you can procrastinate on one modification as you work on another thereby eliminating the need to make a decision.
Sunny plays dominos with the girls on Thursdays, so I take that as my day off to go meandering in the National Forest with my dog Gypsy. I have a permit to collect firewood from the forest so oftentimes I would return with fallen juniper branches in the back of the pickup. Anything of any major size requires its location to be accessible to my truck and on the uphill side of a road. Not the young man I once was. On one of my ventures I spotted an alligator juniper tree right next to the road, 10-12 feet high. It was destined to end up replacing the 4x4 support between the kitchen and dining room. That log or tree set in motion the juniperiztion of our house. We now have two juniper supports and the baseboards and window trim of the kitchen, green room and bath are all done in juniper. Enough with this stuff, let's get to the floor.

As I collected the juniper to be used as firewood, I would also pick up pieces with the intent of making something out of them. What I would make, I had no idea…maybe some flash of inspiration would hit me. When I cut up the juniper I noticed the beauty of the end grain cuts. It seemed a shame to just use this for firewood. The idea to use as flooring started to form. Why not? Tile is cemented to the concrete, oak is glued, and laminate floats. Juniper is a dense wood so hopefully expansion and contraction won't be a problem. I cut disks of several species of wood about an inch thick and glued them to several pieces of cement board. The woods tried were shaggy bark juniper, alligator juniper, birch, resinous pine, sycamore and mulberry. The best looking of the bunch were the juniper, according to Tony.
Several adhesives were tried: liquid nails, tile adhesive and cove adhesive. Initially they all seemed to work ok, but after letting them stay outside exposed to the elements adhesion was not its best. I eventually learned that a urethane-based adhesive would work the best and so it did, and naturally the most expensive. O, by the way, if you naively believe this is a way to save money like the author here, you will be disillusioned. Also on these sample cement board pieces we applied several colors of polygrout to see which one we liked the best to grout the wood disks with.
Having determined that this may possibly work we proceeded to cut disks, lots and lots of disks. I initially used a 10 inch miter or chop saw. Note: make that saw dedicated to only cutting disks. As I was also in the process of doing modifications to the home that saw had to be recalibrated each time it went from one use to the other. I decided to cut disks one inch thick. If too thin they will break apart. ¾ inch may be a better width but once you have several bushels of them cut it is a little late to change depth. However you set up your saw to cut the desired depth make sure it can not, cannot, can't, move. I secured mine initially with clamps. The force of the saw blade caused my guide to move imperceptibly. After cutting several trashcans full of now kindling for my fireplace, I found my disks varied from ¾ to 1 ¼ inches. Variations in the concrete will cause enough problems, disk variation, unacceptable. A ten inch chop saw will cut only so deep…3-4 inches, so for awhile I tried flipping the log over to get a larger disk. Not the best way to go.
Eventually, I trotted down to harbor freight and bought a 12 inch sliding chop saw for 139.95. This project beat the hell out of that thing. All the little plastic pieces are gone as well as many of the metal guides, but the saw itself works fine. I bolted a 4x6 block of wood 1 inch from the blade to use as a stop for the log I would be cutting.
This is not a safe procedure. OSHA will never sanctify this. There is a tendency for kickback. Always wear gloves. Stand to the side of your saw. Do not drink or partake and saw. I limited my sawing to an hour at a time. It is repetitive and monotonous, but you must be aware at all times. I would have preferred to have had a saw with a brake but I did not have one. I tried cutting with a band saw. It was too slow, often burned the wood and the cuts were not as straight. I also tried a chainsaw on some of the bigger pieces. It would have been glorious if it had worked, but I can't cut that straight with a chainsaw. I took some of the chainsaw pieces, actually only one, I can learn fast, through my 12 inch planer. Try it if you want.
The next step is to glue the disks to the floor using a urethane based adhesive. We used loctite in the large caulking tube. We also removed as much bark as easily possible both before disks were cut and then also after the cut. Round objects of varying sizes do not fit efficiently in rectangular spaces. Sunny would lay out the floor in 2-3 square foot sections and I would then glue then down in hopefully the same spot that my lovely wife initially oriented them. Problem is that once I picked one up, put on the glue and squished and twisted into place the original orientation would be disrupted. But it is a work of art and the grout will fix the gaps. After the first day of gluing, my back was screaming. Second day it was screaming again. I dreaded this job. Cutting the disks may be dangerous and monotonous but it didn't hurt. The third day it didn't hurt so much. After that it didn't bother me much at all. I guess it took a few days to strengthen dormant parts of my body. I believe we used 4 cases, or 48 large tubes of loctite urethane based adhesive, or about 12 tubes per 100square feet.

Sanding
We let the floor dry for about a week. I went down to the tool rental store and explained what I had done and even showed pictures. They had several sanders and thought that the rotary one would work the best. I had used drum sanders before and knew how fast they can cut into your wood floor if you are not careful. The purpose of sanding was to level out all the disks to a common height. Due to the nature of the gaps between the disks the rotary sander would grab those edges and send the sander out of control. After several attempts of using this beast and two holes in my kitchen wall, I determined to terminate our relationship, so back to Verde Valley rental. I got a drum sander and lots of sandpaper and also a nauseating earworm. A couple of the guys at the rental place said what a cool floor, what are you going to grout it with? Why, polygrout or some sort of mortar, of course! That won't work they replied in unison. You would think they were in a barbershop quartet. Uh oh, I say to myself. They proceed to tell me why. Undaunted, I return home knowing the Google machine will have the answers. It always does, and you know it never lies.
I guess it is confession time. I never really researched this project much. It kind of fits my MO, just go ahead do it, if I get in trouble figure it out or ask forgiveness. From the limited info on the Internet about grout mixture for juniper disks cemented to a concrete floor I deduced using a mixture of sawdust and polyurethane. 3:1 mix was suggested. Sounds messy, back to sanding. The drum sander worked very well. It worked me hard. Because we were sanding the end grain instead of with the grain the sander cut very little at each pass. We never had a problem of it cutting deep into the wood. I did use a lot of sandpaper, but hey, the wood was free. I saved all the sawdust from the sanding to be used in the next step of grouting.
Grouting. This is where forgiveness comes in. Sunny, it seems our floor may be going slightly over budget. We may need just a little more urethane than just a topcoat. Good news, polyurethane is cheaper by the 5-gallon bucket. Bad news, in Arizona polyurethane cannot be sold by 5-gallon bucket, only in the more costly one gallon size. In my endeavor, I cleaned out the polyurethane stock (satin finish) from 3 different Home Depot stores. Remember Sunny, the wood was free. (She loves the floor) I started the floor with a 3:1 ratio of sawdust to urethane. It was difficult to pack into the cracks, so the ratio became 2:1 where the mixture flowed more readily into the spaces. The sawdust from the sander was extremely fine which a good thing was. The grouting itself was a very hands-on thing. Dump it on the floor and push it into the cracks with your fingers, disposable gloves are recommended. This grout was allowed to dry for a week or so before coming back across the floor with a handheld rotary sander to get the excess grout off the disk surfaces.
Poly Topcoat
When putting on the finish coats of poly, the part that had the 3:1 ratio absorbed far more poly than the rest of the floor. It also took more coats. After getting the floor coated and dried we opened up this area to further construction for several months. Now that most of the modifications have been performed on this house, a final sanding and coating was done to the floor. We like it, it reflects my wife and I.
Would we ever do this again? Probably not. But that is what most people say after giving birth.
p.s. I found a 15 inch chop saw.