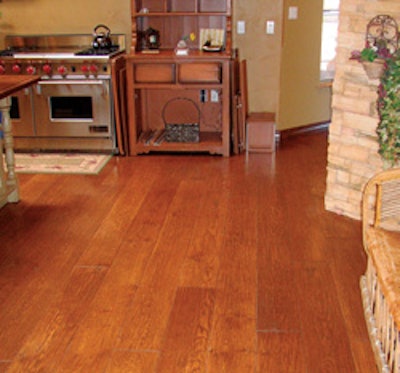
 Good subfloor preparation is vital to successfully installing beautiful glue-down floors such as this engineered wide-plank floor (courtesy of Benchmark Wood Floors).
Necessary tools:
- Moisture meter or other moisture-testing method
- Broom
- Scraper (for drywall compound)
- Vacuum
- Buffer and hard plate
- Magnesium screed
- Drill with spade bit
- Spacers or measuring tape
Necessary materials/supplies:
- Lumber crayon
- 30-grit abrasive disc
- Latex underlayment
- Garden hose (for cleaning screed)
Step 1:

First, test the moisture content of the slab to make sure it's ready for wood flooring installation. Never install over a slab that's less than 30 days old. To test,there are several options, including moisture meters, poly film tests and phenolphthalein tests. If any indicate moisture, use a calcium chloride test.
Step 2:

Sweep the floor clean of all dirt, dust and debris.
Step 3:

Scrape the floor clean of drywall compound, paint and other substances on the floor. If the wood flooring is to be glued down, make sure there aren't sealers or other coatings that may interfere with the adhesive bond. We avoid those problems by using a buffer and hard plate with 30-grit sandpaper to abrade the surface. Then, sweep again and vacuum.
Step 4:


The floor must be flat (not level) to with in industry standards (within 1/4 inch in 10 feet or 3/1 6inch in 6 feet). To check, we use an 8-foot-by-1 1/2-by-3 1/2-inch residential magnesium screed. You can use anything with a true flat edge, but we like this kind of screed because it will stay true and can be used for spreading the underlayment. A 3/16-inch spacer is handy for measuring the gaps.
Step 5:

We follow the same process around the entire job, using a lumber crayon to mark the differences in height. Large sweeping marks(at right) indicate the outlines of low areas, and we also write down the measurement of how low the area is relative to where it should be. This shows us where to pour the latex underlayment and gives us an idea of about how much we need to pour.
Step 6:

Self-leveling latex underlayment is mixed at the job site and applied immediately. It's a good idea to cut out a hole in the lid of the 5-gallon bucket big enough for the drill bit. That way, the underlayment doesn't splatter all over walls, coworkers, etc., while it's mixing.
For glue-down floors, it's a good idea to use a latex primer before you put down the underlayment, as it helps create a stronger bond to the concrete.
Step 7:

Next, we use the same screed to drag the underlayment across the floor(standard straightedges are too flimsy). We pour the underlayment on one end of the "puddle" and pull it down the length of the area. When we're done, we go outside and clean the screed with a hose we bring along.
Step 8:

Since we'll be installing a plywood subfloor here, our slab preparation is now done. All we have to do is wait for the underlayment to dry (in our climate,typically overnight if it's a 1/2-inch thick or less—follow the directions).
If this were a glue-down job, we would use a steel trowel along the edges of the underlayment to make sure they are as smooth as possible.