
Just about any wood flooring contractor can lay a plain wood floor,but not many go beyond that, offering customers upgrades to customize their wood floors. Some contractors are intimidated by the thought of having to install borders and inlays, not realizing that custom floors can begin on a simpler scale. Staining is a relatively easy way to create custom designs on the floor—all it requires is some basic layout skills, tape and stain.
The most important step in creating a custom stained floor is the proposed layout for the customer. Sketch your ideas to scale for the room. Once you and the customer agree on a design and price, have him sign off on the design and the estimate. Keep in mind that this is a custom floor, and you should charge appropriately for it.
As for the actual floor, prepare it just as you would any other stain job. Don't try to do this on species that don't stain well, such as cherry and maple. Remember that the key to a good stain job is a good sanding job—any sanding imperfections will be highlighted by the stain. Don't end with too high of a grit, or you'll close the grain, which may not allow the stain to fully penetrate. In general, you don't want to end with anything higher than 150 grit. On this sample floor, we ended with a 120-grit screen backed by a white pad.
Necessary tools and supplies:
- Non-marking tape
- Measuring tape
- Kite string
- Putty knife
- Razor knife
- Stain
- Clean rag
Step 1:

Begin your border pattern by laying a row of tape. As with any custom work, layout is crucial. The finger block parquet shown in our example makes calculating layout on this floor easy—a regular strip floor would take a bit more work. Since you don't want to mark the floor with chalk at this point,you can tape down string to mark your lines if needed.
Step 2:

Lay another row of tape to create the inside edge of the border. Of course, the tape should be as straight as possible.
On this floor, we're making one solid border, but you could make several rows—the design is up to you and your customer.
Step 3:

As you lay the tape, press down on all the edges so they're tight against the floor—you don't want stain to seep underneath the tape.
Step 4:

At the corners, use a putty knife to tear off a neat, square edge.
Step 5:

An easy way to create a starburst design in the middle is to make a template. This octagon shape is made of metal.
Step 6:

The template makes it easy to lay out the tape for the design. Simply stretch out pieces of tape along each edge of the octagon. Don't worry about the length; just make sure it's long enough to create your design.
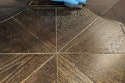
Step 7:

Continue with the tape until each edge is done. Now you can see the design taking shape. Remove the template. At this point, the pattern is ready for stain. For the starburst pattern we're doing,all you need to do is stain the inner gaps.
Step 8:

If you're staining the outside areas, use your putty knife to tear sharp edges for the star tips. Many different designs can be created depending on which areas you stain. You can stain only outside of star for a reverse starburst, or you can pull the inside tape out to stain the full star.
Step 9:

If the tape tears, you can use a knife or razor to score the tape, but make sure you don't cut into the wood floor.
Step 10:

Now you can fill in the gaps with your stain of choice. Be careful not to drip allover your floor or leak stain over the tape edges. Use an almost-dry stain rag,wiping the stain away from the tape to the center of the gaps.
Step 11:

Do the same thing for your border,being careful not to overlap the tape. Remember to wipe away from the tape to the center of the gaps.
Step 12:

Carefully removing the tape reveals a custom border.
Step 13:

It's easiest to remove the tape on the starburst by lifting the tips of the star and then removing the whole design in one piece.
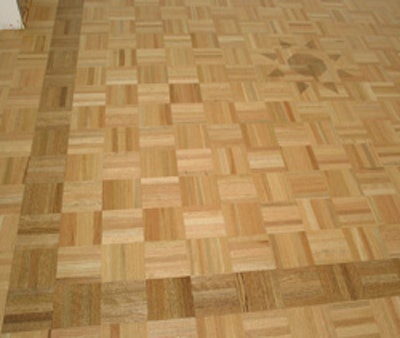
Step 14:

With the tape gone, our floor now has a custom focal point—in relatively short time and with very little expense.