
One of the first things a flooring contractor learns when getting into the business is that water is wood's worst enemy. Whether the source of moisture is environmental conditions or an appliance gone awry, not taking the right steps can spell doom for your job. Whatever the situation, a line of defense coupled with conscientious installation procedures is needed to ensure a successful wood flooring installation. In addition to the everyday challenges with moisture, there are several circumstances that require exceptional diligence to circumvent potential moisture disasters. Here are five potentially troublesome moisture battlefields and how to dodge their bullets.
1) Radiant Heat
Installing wood floors over radiant heat systems doesn't have to be complicated if the proper precautions are taken. Tubing filled with water in concrete or under plywood supplies the heat beneath the wood floor. When the heat travels through these tubes, moisture is taken out of the subfloor and, subsequently, the wood flooring above it. In any installation, the subfloor and the wood must have a moisture content within 4 percent of each other before the wood floor can be installed. Where many contractors get into trouble is by following this guideline without first turning on the radiant heat system and allowing the slab and the subfloor to completely dryout. Most floors are installed in the hot summer months when the last thing people are thinking about is turning on the heating system. If the radiant heat system has not been up and running prior to installation, the moisture in the slab will migrate to the wood floor when the heat is turned on, causing it to severely expand and contract during the heating season. To avoid this, run the radiant heat system at its normal recommended setting—don't try to cook the heat out at a higher temperature—prior to installation. On a slab that has been in place for at least 60 days, the radiant heat system may need to run 72 hours to six days before installation. Newer slabs require longer times—up to 60 days—so inform the builder ahead of time. Also, lightweight subfloors such as gypcrete need more time to dry. Check with the manufacturer for specific guidelines, and take several moisture readings throughout the floor before you begin installation.
Because of the inherent moisture fluctuations associated with radiant heat, flooring that is dimensionally stable is less likely to be affected by these changes. Check the dimensional stability rating of the species you're installing. Wide-plank floors tend to expand and contract more, so suggest as narrow a product as possible. Also, quartersawn and riftsawn products tend to move less than plainsawn products, making them ideal over radiant heat. Engineered floors are another obvious choice for their dimensional stability.
When it comes time to install the flooring, moisture fluctuations make it necessary to use a vapor barrier suchas 6-mil polyethylene over the slab. Also, use fasteners that won't penetrate the subfloor and puncture the heating tubes. Once the product is installed, caution the homeowner not to crank up the heat all at once. Gradually heating the floor will help the wood floor acclimate.
2) Leaks
Sometimes leaks are as obvious as a dripping pipe under the sink. Other times, finding the source can take some detective work. For example, if the floor is cupped in front of a dishwasher, the obvious first step is checking the dishwasher's plumbing. If no leak is apparent, ask the homeowner if there have been problems with the dishwasher in the past. Sometimes there can even be a puddle of water in the middle of the floor, but no surrounding appliances. In these more challenging cases, take several moisture readings on the floor and surrounding walls with your moisture meter. If possible, see if the homeowner has the plans for the home,which can help you determine if there is a water line running through a nearby wall. Hidden leaks occurring over time can cause problems. For example, during a kitchen remodel, a carpenter may have punctured the water pipe to the refrigerator when finish-nailing the baseboard. Perhaps six months later, when the nail eventually rusts, water could seep into the wall,making the subfloor wet and causing the floor to buckle.
In a high-rise building or multi-unit complex, finding the source of moisture may be a daunting task. Oftentimes, the source of a leak may be from another unit in the building. The culprit may be next door, or even one or several units above the moisture-laden floor. The previous example with the refrigerator could wreak havoc on surrounding units in the building. A leak from outside also could find its way into a unit through an area that's not properly sealed or caulked. The water then could find a path on the steel beams and travel into another unit,where it settles in the middle of the room.
Whatever the case, investigative work is necessary to find the source ofthe leak. Keep your moisture meter in hand, and find out as much information as possible about the building. Talk to the homeowner or building manager to get clues about the plumbing and construction. Once the source of the leak is found, make sure the problem is corrected and that moisture levels are back to normal before you repair or replace any flooring.
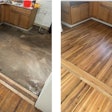
Fixing the floor depends on how badly the floor is damaged and how large of an area is affected. If there is minor cupping and surface damage, you can sand and refinish the floor once it has dried back to its normal moisture condition. Some water stains will not sand out of the floor, so those boards may to be replaced. A minor leak may require replacing just a few boards. However, if the floor is badly cupped or buckled, the affected area needs to be ripped out and replaced. If the water damage covers a large area, it may be easiest to rip out the entire floor and start over.
3) Below Grade
Dealing with moisture is tricky enough above-grade, much less in areas below the earth. Moisture can reach high levels below grade, despite diligent precautions. For this reason, solid wood flooring is not recommended below grade. Engineered and floating flooring is more dimensionally stable and able to handle these moisture fluctuations. Some contractors admit to installing solid products below grade, but they are taking a risk—most manufacturers won't stand behind a solid floor installed below grade, and NWFA Installation Guidelines advise against it.
Before the floor is installed, checkout the surroundings. Inside, look for signs of moisture and water damage. If you notice a mildew odor, water is present somewhere. Take moisture readings in all areas of the room and surrounding areas to see if proper moisture conditions are present. Next,take a look outside the home. You may think you're installing a floor that is above grade, but if any part of the slab is 4 inches or more below the earth, it's considered below grade. Walkout basements also are considered below-grade. If you install a solid product in these conditions, you are responsible if the floor fails.
Knowledge of the conditions in the surrounding area is important, as well. If the community is built on a floodplain or a nearby water source, abasement is more likely to flood and have moisture issues. The condition of the earth below also is a concern. Some new housing developments are built on top of old ponds or wetlands that have been filled for development. Knowing as much information as possible about the construction site helps you determine if a wood flooring installation of any type is possible.
A below-grade installation requires careful moisture testing of the concrete slab, which should be dry before you begin installation. A new concrete slab can take 60 days or more to cure, depending on conditions. Be sure that the space is at "normal living conditions," which are between 30 and 50percent relative humidity, before moisture readings are taken. The preferred concrete testing method has been the calcium-chloride test, however, technology has improved the accuracy of concrete-specific moisture meters. One calcium-chloride test should be performed for every 1,000 square feet for 24 hours. If using a moisture meter,test each perimeter wall and in several spots in the center of the floor,depending on the size of the room. Write your results on the slab and take photos for documentation. Once the slab is dry, use moisture barrier systems such as sealers, elastomeric membranes and 6-mil polyethelene underneath the wood flooring. Always check with the manufacturer to determine which systems work best with the flooring and conditions.
4) Flooded Floor
When a wood floor is flooded, it's imperative that you remove water as soon as possible. Potentially harmful mold can start to grow in just 48 hours. (If you suspect mold is already present, call in a mold remediation specialist.) Find the source of water and make sure the area is free from further water damage. Document your procedures and readings, because there's a good chance that an insurance claim will be involved. Use fans and dehumidifiers near the area of the flood to get air circulating and bring down humidity levels. If possible, place fans in the area below the flooded floor,such as the crawlspace or basement. The heat should be turned up to between 76 and 80 degrees. After these steps are taken, you need time and patience—the floor could take several weeks or longer to dry and flatten out. A common mistake is to sand the cupped floor before it returns to normal moisture levels. When it finally dries, it then turns into a crowned floor, creating a whole new problem.
Once you think the floor has dried,take several readings with a moisture meter and hygrometer to see if the area is really back to normal living conditions. Once it is, determine how to fix the floor. If the floor is severely cupped or buckled, the floor needs to be torn out and replaced. If there is minor surface damage and cupping, sanding and refinishing probably will restore the floor.
5) Climate Shifts
The trickiest installations may occur in conditions where the temperature and humidity levels fluctuate greatly. Areas in the Midwest such as Minnesota and Wisconsin are known for their cold,dry winters and warm, humid summers, as are many areas in the Northeast. Even with proper temperature and humidity controls, it sometimes can be difficult to maintain normal living conditions.
The impact that humidity shifts have on wood flooring can be quite apparent, especially with certain species and widths. For example, if a 5inch red oak plank has a moisture content of 7.7 percent at a relative humidity of 40 percent, at 20 percent relative humidity, the moisture content would be 4.5 percent, and it would shrink by 0.059 inches. Over 10feet of flooring, that could mean 1.4inches of shrinkage. If the relative humidity rose to 65 percent, the moisture content would be 12 percent, and it would expand by 0.079 inches. Over10 feet of flooring, that could mean 1.9inches of expansion.
Knowing that the boards will expand and contract, you should acclimate the wood to the average conditions of the area. If you have to install on a very dry or humid day, the wood should have a moisture content in the midrange for your area. This could mean that you need to add humidity to the air in the winter or take it out in the summer. Make sure the HVAC system is running, and use a hygrometer to make sure the area is within an acceptable humidity range. In extremely dry conditions, you may have to leave extra expansion space or spacer rows.
Even with careful precautions, a solid wood floor still is likely to expand in the summer and contract in the winter. Wider plank floors expandand contract more than 2 1/4-inch strip flooring. Inform the customer of this process, and be upfront about the gaps that could appear in the floor during drier months. If this is not acceptable, suggest an engineered or floating product.
Moisture situations don't have to be complicated if the proper tools are used and precautions are taken. Armed with a moisture meter, hygrometer, education and knowledge, contractors have the tools to fight the moisture battle.


