 Beautiful stone medallions add an upscale element to a floor while being relatively easy to install.
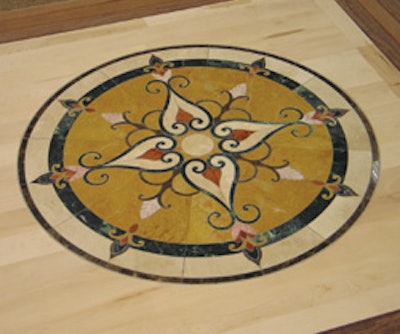
Many contractors would like to make a name for themselves by installing custom floors. Custom parquets, intricate borders and inlays all can add upscale elements to a room. But some of the most striking wood floors—and most expensive-looking—are those that combine wood with mixed media, such as stone,tile or metal. One easy way to start a foray into mixed mediais to install a stone medallion. As you'll see, the steps are similar to the simple steps for installing a wood medallion.
Necessary tools and supplies:
- medallion and template
- chalk line
- pencil or pen
- safety goggles
- ear plugs or ear muffs
- router and bit
- stud finder
- vacuum
- hammer and/or crowbar
- clear tape
- adhesive and trowel
- blue tape
- razor knife
- silicone/latex grout
Step 1:

First, choose where you would like to place your medallion for the best aesthetics, and have the customer approve the placement. Here, I'm snapping lines to place my template so the medallion is centered within this unfinished maple field surrounded by an ipé border.
Step 2:

Because this template is square, placing it in the center of our snapped lines is an easy task.
Step 3:

With the template in place, I use a pencil or pen to mark the circumference of the medallion.
Step 4:

Then, I move the template and use a stud finder to find spots where the router may hit fasteners, and I mark those spots. When I go over them with the router, I'll move slowly to grind off the top of the fastener and then use a nail set to punch the fastener down, out of the way.
Step 5:

Now, I nail the template securely to the floor, trying to place the nails so they'll be between two boards, making the small holes easy to disguise.
Step 6:

Now I need my router and a router bit designed specifically for this purpose. The bit may be provided with the inlay, but if not, you can find them at your local wood flooring distributor.
For the first pass, I set the depth of the bit so it will cut only 1/4 inch into this 3/4 inch floor.
Step 7:

I use the router going in a clockwise direction against the template with the router set to cut 1/4 inch.
Step 8:

Before making my next pass, I vacuum the area thoroughly.
Step 9:

After two more passes with the router, going down a 1/4 inch deeper with each pass, the wood in the middle can be removed. Then, I remove the moisture barrier and carefully check the subfloor for any protruding fasteners, setting any I find.
Step 10:

I also check the subfloor for evenness, and use my hand-scraper to bring down any high spots I find.
Step 11:

With the subfloor prepared, I put the moisture barrier back in place and put the medallion in upside down. Then, I sand the floor just as I would any wood floor. I'll remove the moisture barrier later, but for now it will hold the medallion up to the same thickness as the adhesive will later, so it helps ensure my final fit will be at the correct height. After sanding, the floor can be finished.
Step 12:

With the floor sanded and finished, the medallion can be removed. Here, I've applied clear packing tape to the medallion so my suction cup will grab the medallion and lift it out. If I didn't have the suction cup, I could also carefully drill a short screw into the plywood backer board (which is 3/8 inch thick) to help lift the medallion out.
Step 13:

Next, I dry-fit the medallion right-side up. Before dropping it in, I used that clear packing tape, this time putting it under the medallion with extra sticking out on each side.
Step 14:

The fit looks fine, so I use the packing tape to lift the medallion back out.
Step 15:

Now I'm ready to spread the adhesive—I'm using a one-part, moisture-cure urethane adhesive with a trowel that has the recommended notch pattern for my adhesive.
Step 16:

As I set the medallion in, I'm careful that the points in the pattern align exactly where the customer wants them.
Step 17:

This medallion is mounted on the wood backer board such that there is a gap between the wood floor and the stone,leaving room at the edge for the flexible silicone/latex grout I'll be using. To protect the wood and the stone, I put a layer of blue tape covering the area where the wood floor meets the medallion, then cut the tape away from the gap. In any installation involving stone and wood, the two materials should never butt up tightly against each other—expansion in the wood can easily crack the stone.
Step 18:

Regular grout would not have the flexibility required to allow for expansion in this floor, so I'm using a silicone/latex grout formulated to match the color of the medallion's sanded grout and have enough give for expansion and contraction. After I squeeze it out, I push it in with my finger to make sure it's down in the gap.
Step 19:

Next, I carefully pull up the tape and inspect to make sure no silicone/latex grout has gotten on our wood floor or the medallion.
Step 20:

With the grout in place and the tape removed, our stone medallion is now as how-stopping focal point of this floor.