


If you do enough installations, you're bound to come across some cuts that are too steep to cut on your chop saw. If the cut is up against a wall that will be covered with trim, you can get away with just tracing your line and using a jig or table saw to cut it out. However, let's say you have a precise cut you need to do up against a header. Yes, if you have a steady hand and you have the time, a table saw will get the job done. And yes, putty can be your buddy if you want to be a less-than-average installer. But, there is an easier, faster, and better way.
One of my favorite tools for custom or odd cut work is a track saw (the one most contractors are familiar with is made by Festool). I also like to use it for cutting in stair treads and risers, because I find it to be faster than a sliding compound miter saw. If you're unfamiliar with one of these pieces of equipment, you need to visit your local woodworker store or an NWFA installation school and get acquainted.
A very basic description of a track saw is that it is a circular saw that rides along a track, keeping your cut very straight and smooth. Most of the time you do not even need to clamp the track down, as it has strips of rubber on the bottom to keep it from sliding. Another very nice feature is that you can connect a vacuum hose to it and have nearly dust-free cutting capabilities. This type of saw also works well to cut out an existing floor if you plan to run a border around the perimeter. Multiple tracks can be connected together to provide any length necessary.
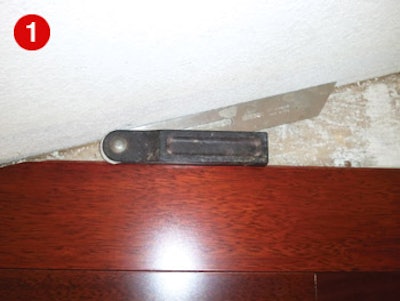
One other tool you need is just a basic angle gauge/finder. It doesn't have to be one of those fancy ones with a digital readout of the angle. You want one that can tighten and lock the angle in place so you can transfer the line over to your board that needs to be cut.
Take your angle finder and place it on the floor next to your already installed floor, then swing the arm out to your angled header board and tighten it down to save the angle (photo 1). Next, bring it to the board you want to cut and transcribe that angle (2). Take the board over to your cutting area and just lay the track on your board, lining it up along the line you marked (3). Cut it with the track saw and you have a perfectly clean cut (4) that will fit beautifully into place (5). Before you install it, you should run the board through a router, putting a groove into it so you can spline it for better holding power.
This is a great way to install up against angled headers, especially if you are installing a prefinished product and you don't want to use any putty to fill imperfections. Clean, sharp-angle cuts at headers are a mark of someone who cares about their work and has a passion for quality. It's the little details that can make or break you. The average homeowner probably won't notice what a professional job you did, but they would notice if you didn't do a high-quality job.