
As an example, let's talk about a contemporary design my company recently did and what it required as far as the installation, sand and finish. The house had four stories with an open layout between each floor, and the design called for straight, clean lines. Choosing the wood-rift and quartered red oak-was easy. But after that, the job became more challenging:
• In many areas, there was vertical T&G cedar on the walls. We had to undercut the cedar and slide our floor underneath, because no baseboards were to be installed in those areas.
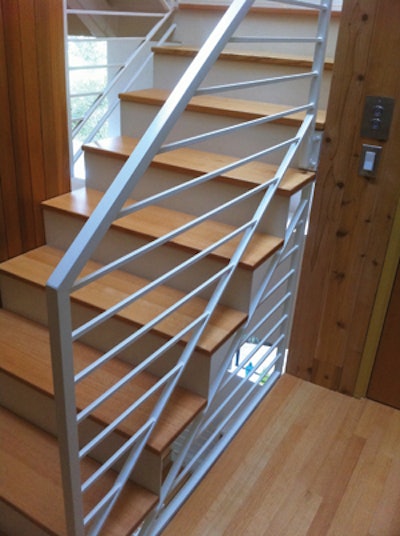
• The stair treads had to be installed over a metal frame. We had the builder drill eight pilot holes in each tread. After fitting the treads, we screwed them from underneath with wood screws. The treads were ordered with a square edge, and we ran them through a ¼-inch round-over bit at the designer's request. The treads were flush with the metal frame on each side, and the front of each tread had an overhang. After checking every metal tread to make sure they all were exactly the same size, the treads were then cut to length. We used a jig made on-site to make the cutting of all the treads consistent, safe and fast.
• Some of the metal risers had a gap to the vertical surfaces such as the cedar walls. We made sure the treads in those areas had the same consistent 1/8-inch gap to match the gap to the metal riser.
• The nosings had to be fitted around the metal railing in some places. That made the installation challenging, and what made it even more challenging was the fact that, due to the open layout, you could see every nosing from every angle.
• The landings had a layer of plywood that was installed by the builder when they assembled the frame on-site. Three sides on each landing were open. A time-consuming detail was having to work with ladders from above and underneath the landings. All the landings were sanded in place while the crew used ladders to reach the sides and bottoms of the exposed nosings.
• The fireplace in the living room was designed to be a poured concrete surface. It was agreed to wait until after the wood was installed to pour the concrete over the floor, because the design concept was to make the floor look like it was running underneath the concrete. Moisture was not an issue because it was such a small amount, and there was no direct contact between the concrete and the ends of the floor boards.
• All the treads were prefinished on-site to make life easier.
So, a "simple" design decision on this job was to have clean lines and an open space between each floor. While the decision was simple, it made the actual installation and sand-and-finish challenging and time-consuming. When you are bidding a job, appreciate what challenges some designs may create for you on-site. What looks simple at first sight (like the treads on this job), may end up consuming two or three times as much of your valuable time.
More photos of this project: