 Me and my business and life partner, Cairo Chapman, at the launch party after the completion of this showroom.
When flooring supplier Tongue n Groove Flooring completely revamped their showroom in Brisbane, Australia, where we are based, they had a concept that isn't typical for a flooring showroom. Instead of displays, they show the flooring off in a series of ascending steps and ramps. The project ended up being one of the most challenging but also most special jobs we've ever done. Here is how we did it.
An unusual substructure
Before we started this showroom, Tongue n Groove had already redone their showroom in Sydney with a similar concept, but in their floor, the fronts of all board edges are black aluminum. My partner, Cairo Chapman, and I immediately thought that instead, we should do our thing with the "waterfall" or "origami" edges so the platforms would look like they are actually blocks of wood (we also knew it would be a monumentally difficult task to do). Not long after that we were at the Australasian Timber Flooring Association gala awards night, and we were drinking champagne and talking with Richard Karsay, the owner of Tongue n Groove. He was telling us how he wanted the Brisbane showroom to be next-level and how he didn't want to use the black aluminum—he wanted faces of timber. He said the thing was, he hadn't figured out how to do it yet. Cairo was standing there smiling, and I told him, with a smile on my face, "Richard, I've got it." He said, "You do, don't you?" Cairo and I nodded, we winked, chinked glasses, and the rest is history.
We will always be eternally grateful to Richard for not only trusting us to do this but also funding the extreme amount of additional work.
 As you can see, we found inadequacy in the 'flatness' of the delivered platform. We knew that if we were going to deliver on the standards we expected for this installation, the subfloor would have to be, basically, perfect.
 Here in Australia, we have a type of builder called a 'shopfitter' that specializes in building out commercial shops like this one, in the heart of Brisbane's trendy retail and homewares precinct, and usually in a tight time frame. On this job, it was up to the shopfitters to build the complicated subfloor structure for the flooring, which was a series of ramps that form a path through the showroom and comply with all requirements for accessibility. In these photos you can see the work of the shopfitters building their subframe using framing timber (it looks green because it has been treated to be insect-resistant) over an uneven concrete floor in a large warehouse-type tenancy. The structural timbers were then covered in what we call 'yellow tongue,'' which is basically chipboard and is what we use in Australia for subflooring.
 Besides flatness, we had to make sure the subfloor structure completely aligned visually with the grid structure—this is a photo taken after completion showing the sight lines where the flooring had to perfectly align. As we inspected the subfloor we found that it was not, at all, in alignment, and had to do extensive adjustments.
 At the same time we were working on the repairs to the substructure, we fitted a kickface and lip to the stairs that allowed for the installation of backlighting using LEDs. Here you can see all the cords under the substructure before the LED installation and how we had painted the boards black to create a shadow line. Once we were done with these, the electrical contractor came back to install all the LEDs.
 We used lasers to mark the correct straight lines for the entire layout, and I used screws in the substructure to mark, for reference, where our critical points were. Then we went about rebuilding the subfloor structure so it aligned, and we also redid some sections, as you can see above, to make them flat.
 Here the substructure is ready and lit with the LEDs, all ready for flooring installation. You can see that to be sure the subfloor seams were flat, we sanded them flat. To do that, we use what we call the 'Angry Disc'. It's a 7-inch 10-grit disc that we run on a 2400-watt, 240-volt grinder at 6500 rpm. Don't hit ya knuckle with it!
Building the 'Great Wall of Flooring'
Part of the showroom's design called for a "Great Wall" showing off the company's "Tongue n Groove Massivo" boards, which measure 400 mm wide (15.7 inches) by 5 meters (16.4 feet) long, as seen above. Seven colors of these boards were to be installed on a 45-degree angle, and we were to limit end joints to show off the size of the flooring. Above right, in the red dotted area you can see where I installed boards to the steps where the Great Wall was to fit behind the platform—that way the platform floor could be fitted neat at the stairs, then the flat sections of the platform were cut with a track saw. I cut the angle for the bottom, removed some of the flooring pieces hanging from the ceiling that were in the way, then used the track saw and a laser level to cut the top of the wall and re-installed the dangling flooring pieces.
The monster boards (2 square meters, or 21.5 square feet each) required three sets of hands to install on a 45-degree angle.


The art of the 'origami miter'
I've always said we "fold" timber, but I'm constantly told by Cairo that we technically do not "fold" the boards. She is correct: They are cut and reinstalled on a different plane. Being a fan of 1) things three-dimensional and 2) changing things up, we at Scribed Flooring have a signature I like to call the "flow through." Our medium is the wood, and I love to let the boards talk. So many pros do not care about this simple and "free" use of the same board and placing it where it should be. Feng Shui says that if the master of the home places a rock in the garden on a different angle from how it was placed when it was removed from nature, then he will bring bad fortune down on the household (or at least something like that). My interpretation is if you take a piece of horizontal slate stone and make something unnatural using it, you'll devalue your property, where on the other hand, if we make the grain in the boards flow through walls or upon a different plane and place grain back together like it originally was in nature, than you will add value to your property: good Feng Shui. I try to remember to call this technique the "Origami Miter."
The actual method is relatively easy, with skill and tooling. We use PVA in the tongue-and-groove joints when gluing the floor down and lay just past the edge of the miter by the required distance, adding length for the kerf and some minor trimming. If the fold flow is required to continue, we will number the off-cuts and guard them with our lives—if we mess up one board in the row, ruining the flow-through, we will remove the entire row to start over (or at least search the next few packs for a board with matching grain and color). Next we use a long track and set the saw on a 45˚ angle and cut. The strip that is the off-cut then also gets the same 45˚ cut while sitting on some scrap material … simple. Then everything is glued, dressed and done! This project was just incredibly complicated due to the size of the project and the angles of the ramps.
 Here we are using the origami 'folding' technique with the chevron, so we are laying it past the edge. We cut the part hanging over on the 45 with the track saw, then cut it again on the 45 going the other way so it meets to form a perfect 90 degrees. Then we have to fit it together. It's fiddly and takes a lot of precision, but it isn't rocket science. In the second photo (above right) you can see what this particular 'fold' looked like when it was done.
 Here you can see spans of the chevron 'folds.' We installed each 'folded' riser before the ramp flooring below it and hid the riser cut behind the ramp flooring.

 In these shots, you can see the origami miter and in the top shot you can see 1/8-by-1/2-inch brass inlay that separates each section. Installation of the brass was easy—as we completed a color, we used a tiny bit of glue and tiny screws in the side to install the brass before we started the new color.
Installation progress
 An important part of our 'Scribed Flow-Through' technique is that the boards are the factory (long) lengths, meaning we carry the appearance of original lengths throughout the floor even when the color changes or the surface angle changes—it's like the board just changes colors. The board on top here shows what the factory length is and how that length is carried through in the installed floor even over three changes of color or angle. If I make a mistake, generally, I will remove the good parts of the board out of the bed of glue just to maintain our visual flow-through.
 For the installation, we started at the top and worked our way down the ramps.
 Here I'm cutting a 20-square-foot board on the Festool CMS table saw that we are fond of and is no longer made (only a handful of these saws exist in the U.S.!).
 Here, the first board of the main floor is scribed into platform's last panel. In the end it took up to 10 guys over six weeks to do the entire showroom floor, which is a total of 300 square meters (3,229 square feet).
 The main floor was laid using 360 mm X 5000 mm boards installed over the yellow tongue subflooring I mentioned earlier. They are nailed down only—no glue—making the flooring removable if trends change.
A massive counter
In addition to the floor and the Great Wall, our work also included adding the wood and brass to this massive waterfall counter in the showroom. Over a few late nights in our shed (what you in the U.S. would call a "shop") I made the long wood pieces and brass detail.
 Creating the huge miters in our shed.
 The main part of the counter was created by a concrete company. Here, I've glued and clamped the pieces I created in my shed to the concrete in the showroom.
 The finished counter.
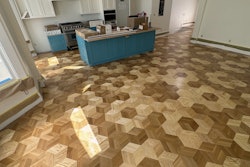
The final product
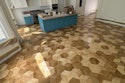
In these "after" photos you can see how the entire concept came together of people walking the steps or ramps to see large swaths of actual flooring in place, complete with the LED lights under the steps, "Great Wall" of flooring, and the massive counter, too.
The intention for the concept of the showroom was that you can open the doors facing the street, leaving one whole wall exposed to the street, making people stop in their tracks and think: "What even is this place?" Mission accomplished.


Project CreditsFlooring: Tongue n Groove Owner: Richard Karsay Architecture: Nick Tobias, Tobias Partners (Sydney, Australia) Installation: Scribed Flooring (Brisbane, Australia) |