SPONSORED BY:
|
Pure confidence in their craft: That’s what you’ll find on the following pages when you read through this year’s WFB Design Award winners.
Each one of the recipients this year pushed for greatness in their own way—and each one achieved it. Whether it was replacing a simple water-damaged plank with an immaculate hand-cut inlay, blowing up a painting to span the length of a basketball court, or convincing a team of homeowners, designers and architects to take a staircase design to new heights, these craftsmen approached their projects with vision and a courage that can only be cultivated through years of dedication to their trade. There are times when you have to fight for creativity and excellence on a job site, and these wood floor pros came out swinging.
We’re honored to announce the awards for Best Residential, Best Commercial, Best Stairs, Best Gym, Readers’ Choice and Next Gen (for companies owned by someone 35 or younger).
Congratulations to all of the winners (chosen by an independent panel of wood flooring experts and, for Readers’ Choice, via an online survey). Each will receive a $500 product voucher and a Swag Bag from this year’s Design Awards sponsor, Bostik. Plus, one winner will receive a $500 Visa gift card.
Thanks to all who submitted to the 2023 Design Awards. We want to hear from you next year—to enter our 2024 contest, which is open to all wood flooring professionals, go to wfbmag.co/da24enter. To see this year’s winners, scroll down.
Readers' Choice

Construction Junction | Deer River, Minn. | Northern Hardwood Floors | Nome, N.D.
In the north woods of Minnesota, it’s hard to specialize in one craft. “Where I live, we kind of do everything, because there’s very small population,” explains Leigh Golemgeske of Construction Junction. He builds stairs, does carpentry and installs wood floors. But when looking at his work, one sees the phrase “Jack of all trades, master of none” does not apply. A simple glance at this year’s Readers’ Choice-winning floor makes that apparent.
Golemgeske has previously installed complicated wood floors in this client’s lake home, and now he was building what they refer to as a “yurt” on the same property. “He wanted a yet-more-spectacular floor than he had anywhere else, so I saw it as an opportunity,” he says.
Golemgeske took inspiration from photos of a John Yarema wood floor with inlaid live-edge slices of tree trunks. For the foliage, he used Penrose tiles of various species. Penrose tiles have two sizes that combine into patterns that don’t repeat. “When the owner found out about these tiles ... he said, ‘Could you do this in wood? Wouldn’t that be cool?’” Golemgeske says.
Of course it would—but the angles had to be perfect, or the pattern wouldn’t go together. Golemgeske found selecting the right part of each wood piece was also critical. “You can’t just blindly cut these things out of wood, or you’ll get weird results,” he explains. “I made templates with plexiglass that I could slide it over a board, then scribe around the plexiglass. I’d cut it out with a band or skilsaw, then put it on the table saw, then the chop saw, then the table saw. It was a multi-step process for every single tile.” Each was also tongue-and-grooved.

Before he even got to the foliage, however, he had to figure out the layout of the tree trunks, which were from trees cut on the property. “The first part of the floor was an utter battle just to get a system going that wouldn’t hamstring you in the future,” he says. “Scribing one edge of the board is fine, scribing three edges is not going to work.”
When the entire puzzle was sorted out and installed, Golemgeske turned the sanding over to his friend and wood flooring pro Ed Lausche. “I knew from the beginning it was going to be a very special project to be a part of,” Lausche says. “I told Leigh, ‘I am both terrified and excited to do this floor,’ and Leigh said, with a completely straight face, ‘Those are the correct emotions.’”
Lausche saw the floor while it was in progress, and thinking about sanding it in the future “pushed me to try harder and look at things deeper,” says Lausche, who also bought a multi-head sander to up his sanding game in the years leading up to this floor. When the time finally came, it took him three and a half days to sand the 350 square feet—”90 percent of it with the Trio”—before coating with an oil finish. “As I’m working the oil across the floor, it’s just like pow, pow, pow—all these colors and species of wood ... all these different crazy transformations happening with every swipe. It was just a thrill,” he says.
For Golemgeske, the yurt is still in progress, but the satisfaction of executing his original vision for the floor went beyond his expectations. “The material is so gorgeous, and the way it fits together is so stunningly beautiful—that’s the part that was better than I thought it was going to be,” he says.—K.M.W.
See a video of this project here:
See more photos of this project at this link.
Suppliers
Abrasive: Lägler | Adhesive: | Bona | Big machine: Bona Super 8 | Buffer: American Sanders | Edger: American Sanders Super 7 | Finish: | Berger-Seidle Classic Base oil clear | Knot filler: Rangate | Moisture barrier: Bona | Sander (palm): | Festool RO150 | Sander (multi-head): Lägler Trio
Best Residential

Ourada Designs | Nine Mile Falls, Wash.
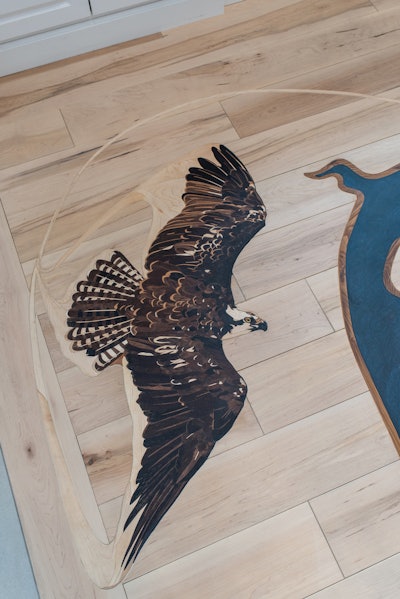
This floor, possibly the most stunning of Tom Ourada’s already impressive portfolio, had an inauspicious beginning: a refrigerator leak on prefinished flooring. He didn’t think much about the call until he looked up the address online and discovered it was a multi-million dollar home on the banks of the Spokane River. Once he arrived on site, a simple repair took on a scope that was unprecedented in his career.
First he designed a medallion that would replace the cupped maple flooring in front of the refrigerator. The clients liked the medallion but said they didn’t like it there: Could he make it bigger and put it in the entry? You bet. And then how about they have a river go from the entry to the living room to the dining room and the kitchen? Of course, we can do that. And how about an osprey in the kitchen? And an eagle in the entry? What if, Ourada suggested, the eagle and the osprey were fighting over a fish on the floor? “Their eyes got big,” Ourada says, “and they asked, ‘You could do that?’ Well, yeah.”

Ourada designed the layout as he does all his “art floors”—by sketching the design onto paper. Once the design was approved, it was transferred to huge sections of paper taped together throughout the house, he took the unwieldy collection of paper home and began to figure out how to actually create it. “So then I’m thinking, ‘How do you do an epoxy river 50 feet from one end of the house to the other?’” Because epoxy must flow out on a perfectly level surface, he knew doing it on site would be “ridiculously difficult.” He would have to create it, like he does all his floors, at the shop and then bring the pieces on site for installation. But how could it look continuous? That’s when the idea came to him of having “contrails” from the raptors crossing back and forth over the river.

Next Ourada began months of meticulous cutting and building, piece by piece, starting with the medallion (which features Lake Coeur D’Alene), the Spokane River, the raptors and the osprey nest that was the eventual fix for the refrigerator leak that began it all. When every piece was built, he transported them to the home, where he and fellow wood floor pros David Merrill and Keith Long worked continuously for two and a half weeks to inlay them into the existing prefinished plank flooring.
With the entire wildlife drama complete in the floor, the client told Ourada, “I didn’t know what to expect, but you far, far, far, far exceeded my expectations,” he says, adding that he would never do something similar ever again—but not because he didn’t enjoy it. “I need a challenge,” he says, “This problem has already been solved.”—K.M.W.
See more photos of this project at this link.
Suppliers
Abrasives: | 3M, Festool, Norton, Virginia Abrasives | Adhesive/Moisture Barrier: Bostik Greenforce | Big machine: Lägler Trio | Buffer, Edger: American Sanders | Filler: | DuraSeal | Finish: Rubio | Moisture meter: Lignomat | Nailer: Bostitch | Router: Porter Cable | Palm sander, Saws: Festool | Wood flooring (existing): WD
Best Commercial

PTL Hardwood Floors | Yelm, Wash.
“Think 1920s-era”—that was the assignment for Joshua Crossman of Yelm, Wash.-based PTL Hardwood Floors for this floor at a private food and beverage establishment. With only those instructions to go off of, Crossman crafted a patterned white oak floor that was ’20s enough for dancing the Charleston.
He began by researching some classic floor patterns and making mockups of them for the 430-square-foot space. He experimented with several patterns, but what made his final choice click was the addition of bevels in the boards. “I hand-beveled all the edges of the sample pieces and then put the color that I wanted and just really liked the look of it,” he says.
Crossman set to work on his table saw cutting the pieces—and cutting, and cutting.
“One of the most challenging parts of a project like this is probably the mundaneness of cutting the same piece of wood all the time,” Crossman laughs. “You’ve just got to be mindful and remember what you’re working toward.”

Crossman used a router and a palm sander to round the edges of each board to create the bevels. The 24-by-24-inch squares were assembled in his shop and taped together, then transported to the job site months later when the renovated commercial building was ready for them. Crossman and his team tore out an old carpet and began gluing the white oak squares over the plywood subfloor.
Once they were installed, Crossman applied one coat of a “Smoked Oak”-colored oil finish before sitting down to another repetitive task that would have a huge impact on the outcome—coating the bevels. “I didn’t think about the bevels and how to get those all stained, so I had to go back in with a paintbrush and paint each individual bevel to get the stain in there so it would take the color,” Crossman says. “That was … a process. A whole day just sitting there with a paintbrush and going between each little bevel.”
Another buff and a second coat of the oil completed the job, and the labor-of-love floor was brought roaring to life.
“I had a vision of what I thought it would look like, and I think it came out better, especially going with the beveled edges, because that was an unknown,” Crossman says. “Everybody who sees it is like, ‘Wow, this floor is awesome.’”
And although the floor may have been inspired by the 1920s, the craftsmanship of the end result is clearly timeless.
“I think we need more patterned floors in this world,” Crossman says. “I get joy out of doing something a little different like this once in a while.”—R.K.
Suppliers
Abrasive: Norton | Adhesive, Moisture barrier: Bona | Big machine, Buffer: Pallmann | Edger: FG Floortech | Finish: Loba Impact Oil | Moisture meter: Lignomat | Palm sander: Festool | Saws: DeWalt | Wood: Missouri Hardwood Products
Best Stairs

Area Floor Works | San Francisco
Even for a stair expert like Avo Sanasaryan, it’s hard to describe the stairs that won this year’s Best Stairs category. “Are they floating stairs or cantilevered? It’s hard to name them,” he says, because they are like a hybrid of both styles.
As is often the case when Area Floor Works has complicated stair projects, the design came from the architect charged with completely renovating this San Francisco-area home, but Sanasaryan had one suggestion for a design modification that took these stairs to the next level: The small reveal between all the stairs and the wall. “That’s what makes it look like it’s completely in the air, like it’s a separate piece of art,” he says.
The reveal echoes the gap between the wood components of the stairs and the metal structure—a structure that’s hidden for typical floating stair projects. In this case, it is a critical design element.

Before the metal was created, Sanasaryan gave the metal fabricator the dimensions where they needed to leave holes so his crew could screw through the plates. “We fastened the bottom part of the treads and the risers with screws. After that, we glued the plywood on the metal, then we screwed the top plywood onto the bottom part of the stair treads,” he explains. Once that was done, they installed the top stair treads and risers.
The wood on the stairs needed to match the floors Area Floor Works installed in the rest of the house, which was 7-inch rift engineered white oak. “Since we were going with rift-only on the floors, we decided to go with the same species and grain on the stairs, even though it was super expensive for the client,” Sanasaryan says.

The designer had approved each board going into the floor, and even more time was spent making sure every piece of wood for the stairs was approved and installed in the correct order. “There is lots of sapwood in rift white oak, but we completely eliminated all the sapwood,” Sanasaryan says, to achieve the visual of the stairs being one monolithic piece.
Installing the wood for the stairs took three weeks. Once installation was complete, the floors and stairs were sanded, then coated with commercial-grade matte waterborne finish.
Sansaryan says that one of the most difficult parts of such jobs comes before any work even begins: being precise on pricing. “You’re building pricing for the client right based on architectural drawings … before installation of the entire stairs, you have to do mockups. You can’t just send photos downloaded from the internet and say, ‘This is how it’s going to look.’ You have to really make the stairs so you can convince the designer and architect and homeowner that this is the right direction to go.”
Although they may be complicated, for Sanasaryan, these difficult stair projects are the most satisfying part of his work. “When you do regular plank floors, especially prefinished, there’s nothing unique in it … but when you have unique designs for stair treads, your life becomes more interesting,” he says.—K.M.W.
Suppliers
Abrasive: 3M | Adhesive: Bostik | Finish: Bona | Palm sander, Saws: Festool
Next Generation

Potter’s Custom Floors | Cazadero, Calif.
Stephen Potter’s winning floor doesn’t have to go fishing for compliments—the inlaid trout are already there, and viewers can’t help but dish out praise for the multi-species dining room floor.
Potter came up with the design for a repeat client who is an avid trout fisherman, and when the client and his spouse saw Potter’s trout-inspired vision they were, well, hooked. “When I pitched that idea I kind of knew they weren’t going to say no,” Potter laughs. Along with the four trout inlays, which include a brook, cutthroat, brown and rainbow trout, Potter incorporated some of his own interests in the design, including rounded radius corners and a herringbone center.

The trout inlays were crafted at Potter’s shop using a scroll saw and a combination of white oak, wenge, maple, Brazilian cherry, purpleheart and lacewood; he modeled the fish after trout paintings he found online. Some of the trout pieces were treated with food coloring as a dye to get the right color. “Food coloring works great,” Potter says. “Some dyes react differently to different finishes, and I wanted something that was compatible with the oil-base that was going to go on top.”
Potter hand-cut the white oak herringbone for the center of the floor, routing it in and installing it with glue and nails. He installed from the center outward. “I got big sheets of MDF, and I made templates of the exact design out of the MDFs,” Potter says. “They also served as forms for bending the wood.” Potter cut slivers of wenge and laminated them together using the template to achieve a perfect bend for the feature strips. The quartersawn white oak pieces between the bent wenge and herringbone were chosen to accentuate the inlaid trout and were also hand-cut and tongue-and-grooved.

The intricate install took two months to complete. “I worked on it like crazy,” Potter says. Including surrounding areas he refinished, the project totaled around 800 square feet. After sanding, Potter taped off the floor and applied a medium brown stain to the center herringbone to create contrast with the original chestnut stain color on the surrounding floor. The quartersawn white oak in the design was left natural. The entire floor was given three coats of clear satin oil-modified finish.
The resulting floor was a huge catch for the client. “His wife’s joke the whole time was that when he dies, that’s where they’re going to have the wake, right there on the floor,” Potter laughs.—R.K.
See more photos of this project at this link.
Suppliers
Abrasive: 3M, Norton | Adhesive, Moisture barrier: Bona Quantum (R851 & R540 system) | Big machine: Bona 10 | Buffer, Edger: American Sanders RS-16, Super 7 | Filler: Woodwise | Finish: Bona Woodline | Moisture meter: Delmhorst J-2000 | Nailer: Powernail 445 | Routers: Festool, Bosch | Palm sander: Porter Cable | Saws: Festool, DeWalt, Bosch | Wood flooring: Northwoods, Graf Bros.
Best Gym

Hero Flooring LLC | Cincinnati, Ohio
Jordan and Pippen. Shaq and Kobe. LeBron and Wade. These legendary duos made history on the basketball court, but now there’s another partnership making magic on courts around the country, albeit behind the scenes: Hero Flooring and nonprofit Project Backboard. Every gym the team touches seems to end up a slam dunk. And most of them, like this one-of-a-kind 6,500-square-foot project in Cleveland, are done for underprivileged areas and communities. The facility, known as the Merrick House, has been open for 100 years, and the gym floor looked it. Thick with layers of finish, the floor likely hadn’t been sanded since the ’70s, says Hero Flooring Owner Luis Perez. Perez hit it with an aggressive sanding regimen, starting with a 24-grit. “It was a long, slow grind,” Perez says. On the plus side, the historic boards waiting underneath the murky globs of poly were brilliant. “We don’t have maple that thick anymore,” Perez says.

With the sanding done and two coats of sealer applied, Perez, his helper Tyler White, and Sam Peterson of Project Backboard taped the game lines before mapping out the elaborate artwork. Project Backboard, which scopes out these projects and funds them via sponsorships (in this case from Mobil1 and Microsoft), also works with local artists on the designs. This court’s design originated from Cleveland artist Dakarai Akil. However, it was the whole team that decided to have the design span the court. The ambitious choice meant they needed 13 layers of one huge mask to execute the picture. “We wanted it to be baseline-to-baseline art,” Perez says.
Perez spent long hours mixing the colors to match Akil’s design. Once he had them, Perez, White and Peterson lined up the mask, which spanned about 4,000 square feet, and began painting. In some areas, they used an iridescent paint that’s not yet on the market—it gradually changes colors like a gradient as it’s applied, one from orange to pink and the other purple to green. “There’s different natural tones and stains, dark browns that go into deeper brown that go into ebony,” Perez says. “I just love this project because I feel we really used all aspects of staining.”
When the artwork was dry, they painted the game lines and then treated the floor with two coats of water-based finish. “There’s a lot of paint, and you want this stuff to last,” Perez says. The entire project wrapped up in 31 days—during which time Perez was simultaneously working on four other courts in the area, as the city was also preparing to host the NBA All-Star Weekend. “It was beautiful chaos,” Perez says.
Perez’s favorite part, as always, was seeing the community rally around the artwork, courtesy of the dream team of Hero Flooring and Project Backboard. “It’s like a sigh of relief to see everybody happy and joyous about the work that you did,” Perez says.—R.K.
See more photos of this project at this link.
Designer
Suppliers
Abrasive: Norton | Buffer, Big Machine, Edger: American Sanders | Finish: Bona
SEE MORE PHOTOS OF THE PROJECTS IN THE SLIDESHOWS BELOW: