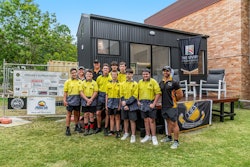
Me (on the right) and my brother, David Stringer, who is our operations manager and lead installer.
One day In 2016, I had just returned to my office and my assistant said she had received a call from a construction company that had a project. They were wanting to install some chevron throughout the whole house and so were organizing a site meeting the following day to walk through the project. I said that would be fine; I would meet with them on site. My assistant booked in the job, gave me the address and began giving
me directions to the job. I told her not to worry—I knew the area, as we had installed about 900 square meters (about 9,700 square feet) of chevron oak about five or six years prior in that street, and there weren't many houses there, which is in a river valley close to the ocean in the Geelong area about an hour down the coast from Melbourne, Australia. I figured this new job was likely the next door neighbor wanting the same floor as the neighbor.
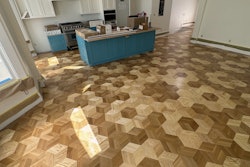
Above, how I had last seen our chevron floor at the home after renovations in 2006. Below, how I found the floor—with no walls!—when I returned in 2016.
A surprise do-over
The next day I drove out on site to meet with the project manager, and as I drove down the road looking for the number, I got closer and closer to the house we had previously done. When I arrived at the front gate, I saw the number and realized I had arrived at the correct address, which was the same house we had done not many years prior. As I drove down the long winding driveway into the valley, I could see the house down toward the river surrounded by contractor vehicles. This house, where we had put a beautiful chevron oak floor in when they had renovated a few years prior, was undergoing another renovation.
I walked into the entry, where I found the windows out and no doors on, and our chevron left exposed to the elements. It was covered in stain, paint and mud. I noticed that they had installed some sheet flooring around the perimeter—they had expanded the floor plan by about 300 mm (about 1 foot) around the perimeter. I thought to myself, "I need to find this project manager and have this building closed up to protect the chevron!"
There was a total of 440 square meters (4,736 square feet) of wood flooring for the project. In the overall home layout (top), the areas highlighted were the areas with our wood flooring. Above, the various patterns that were required for different areas of the home.
Once I found the project manager, I started to explain to him about protecting the oak flooring so that we could undertake the repairs around the perimeter of the house without moisture uptake, water staining, etc., in the wood flooring. He said, "Don't worry about it, we have ordered new chevron oak to install over the top of the existing floor." I was a little surprised by that, as there was nothing wrong with the existing floor other than needing blocks added to the perimeter or cutting in a border.
Left, this was the control sample that was approved for the project. It is only one piece of wood a couple inches wide. 'This is the color we have approved for the floor,' is what we were told when the sample was cut from one of the larger samples and handed to me. Center, that top piece of wood was the timber cladding on the house walls and ceilings, and they wanted the floor to blend with this. The only difference is that the cladding was stained spotted gum, and so our oak was going to look different even if I used the same color. Below the spotted gum cladding is the oak stained to blend with the sample.
I started to explain that we could repair the floor and that I actually had some left over in my warehouse from the project. He said it was too late—they had ordered a container of chevron and it was due to arrive in about eight weeks. They just wanted a price to install over the top of the existing chevron and sand and stain it black. I said for starters, we can't just install new chevron over the existing chevron because we would need to sand the existing chevron flat and then install ply over the top so we wouldn't have movement between the layers of solid chevron. He responded that they didn't have the height to add ply, as all the doors and windows and stone were set 20 mm (about 13/16 inch) above the chevron to finish flush.
Top left, this is the ply we installed in the entry over the chevron we had installed only 10 years before. We used an aluminum straightedge to keep our rows straight. Above is the raw flooring after installation and above right is the entry after the Loba PreTone was applied.
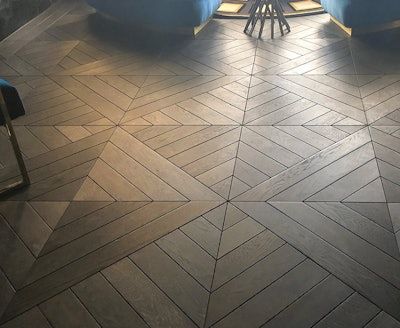
In this area we installed the big block engineered herringbone directly over the old chevron. We ran multiple string lines, and it was critical where we started and stopped, as the blocks were a custom width and length to eliminate any half blocks; the entire floor was symmetrical. Below, the herringbone during sanding. Bottom, after we applied PreTone.
This became a major issue, as I wasn't prepared to install a 19-mm (¾ inch) solid chevron from some random Chinese factory that had been ordered by a building contractor, with no one knowing what the moisture content would be or what the machining tolerances would be. I told him we would not be able to proceed with installing what they ordered or installing it the way that they wanted to, and that I would be only interested in the project if I could have my own chevron produced to my own specifications and install it over ply. I suggested a 6-mm (1/4 inch) ply installed over the chevron and a 15-mm (9/16 inch) solid chevron European white oak block installed over the ply, then sanded and stained black. He told me to price the option, but he still wanted to use what they had already ordered. I left wondering how much of my advice they would take.
On the drive back to the office, I thought that was the last I'd hear about that job, because no one was going to waste an entire container of chevron oak they had ordered for a job. Once back in the office, I worked out a price to do it the way I wanted and sent him the pricing. "That's the last I'll hear from him," I thought as I sent off the quote. A few weeks went by, and we did a follow up and heard nothing back, so I figured they'd found someone happy to install their new chevron over their existing chevron.
To our surprise, an invitation back
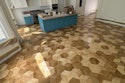
To my surprise, we received an email and were asked to attend another meeting on site to discuss some changes to the flooring. Once on site, the project manager said they had some changes to what would be happening to the timber flooring, as the owners and interior designer had decided to change the floor design—chevron was no longer an option. I was given the new floor plan, and it was all drawings of parquet panels. As I looked at the design, I noticed all the designs were custom drawn for the rooms they were to be installed in. Each block was a custom width and length to fit perfectly into the rooms without any small cuts or rips.
I immediately thought it would look amazing ... but it's one thing to draw a pattern and calculate how wide and how long it needs to be to fit in a floor plan, and another thing to make it actually work on site. Machining tolerances of 0.1 or 0.2 mm in every block all of a sudden would transfer to be 1 or 2 mm (1/32 or 3/32 inch) over 10 blocks, 10 to 20 mm (3/8 to 13/16) over 100 blocks, and so on. So this idea of having no cuts was going to be difficult. Then I started thinking about the "as drawn" measurements as opposed to the "as built" measurements. Not all of the internal walls were in, so we couldn't accurately measure yet, and it was likely going to take a few weeks to order the oak, then a couple of weeks to kiln dry it to the moisture content I wanted on this job (more on that later). Then it would need to be machined to various widths, and each block would have to be cut to size and have a bevel on all sides. I guessed with all of this work, plus shipping, the quickest we could do it would be 12 to 14 weeks. It was now April, and they wanted the house finished and handed over by Christmas. I said I'd need to get working on it, as it was likely going to take us a couple of weeks to price the job and have samples made and signed off on before we started the process.
I quickly returned to the office and worked out the measurements, calculating each pattern and working out how long it was going to take to make all the patterns, as well as how much waste was going to be required. I did all of the math on paper and worked out a price, then decided I'd go and make each of the patterns to determine how long it would take to make each panel and how much waste I'd get from each one. So, I grabbed oak floorboards from the warehouse and started to rip them down to the different widths required for each design. Then I cut each piece to size and assembled the designs. I then looked through all the specifications, and it said "express bevel all-sided." What is an express bevel, I wondered? I wasn't sure, so I added a bevel bit on the router table and tested and measured it at 2 mm. I bevelled all of the blocks on one design at 2 mm. I then adjusted it at 3 mm and did another panel at 3 mm. Then I thought I may as well change it to 1 mm for another one and call it done.
In this small staircase area, there was another custom parquet panel design that was designed to fit the space without any partial cuts. The two bottom photos show the floor after oiling but before the final buffing.
Figuring out the finish
I then glued them all together and left it to dry. My only other guidance was that it should be stained black. Black is always a challenge, because you don't know if the customer wants it solid black or more transparent. So, I did the following samples:
1) 1 coat of Loba PreTone Schwartz (black), let it dry then 2 coats of Loba 2K Schwartz (black) Impact Oil.
2) 1 coat of Loba PreTone Schwartz (black) 50% strength, then 2 coats of Loba 2K Schwartz (black) Impact Oil.
3) 2 coats of Loba Schwartz (black) Impact Oil.
4) 2 coats of Markant Schwartz.
5) 1 coat of Lobadur ProColor Schwartz (black), let it dry, then 2 coats of Loba 2K Duo waterborne finish.
I took the samples out on site to get approval. It turned out that the owner liked a 3-mm bevel and the interior designer liked a 2-mm bevel. I suggested a 2.5-mm bevel, which they all agreed was a good compromise.
They wanted an oil finish, so they liked the PreTone Schwartz and Schwartz oil the most but felt it was a bit dark … and thought the 50% strength was a bit light. No problem, I said, I'll have samples made for next week's site meeting. For now, at least, I could finalize my price because until that point we had only been working with a pretty wide range of what the pricing could be.
I went back to the warehouse and made a new sample somewhere between the 100% and 50% pretone. Normally I'd make it 75% and call it done, however I got the feeling that they'd like some choices, so I did a sample at 75%, one at 50% and one with 2 coats of 50%. Then I finished them all with two coats of Schwartz oil. The truth be known, they all looked very similar, and obviously different cuts of the wood were going to take the stain differently, and they'd probably all look good. When I showed them the samples, the two coats of 50% PreTone was chosen.
Figuring out materials
With the confirmation given on the product specs, we were now in a race against time, as it was May and they wanted it installed in late September. I figured we'd have a week of subfloor prep, so I could buy some time. Then we'd have to measure up the rooms to find our starting points so could maybe buy an additional week. Everything went smoothly, and the oak was made and shipped and sitting in our warehouse by the middle of September.
However, back at the job site, they had delays and were running a couple of weeks late on-site. We had all the 15-mm (9/16 inch) solid oak for all the panels, and all of the borders ready to go. We had also ordered 20-mm (13/16 inch) engineered boards in 180 mm (71/16 inch) to install in the kitchen, passages and around the herringbone in the dining room. For those areas, which didn't have a custom parquet pattern, we chose to use engineered flooring, which would be installed directly over the existing solid chevron flooring.
We completed the oil with our RS-16 slow-speed buffer, but then I always like to bring out my custom-built 800 rpm machine to give the floor a little burnish.
The herringbone was also a custom size, as it was designed to be installed as full boards that were 808 mm (3113/16 inch) by 148 mm (513/16 inch) across the whole floor.
The oak was French white oak in AB grade (a clean grade with small knots), as they did not want too many large knots. There was a total of 440 square meters (4,736 square feet) of wood flooring for the project, and we cut about 85% of it before we got to the job; it took two men two weeks to cut all of that on a panel saw using jigs. Each of the parquetry panels was cut to size, sanded, stacked on a pallet and then wrapped in plastic and marked for each room.
When the job was close to complete, we had to sand and stain several areas of the floors again after windows and doors that weren't sealed were pressure-washed from the outside. The water and cleaning solution used in the pressure cleaner removed the colored oil and PreTone from the oak, as you can see here.
An unexpected stop during installation
Once the job site was ready, we started the prep and the installation of the flooring, and a couple of days into it we were told to stop the laying of the floorboards. They didn't like short boards in the passages and wanted them all long—nothing under 6 feet was to be used. We had random lengths from 3 to 8 feet, and I had ordered extra, but based on the breakdown of the flooring, we were around 250 square meters (2,690 square feet) short of floorboards. Immediately I got on the phone to the factory and asked what we could do. They already had feedstock at 10% moisture content in the correct width, so they did production immediately, and we then air-freighted two pallets of 6-, 7- and 8-foot French oak flooring and had it in the country within three weeks of ordering it. It was an amazing effort from the factory to be able to help us out at such short notice. The air freight bill wasn't so nice to get, but at least we were still on track.
The builders put a plastic/foam combination underlay over the floor after we were done, and they added 4-by-8-foot sheets of 1/8-inch MDF on top to protect the floor. This was different from the brand we had told them to use (and told them where to buy), but we never saw this until we returned to the site weeks later to finish buffing the oil. I was worried about the microenvironment created under all this, but it all turned out fine.
Finishing up the job
We continued with the install in October. We started by sanding all of the existing chevron flat to remove any cupping and lipping. Moisture readings were taken across the entire floor, and we found parts of the house that hadn't been exposed to the weather had moisture contents of 10% on average. Areas that were exposed earlier in the year when there were no windows or doors had readings of around 12% in April but had now settled to 10% after having the house locked up again and protected from the elements. The entry still had a few higher readings, but with the coating removed and us checking it frequently, it quickly came in line with the rest of the floor. I had ordered all of the oak for this project to be supplied at 10% plus or minus 1%, as that's what had been working at that location for all of the years prior. We knew this because we had sent pieces of the oak to be oven-dry tested earlier in the year, and approximately 10% was determined to be the moisture content of the floor in-service.
We then used Wakol adhesive and installed the ply over the chevron. After installing the ply, we installed the parquet. As I mentioned, most of the flooring had been pre-cut, so we only had a small amount to cut on-site to fit. We needed to slightly machine some of the blocks to make them slightly narrower to fit, and we actually had some extra timber machined oversize so that we could add it around the perimeter and in the border to stretch the pattern slightly to match the dimensions where necessary.
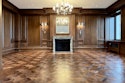
The long, straight passage was more than 20 meters (about 66 feet) long and was the reason we had to air-freight in long boards mid-installation. The wood floor in this area was left plain so that the ceiling was the feature. Middle photo, the passage after the walls were installed and finished but before we buffed and burnished the floor. When the home was complete, a custom rug mirroring the ceiling was placed over the floor.
We then sanded the panels and applied two coats of Loba PreTone Schwartz at 50% strength. The day we put the final coat of oil on the floor is also the day that the painters thought would be a good day to pressure-clean all of the external timber on the house to get it ready for coating. The only issue with that was that they also pressure-cleaned all of the windows and doors at the same time. They also were using a mild detergent/cleaner of some description. Unfortunately, none of the doors had weather seals fitted at this point, as they were all enclosed by verandas, and it wasn't possible for water to get to them naturally. So, as a result we were busy the next few days sanding and staining sections of the floors again, including the entire passage and other small areas close to the doors.
A few days after we were done, the contractors covered up the floors so they could complete the final fit out inside. We were booked to come back late December when all works were completed to give the floor a spray buff (the black oil mixed with some maintenance oil that we sprayed on the floor and buffed) upon handover. We arrived as scheduled and undertook works as required, and the floor looked great when we left.
An unexpected Christmas visit
A few days later, on Dec. 23, we got a phone call from the project manager, as someone had damaged the floor. I had black stain, oil, touch-up pens, brushes and sanding machines ready, as I had no idea what I was walking in to. Everyone—all the other trades and all my employees—had already finished for Christmas, so it was just me and my sanding and coating gear. I found a few scratches and a few scuff marks, and someone had spilt something on the floor. Fortunately it was oil, so I added some black pigment to the oil and wiped it across the scuffs and scratches, then pulled out my 18-volt cordless buffer and gave the floors a quick buffing, and those repairs were done. The area that had something spilt on it was wiped up with some parkett oil to break it down, then rubbed with a maroon pad to smooth down the edges and coated with 2k Impact Oil and buffed once again with the cordless buffer. All this done whilst rugs were being installed and furniture placed around me. Once it was all done, we had a quick walk-through and everything else was fine, so we wished each other a Merry Christmas, and that was another year's work done.
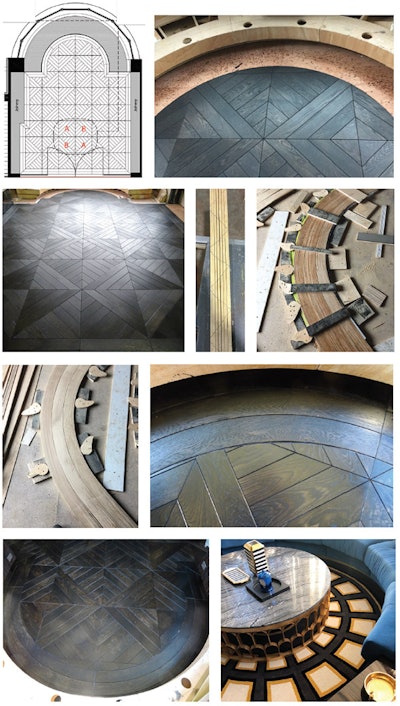
Bending wood in the library
Bending wood is something that we often do today, and nowadays we don't think much of it. But we learned how to do it maybe 15 years ago when some American instructors came to Australia to teach us some of these techniques. The instructors were led by some of the best teachers I've ever had—not just with flooring, but anything. Daniel Boone and Christine Coates were very influential to me at that time, and they continue to impact what I do today and what I will continue to do. Now with Daniel working for American Sanders, each time he returns to Australia to run a school I'm always there helping out as an instructor, but the truth be told, I'm still learning, and I appreciate each and every piece of knowledge that is shared.
In the photos at right, you can see the floor layout for the library and the curve we routed out for the bent area (the floor had one coat of Loba PreTone at that point). I didn't want to bend the boards until I had routed out the curve so I could make a template from the curve in the actual floor (I also didn't want to hold up the staining). In the bottom photos, the floor has one coat of oil applied and the border installed. As you can see in the last photo, in the end, our carefully bent floor was covered by a custom rug!
All Things Wood Floor, created by Wood Floor Business magazine, talks to interesting wood flooring pros to share knowledge, stories and tips on everything to do with wood flooring, from installation, sanding and finishing to business management.


 Me (on the right) and my brother, David Stringer, who is our operations manager and lead installer.
 There was a total of 440 square meters (4,736 square feet) of wood flooring for the project. In the overall home layout (top), the areas highlighted were the areas with our wood flooring. Above, the various patterns that were required for different areas of the home.
 Left, this was the control sample that was approved for the project. It is only one piece of wood a couple inches wide. 'This is the color we have approved for the floor,' is what we were told when the sample was cut from one of the larger samples and handed to me. Center, that top piece of wood was the timber cladding on the house walls and ceilings, and they wanted the floor to blend with this. The only difference is that the cladding was stained spotted gum, and so our oak was going to look different even if I used the same color. Below the spotted gum cladding is the oak stained to blend with the sample.
 Top left, this is the ply we installed in the entry over the chevron we had installed only 10 years before. We used an aluminum straightedge to keep our rows straight. Above is the raw flooring after installation and above right is the entry after the Loba PreTone was applied.
 In this area we installed the big block engineered herringbone directly over the old chevron. We ran multiple string lines, and it was critical where we started and stopped, as the blocks were a custom width and length to eliminate any half blocks; the entire floor was symmetrical. Below, the herringbone during sanding. Bottom, after we applied PreTone.


 In this small staircase area, there was another custom parquet panel design that was designed to fit the space without any partial cuts. The two bottom photos show the floor after oiling but before the final buffing.
 We completed the oil with our RS-16 slow-speed buffer, but then I always like to bring out my custom-built 800 rpm machine to give the floor a little burnish.
 When the job was close to complete, we had to sand and stain several areas of the floors again after windows and doors that weren't sealed were pressure-washed from the outside. The water and cleaning solution used in the pressure cleaner removed the colored oil and PreTone from the oak, as you can see here.
 The builders put a plastic/foam combination underlay over the floor after we were done, and they added 4-by-8-foot sheets of 1/8-inch MDF on top to protect the floor. This was different from the brand we had told them to use (and told them where to buy), but we never saw this until we returned to the site weeks later to finish buffing the oil. I was worried about the microenvironment created under all this, but it all turned out fine.
 The long, straight passage was more than 20 meters (about 66 feet) long and was the reason we had to air-freight in long boards mid-installation. The wood floor in this area was left plain so that the ceiling was the feature. Middle photo, the passage after the walls were installed and finished but before we buffed and burnished the floor. When the home was complete, a custom rug mirroring the ceiling was placed over the floor.