Many people think that you can’t install solid flooring over a slab. I tell them that I’ve installed solid flooring over slabs here in Florida—hundreds of thousands of square feet of it, mostly wide plank—my entire life. For the last 30 years, many of those jobs have had a floating subfloor system Mickey Moore and I developed in the mid-1990s. It’s simple—so simple that some people are suspicious about it working. Here’s our system.
1) Test the slab for moisture. This is the first step no matter what wood flooring you are installing. Even if the slab is in the acceptable range, we use a moisture barrier.
2) Moisture-test the wood flooring. Again, this is for every job. The moisture content of the wood and the plywood must be in the right range for normal living conditions, and, if necessary, acclimated. Here in Florida, my RH will be between 40 and 55 with climate control, and I’m on high-end jobs where jobsite climate control is part of my contract. We calculate how much expansion the wood will have and, if we need to, we include weed-eater string rows (usually every five to eight rows) to allow room for the wood to swell (that is usually for plainsawn wide plank). We also include the required expansion at the walls (make sure the base and shoe will cover the gap).
3) Flatten the subfloor. As with any job, the slab must be flattened to industry specs.
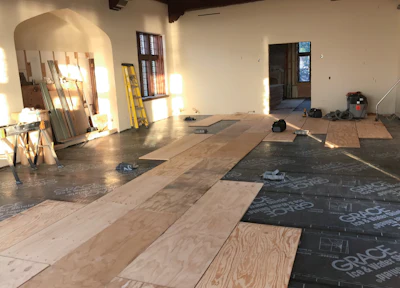
4) Put down a moisture barrier. I use a roofing product called Grace Ice & Water Shield over the slab. The seams are self-sealing, but we use duct tape for extra protection, and we run it 3–4 inches up the walls.
5) Cut and coat your plywood. We use one layer of ¾-inch BC plywood (which is sanded on one side) that is cut into 2-by-8 pieces. On very high-end jobs, I also coat the plywood on both sides with leftover water-based finish. These days you can also buy products specifically for this purpose.
6) Plan your layout and start laying your plywood. Note I did not say “shooting down your plywood.” We stagger it just like you would a wood floor across the slab (like you see at left). I’ve been questioned many times by the architects and the construction companies on my jobs: “What’s going to hold that plywood down?” I tell them, “I’m getting ready to put 20,000 pounds of flooring on top of it—that will hold it down.” Plan ahead for places like doorways and borders, where you don’t want seams.
7) Screw down a backer board and start installing. We screw the backer board down into the concrete (usually in the middle of the room—adjust your center line to prevent narrow rips along the walls) to start installing. After we take it up, we fill the holes in the concrete with epoxy. You can rack out maybe 4–6 feet as you go. That is a little slower than racking out the entire floor, but I think it’s worth it.
Every architect or engineer I’ve done this for has been somewhat skeptical about this system, but once the job is done, they are amazed at how flat it is. Over time, as the wood moves the subfloor moves with it, and I’ve never had a single complaint about a squeak. As my friend Mickey Moore used to say, you don’t glue down a nail-down floor.