|
|

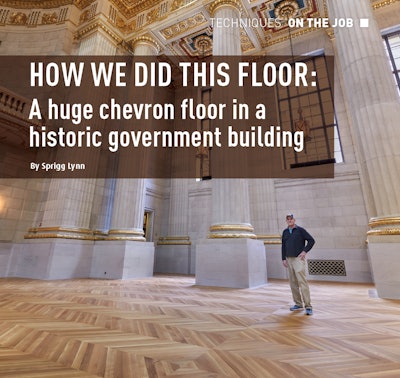
We’ve done hundreds of historical renovations and projects here in Washington, D.C., over the years, but this was one of the most challenging jobs we’ve ever undertaken: the wood flooring in the Andrew W. Mellon Auditorium. The neoclassical government building was completed in 1935 and featured large-format chevron with diamond insets throughout the floor, plus a stage floor. New flooring in the same pattern had been installed by another company a little more than 20 years ago, and it was already so worn (more on that later) that it had to be replaced again. When you take on a project of this scope in a government building, you have to be prepared to have all kinds of challenges thrown at you—you have to think outside the box.
The architect recommended us for this project, and we won the competitive bid for it. From the start of the bidding process to completing the job took two years. Over my years in this industry, I’ve developed a network of relationships with talented fellow wood floor pros from around the country, and Steve Seabaugh, Steve Bumpus and Kent Rogerson (and his crew) were all an essential part of being able to handle a job of this scope. Here is the process we went through to install, sand and finish a total of 14,500 square feet of wood flooring (13,500 of chevron and 1,000 additional square feet for a stage) that will last for the next 100 years or more.
1) Wood delivery diverted

I’ll keep saying this, but with projects like this, every curve ball is thrown at you in ways you just wouldn’t imagine. We had 13,000 square feet of chevron set to arrive on the job site on Monday morning to be unloaded by 17 people, and at 4 p.m. the Friday before I got a phone call that they were going to refuse delivery. They needed an engineering report on where the wood would be stacked and how it would be stacked. The flooring delivery had to be diverted to my cousin Ray Lynn’s distribution warehouse. I had to create three scenarios of how the wood could potentially be stacked, and government engineers had to choose one before we could actually deliver the wood. In the picture at left you can see the final layout of how the wood had to be stacked in adjacent rooms (we’ll be doing more work there in the future).
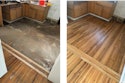
2) Demo (of a not-old floor)

I mentioned that all of this wood flooring had been replaced only slightly more than 20 years ago. Unfortunately, the previous contractor didn’t do any subfloor prep, so when he sanded, he just ground the wood flooring down flat, removing most of the wear layer in some areas. So right after it was installed, it looked like a worn-out floor, with shoulders breaking off in some areas. Our first step was to remove the entire floor, but because we were replicating the exact design and layout of the existing floor, we marked the existing layout with blue tape around the perimeter.
3) Extensive subfloor prep

A lot of people don’t think subfloor prep is very important, but when you’re doing a chevron floor, the subfloor has to be dead flat. When we bid this job, we knew the subfloor would need extensive work, but there was no way to know the exact scope of it. That’s why it’s so important to put in your contract that if there are unforeseen conditions, they have to be reviewed once the existing flooring is removed, and the additional subfloor prep work on this project was done on a time-and-materials basis.
Because the previous contractor had only nailed the chevron, not glued it, we were able to save many of the plywood panels that had been attached to the concrete subfloor. Once they were removed, we used everything you can imagine to get the subfloor flat, but the most important was using self-leveler to get the slab as flat as possible. The slab also had cracks and fissures from when D.C. had an earthquake, and we had to fill those. Then we needed to reattach the plywood that was usable and install new plywood. Concrete doesn’t fully harden for about 100 years, but once it does, it’s so hard, it’s ridiculous. We used hammer drills to drill the holes for the lead sleeves we were inserting into the slab, but because the concrete was so hard, we needed new drill bits about every 10 holes—and we had thousands of holes to drill. Because there were still supply chain issues, one of my jobs every night became driving around to every Home Depot in the area to try to find enough of the drill bits and the fasteners to go in the sleeves.

There are EPA offices underneath this space where people were working, so we had noise restrictions—we started work every day at 4 a.m. and did the noisiest things before people got to work at 8 a.m. I had to buy an additional six hammer drills so we could have as many people as possible drilling into the slab before the government workers got to work. In the picture at left, you can see we’re getting the old adhesive off some existing plywood where the previous contractor had glued the diamonds down (the only part of the floor he glued), and we’re using a Bona Power Drive. Normally we wouldn’t use a Power Drive for that (in the foreground you can see a hand planer, which is the fastest and most efficient way for us to do that job), but we had to stop using the hand planers at 8 a.m. because of the noise restrictions. We also couldn’t make any dust due to the guy working on the gold leaf in the same space. You have to factor enough money into the job to account for things like having to take the extra time to clean your Power Drives when you’re using them for rough work like this.

The final step to making the subfloor as flat as possible for the chevron was sanding all the plywood seams.

4) Moisture precautions

We put in our contract that the job site has to be maintained at 30–50 RH and 68–71 degrees. That’s particularly important in federal government buildings, because they have a mandate that when it isn’t working hours they turn off the HVAC. We tested the moisture content of the wood when it arrived at the warehouse and periodically tested it until it was installed. We couldn’t use an underlayment to protect from moisture on this job since we were going to be gluing and nailing the floor, so instead we coated the plywood with Wakol PU280, which protects the flooring from moisture from below—almost like a liquid underlayment.
5) Precision layout
With chevron, your measurements have to be exact. You can’t start drifting, because each row reacts with another row. This job also had huge pillars with square bases we had to work around, diamond insets throughout the floor, big mahogany doors we had to hit exactly, and it’s all bordered in stone. Some runs were over 120 feet long. There’s no margin for error. So, we spent three-and-a-half days just using a combination of new-school—lasers—and old-school—braided fishing line—to snap our lines and resnap our lines.
6) Installation (with a surprise)
![]()
When it was time to start laying out the floor, we realized the 45 cut on all of the chevron pieces was very slightly off. Like I already mentioned, with chevron everything has to be absolutely perfect. So now we had more than 13,500 square feet of chevron that had to be remilled. Like my dad always said, “It’s easy to be a captain of the ship in calm waters,”—but when the $hit hits the fan, what are your options? We made a plan: Using our Festool miter saw dialed in perfectly, we had one person all day every day who cut one end with a perfect 45. Once we had a 20-foot row of the remilled pieces installed, we used the track saw to then cut the other ends exactly on our line at a perfect 45. You can see in the photo at right that we started with a center layout and worked our way out, leaving space for the diamond insets. To make the pieces for the diamond, we set up a jig that we could use to make all the cuts—taking 40 minutes to make that jig saved hours of time.

When you’re doing something this big and this repetitive, sometimes it can become like working in the factory, and you can lose the focus that every single piece has to be exact. That’s why my right-hand man, Stephen Pollehn, was there all day every day to check on every step and remeasure everything throughout the day. He’s like the conductor in the orchestra pit—without having a guy like that on a job like this, it would be organized chaos. In the picture above, we’re having an internal meeting about how we’re going to handle wrapping around every pillar and having to come out perfectly on the other side; we couldn’t be off even 1/32 inch. I said we were going to take it one board at a time!

In the picture above you can see my friend Steve Bumpus of Simsbury, Conn.-based Farmington Valley Flooring LLC with the manual nailer. With the manual nailer, you can micro-control the amount of force you use, so if you have to leave a micro gap or straighten something out, you can do that. It’s strategic nailing when you have to do things like go around column and meet the floor perfectly on the other side. Because we were behind on the schedule (through no fault of our own!) we were still installing around these columns while we were already sanding the main field (as you can see in the photo in the next section).
7) Sanding

For the sanding and finishing, we partnered with my friend Kent Rogerson of Low Country Flooring in Pawleys Island, S.C.—they do incredible sanding and finishing, and seven of them came to D.C. for this job.
There could be absolutely no dust produced in this space—you can see the gold-leaf work that was also going on while we were working on the floors. They used their finely tuned 12-inch Galaxy big machines, and in the picture of Kent below, you can see the Galaxy has the Oneida Vortex on it. If you look closely at the photo at right, you can see the hose from each big machine goes to a 35-gallon Oneida Cyclonic Pre-Separator. What you can’t see in the photo is that the hoses from the Pre-Separators then go to Low Country’s custom-built gas-powered dust containment system out in the alleyway.

As you can see in the photo from above, when it came time for sanding, we needed cordless lighting since the chandelier lighting in the space was not enough. (When we started this job, we also brought in a refrigerator, microwave, a table and coolers—we were like the Beverly Hillbillies moving in, but it’s better to bring in everything you need for people to eat, because that saves a lot of time and money.) Something as simple as having these lights makes extra work, because with so many of them, someone has to be in charge of charging the batteries and replacing them as they go out.
For this floor, they had to start sanding with 40-grit, then 60-grit and then 80-grit, each one at a different angle to the floor before starting with the Bona Power Drives, finishing with 120 with diamond abrasives.
Everywhere on this job, we had to be extremely careful to not damage the granite and marble that abutted the wood floor. After being careful with the Power Drives to not get close to the granite and marble, there were a couple inches left to edge, and for that they used a Lägler Flip, which made it possible to be extremely precise. When this job was done, there were more than a dozen government people inspecting the floor, and they looked particularly carefully for damage to the granite and marble—but didn’t find any.
8) Coating

Once the floor was clean, they water-popped it to open the grain and ensure the wood would absorb as much of the oil finish as possible. For water-popping, they used a battery-operated sprayer—a mix of 75% water and 25% denatured alcohol. When you water-pop, you have to take surface moisture readings of the wood flooring before and after and compare your readings to make sure the wood is at the moisture content it was before you water-popped before you start coating again. In this case, they waited overnight and tested the floor before coating.
The finish spec’d for this job was Professional Coatings’ UnoCoat Hardwax Uroil, which is a zero-VOC product. They troweled it on, buffed it with a red pad, buffed it with a white pad, then buffed it with a Turkish towel. They timed everything to be within the working time for the oil—they were almost like synchronized swimmers with the buffers!


They came back the next day and did another coat, and then let it cure for 72 hours before traffic was allowed on the floor. Here's a time-lapse video of the coating process:
There’s that saying that “when you run into a problem, you either win or you learn,” and on this job we did a lot of both. This job took a piece of my life, but when you walk in the building, between the floor and the columns and the 60-foot ceilings, you’re just in awe. It’s just a beautiful piece of neoclassical architecture, and when a job like this comes to a close, you’re very proud of what you did—and thankful for your talented crew and colleagues who made it possible.
SUPPLIERS:
Abrasives: Bona, Norton | Adhesives: Bona, Stauf, Wakol | Big machines: American Sanders, Galaxy Floor Sanding Machines | Cleats: Powernail Company | Distributors: Derr Flooring, Horizon Forest Products, Lynn Wholesale Flooring | Dust containment: Oneida Vortex and Cyclonic | Edger: Lägler Flip | Finish: Professional Coatings UnoCoat Hardwax Uroil | Laser: Hilti | Moisture barrier: Loba PU-280 | Multi-Head Sander, Vacuums: Bona | Nailers: Bostitch, Powernail Company | Power Stations: American Sanders, Bona | Palm Sanders, Track Saw, Miter Saw: Festool | Self-Leveler: MAPEI | Company Sourcing Wood Flooring: Premiere Finishing & Coating
 From the Universal Floors team: Back row (left to right): Elenilson Lopez, Orlando Callejas, Jeorge Alvarenga, and Sean Kang. Front row (left to right): Sprigg Lynn, Eun Young Lee, IL G Hwang, Cliff Klyoung Yoo, Logan Underwood, William Herrington, Peter Kang, Jackson Charles Lynn and Caros Alvarenga.
 Back row (left to right): Alex Tilton, Derek Hammond, James Swinton, Kerry Smith. Middle row (left to right): Kent Rogerson, Sprigg Lynn, Josh Clark. In front: Jamie Lambert.
Watch a video showing scenes from this project start to finish:
Plans A, B, C and D

With a large job like this, you have to be highly, highly organized and fluid in what you do, with a plan A, B, C and D at all times, knowing that common-sense solutions don’t work when you have so many layers of government.
You also have to be prepared to handle all the documentation and restrictions. On this job, we had to have certified payroll, pay union wages, have electricians hooking up power, be inspected by OSHA, officially work only eight hours a day, and keep track of all materials, including every single nail and gallon of glue—and where they were used and how much was used.
Our work was stopped so much to accommodate meetings and delayed by other trades (like the ones using this scaffolding) that we had to figure out how to work longer hours or risk getting penalized for not finishing in time. One Sunday morning I was in the building when the man in charge of the building arrived and threatened to have me arrested!
On commercial jobs it’s every man for himself, but there’s a time when you have to take control of your job in a polite way. We put up signage and secured all the entrances to the building and took pictures of that so there was evidence that a reasonable person would say you shouldn’t walk in there. We take pictures of absolutely everything—that way someone can’t say you didn’t do this or that. If they try to tell me that, I can send them collages of photos showing what we did.
On a job like this, there are a lot of things behind the scenes that could break you—they could literally put you out of business if you don’t plan and budget for every possibility.