|
|

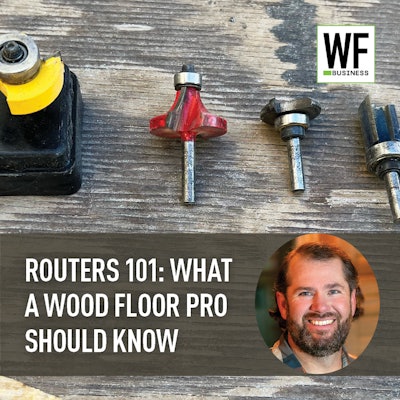
Wood floor pros are always looking for ways to boost quality and efficiency. We all know or have heard stories of the craftsman who knew every trick in the book and had every tool to make a complicated project a piece of cake. We all have the opportunity to channel that inner legend, and a great way to make that happen is to level up your router skills! Here are the essentials every wood floor pro should have in their tool box to make best use of their routers. From left to right: An offset flush trim pattern bit, round over bit, top-bearing groove bit, pattern trim bit with top bearing and flush trim bit.
Router bits:
Here are the main bits every pro should have:
Top-bearing groove bit: Definitely a must-have, you can route in place for a direction change, borders, end match, and use spline to make your own tongue and groove. A groove bit with a rounded edge fits nice and snug for spline and is available for 1/2-, 5/8-, and 3/4-inch thick wood flooring with matching spline. What a luxury!
Pattern-trim bit: This is great for cutting with a template on top of the flooring. It has an upper bearing and is adjusted so the bearing rides against the template as a guide for a perfect cut. This is great for flush-mount vents, radius cuts or many duplicated shapes with a template.
Flush-trim bit: It has a bottom bearing, so you’ll want to use this bit whenever you want to cut your flooring flush to an edge that is under the installed flooring, such as an electrical floor outlet or the edge of a radius stage edge for a cap.
Roundover bit: If you’re doing a project with stairs, this bit can come in handy. You can make your own custom bullnose edge with any size radius from 1/4-inch for a soft-square-style nose to a 3/4-inch traditional-style nose.
Offset flush-trim pattern bit: This one has different sized bearings so if you want to offset your trim, you can. If you saw my Trick of the Trade in the June/July 2022 issue about cutting in floor outlets, you saw me using this bit on the router:
Other accessories:
You’ll also want to have these to use with your router:
Plunge base: This will allow you to preset the cut depth and then lower the bit into the cut with the router’s base. You’ll be able to safely and accurately use many types of cutting bits for inlays and trimming.
Router table: When you’re doing lots of grooving or profiling before your flooring is installed, the router table is a safe and efficient solution. It has a fence, feather boards, protective shields and dust containment that can be utilized.
Track guide: Did you know that most routers can be attached to a track saw guide? You can use this to cut perfectly straight lines. It’s great for use with a plunge base to cut channels for border feature strips or to clean up an edge for a directional change.
Circle/ellipse cutting jig: Got a medallion to inset or want to create your own master piece with a circular flare? This jig pivots from from a center piece allowing you to cut a circle or ellipse with ease.
Your own custom jigs: You always have the option to make your own jigs to mount to the router base. You can make your own offset jigs to tackle a tricky cut or build an adjustable swing arm jig to make your own curved border detail. You’re only limited by your imagination!