
Competition is stronger than ever among today's wood flooring contractors. In this environment, you need the advantage of both efficiency and quality to help increase your bottom-line profit. One of the best ways to reduce time wasted on the job site is to apply stain with a buffer instead of the traditional method of ragging stain on and off. On a small project, the time difference may not be drastic, but on larger jobs, using a buffer to apply stain can save substantial amounts of time.
Using the simple buff-on, buff-off technique also gets you off your knees, saving energy and reducing strain on your body—something every contractor should think about. Using a buffer also can potentially double or triple the coverage rate of your stain (always follow your stain manufacturer's directions regarding coverage rates for different application techniques). Once you try this method, you probably won't apply stain on your hands and knees again.
SUPPLY LIST
• Standard-speed buffer (approximately 175 rpms)
• New carpeting (cut to the diameter of your buffer)
• Carpet bonnet or similar material
• Terrycloth towels
• Stain
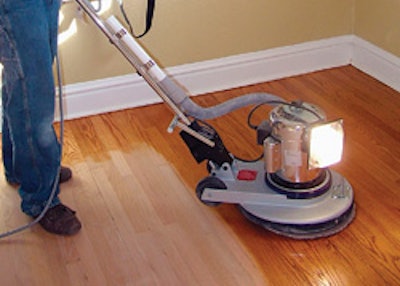
Step 1

Prepare the floor according to the stain manufacturer's recommendations. Be sure to vacuum and dry-tack thoroughly before staining the floor.
Step 2

Once the floor is ready, cut in around the border of the room using the rag-on, rag-off method. Cut in approximately 6 to 12 inches from the wall into the field. Work your way around the room, in sections, without getting too far ahead.
Step 3

Take a piece of carpeting cut to the size of your buffer and pour the stain (about 1/2 cup) in the center. Keep the stain at least 2 inches away from the edge of the carpeting to help prevent it from splattering while you're buffing. Carpeting with a twisted pile and 3/8 inch nap in a neutral color works well for this.
Step 4

Place the piece of carpeting under the buffer and begin buffing on the stain in small sections (as far as you can comfortably reach with the buffer without stepping in the stain). Overlap the cutin area to help prevent picture-framing, which is when the perimeter of the room ends up a different shade from the rest of the floor.
Step 5

Then, to remove the stain and burnish it into the floor, replace the stained carpet pad with a carpet bonnet. A carpet bonnet is just one option; other materials may give you the same result—just be sure to use a material that will absorb the stain rather than simply spread it across the floor. A second piece of carpeting can be used, although absorption will not be as efficient as it would with the bonnet.
Step 6

Make sure you cover the entire section, absorbing all excess stain, before moving on. It is extremely important to absorb all the excess stain. If too much stain is left on the floor, the floor becomes pigment-loaded, which will affect the minimum dry time and also lead to poor adhesion. Attempting to coat over stain that is not dry enough is the most common mistake made when staining. Continue working your way out of the room in small sections, adding stain to the carpeting as needed.
Step 7

Always overlap into previous sections to prevent "holidays" (missed areas) and lap lines, both while buffing on and off. If the carpet becomes over-saturated and begins throwing stain, replace it. When coming to the end of a room, you will need to rag on and off again, since you won't have room for the buffer.
A Few Tips• As always when staining, go with the grain of the wood as much as possible. • Self-dissolving stain works best with this technique. • To prevent a dark spot at the end of an area (when you have to rag on and off again), do not apply too much stain. • Treat water-popped floors as you normally would, taking extra care not to drag or roll anything across the floor (those areas will show up lighter than the rest of the floor). • When working on larger job sites, it is possible to have one person buff on the stain while a second person buffs off behind. The second person should not follow too quickly, but rather allow the stain to absorb into the wood for several minutes before buffing it off. |