When a customer asks for an unusual color on her wood floor that can't be made with typical stains, most hardwood flooring contractors just tell her it can't be done. But that isn't true—dyes can be used to create any color of the spectrum on a hardwood floor. They give richer, deeper color without hiding the grain of the wood like pigmented stains can.
That said, dying a wood floor is very, very difficult. I tried it for the first time on my first hand-scraped floor in a customer's home, and I ended up redoing the floor three times, even though I had friends in the industry talking me through it on the phone the entire time. Dye dries quickly and tends to leave lap marks, so it requires lots of practice before you do it on a real job.
Any time you stain a floor, you need a great sanding job. The same is true for dyes, but while you can easily sand out and restain a few areas where stain highlights sanding marks, repairing a dyed floor is nearly impossible, so flawless sanding is even more important.
Here's how I dye floors; the photos are from my panel at the NWFA's Expert Sand & Finish School last October.
SUPPLY LIST
- Moisture meter
- Blue tape
- Clear packing tape
- Vacuum
- Microfiber tack mop
- Dye
- Water or alcohol, depending on the dye
- Gram scale (if using powder dye)
- Paint pad applicator
- Stain


Step 1
Once sanding is done, if necessary, I tape off the area where I'll be applying the dye. Blue tape is good because it won't transfer adhesive to the floor, but I find that it lets dye get under the edges of the tape. So, I apply the blue tape first, just a hairline short of where I want to tape off (it helps to use something hard to push down the edge of the tape, like your nail) and then ...

Step 2
... I go over it with clear packing tape, applying the edge to exactly where I want the dye to stop. You might need extra light to see the floor well enough to be accurate. If the clear tape is wider than the blue tape, I fold under the extra clear tape so it isn't stuck directly onto the wood floor (the hairline that's covered with the clear tape is OK, but I wouldn't want a larger area stuck to the floor).

Step 3
Once that's done, I vacuum and drytack the floor. I also take moisture readings of the area where I'll be dying the floor so I have a baseline moisture content (MC).

Step 4
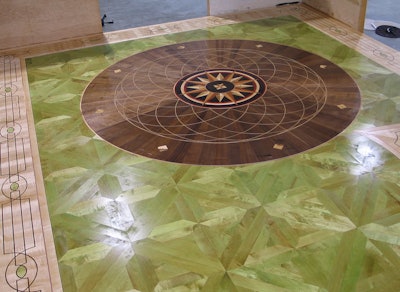
Dye comes in either a concentrated liquid or powder that needs to be mixed with either denatured alcohol or water, depending on the dye (follow the directions on the dye). The liquid should be measured with an eyedropper; the powder should be weighed. Keep careful track of the ratios you use on your test board so you can get the same exact color on the real floor. For this floor, we're experimenting with matching the green poplar wood in the floor's inlay.

Step 5
I always make test boards of the color using boards of the same species that were sanded to the same final grit that I used on the floor. Unlike stain, you can apply dye multiple times; it gets darker each time you apply it. If you want to lighten the color after it's applied, once the floor is dry you can abrade it with a maroon pad or steel wool. I like to do that with distressed floors to highlight the variations in the boards.

Step 6
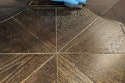
People use all sorts of different things to apply dye, from brushes to sprayers, but I find that a paint pad works best for me. As I mentioned, dye dries quickly and shows lap marks easily. So, it's important to apply the dye quickly and keep a wet edge while you're applying it, much like you do with waterborne finish. This is a patterned floor, but if I'm dying strip or plank, I like to cut my applicator to the width of one or two boards.

Step 7
Any areas that have more dye will show up darker on the floor, so I try to spread the dye evenly and feather out heavier areas, keeping the edge of my applicator at board edges when possible to help disguise lap marks like the one above. Dye doesn't need to be wiped off like stain does.

Step 8
Even though dyes dry quickly, the only way to know if the floor can be coated is to test the MC again. I won't coat it until the MC is the same as it was before I dyed the floor.

Step 9
Dye isn't very color-fast. Even with finish, a dyed floor in direct sunlight will fade quickly. Coating over it with a stain helps preserve the color longterm. Here we're applying a nutmegcolored stain over the entire floor. Of course, if you plan on staining the floor, be sure you include the stain on your samples so the test color is accurate.

Step 10
Once the stain was dry, we coated this floor with a shellac sealer coat, but you can use any type of finish.

Lap Lines
Because they dry so quickly, dyes are extremely difficult to work with. Applying the dye so the edge of the applicator is at a board edge can help avoid lap lines like the one visible above (a distressed floor does help disguise them). If you have a large room that will make it difficult to keep a wet edge, you can divide the floor with a tape line at a board edge, just like you would when applying finish.