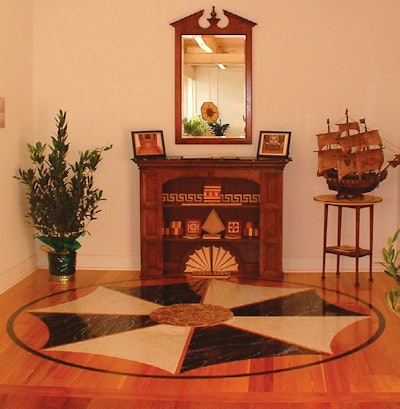
There is no limit to what can be painted onto hardwood floors. Paint can mimic marble from around the globe or look like the most exotic of woods. With today's glazes, texture techniques and finishes, unique designs can be applied to any hardwood floor, whether the floor is site-finished or prefinished. Latex paints are easy to use and can simulate an array of inlays, medallions,oriental carpets or any imaginable design.
Faux finishes have many advantages. Materials such as marble, stone and exotic wood can be recreated in any design, and additional features can be added at a later time. Once painted and properly coated with three to four coats of urethane, they are maintained like a regular wood floor, eliminating the complication of maintaining different floor materials. And, the design can be removed simply by resanding. Another advantage is cost. Painted finishes usually cost about 60 percent of the real floor material, making them appealing for both the customer and the wood floor contractor.
Necessary supplies:
- black and white latex paints
- tints and glazes of latex paint, color-mixed and thinned as needed
- non-marking tape
- paintbrushes (various sizes)
- sponges (various textures)
- rags
- tape measure
Step 1:

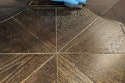
Create detailed drawings of the proposed layout and actual samples of the faux effect. Secure approval for the drawing with a contract, making sure the color,texture and finish all are approved. Have the customer sign the drawing and the samples. Here, faux stone will be painted next to faux marble.
Step 2:

Gather all the materials, supplies and tools needed to create the entire design and all finishes/textures.
Step 3:

Latex paints can be applied over a floor with at least two coats of well dried surface finish or over any prefinished product.
Using a long-lasting, easy-release tape, lay out and tape off the design, making sure the tape is properly secured by rubbing the edges. Lightly sand the areas to be painted with 120 grit or higher sandpaper, making sure the finish powders lightly. As you sand, slightly overlap onto the tape.
Step 4:

Vacuum and tack the area of the design and the surrounding areas. Paint the latex base coats according to your drawings. Remove the tape while the paint is still wet. Then, allow the paint to dry thoroughly (a minimum of 24hours or more depending on job-site conditions).
Step 5:

After the paint dries, compare the sample to the base coats, making sure they match the intended layout and colors.
Step 6:

Re-tape the borders, securing the tape well. Then, for the stone effect, use the appropriate sponge, applying the texture to match the approved sample.
Step 7:

Brush the sponge-applied texture to achieve the final effect in the stone sample.
Step 8:

Use a small brush to hand-paint the vein effect of the desired marble.
Step 9:

With a slightly bigger brush, smooth the veining while it is still wet, working in all directions and pushing down until the paint matches the sample.
Step 10:

After the paint is completely dry, finish the floor with a minimum of two or three coats. Always use the same finish that was used on the original coats (for prefinished flooring, check with the flooring manufacturer for finish compatibility).
As an added detail, different sheen levels can be used on different texture sand finishes. Compare your finished product with the sample, making sure they match closely.
Step 11:

Once you master faux finishing, you can use it to make spectacular effects on any wood floor, allowing you an upgrade that is almost half as much as the real inlay materials, whether marble or exotic wood species.