|
|

Some of you may have noticed that I didn’t include pine in the “Domestic Species for Wood Flooring 101: What Pros Should Know” article from the December 2024/January 2025 issue about domestic wood floor species. There are 120 varieties of pine trees, so I figured they deserve their own article. Of course, let’s focus on the trees most often used in flooring!
Types of pine used for flooring
Pine is primarily found in the Northern Hemisphere, from near-Arctic regions to the mountains of the tropics. Some of the most common species we come across as wood flooring pros are:
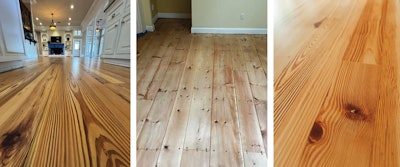
Eastern white pine: A light-colored, soft pine with smooth grain and beautiful knots, often used in wide planks and historically prominent in New England homes.
Heart pine: A darker, richer-toned pine known for its distinctive grain patterns and knots, and historically used throughout the Eastern and Southeastern seaboard.
Southern yellow pine: A popular choice for its durability and availability, often used for its warm, golden tones and ability to be stained.
River-reclaimed pine: This is a subject in itself, and we will leave it to another day.
Pine cuts and grades
Some mills cut pine for flooring using eighths instead of quarters like typical hardwood, e.g., 3 1/8-by-¾-inch pine vs. 3 1/4-by-¾-inch oak.
Pine has both appearance grades (focused on aesthetics) and common grades (focused on strengh and utility). Appearance grades are:
C Select (or Clear): This has minimal knots and a smooth, clean look. It is ideal for furniture, fine woodworking and, in some cases, flooring.
D Select (or D & Better): May have some small, tight knots or minor imperfections, suitable for interior trim and shelving.
Premium: This features sound and tight knots and is suitable for applications with a natural, rustic look.
Finish: A knotty grade with sound, tight knots, suitable for applications where a natural, rustic look is desired.
Standard: A versatile, rustic board with various natural characteristics.
Common grades for pine include:
#1 Common: This is known for its tight knots and suitability for general construction and woodworking projects.
#2 Common: This has more visible knots and imperfections than #1 Common but is suitable for applications where strength is essential, such as framing.
#3 Common: This utility grade may contain larger knots, knot holes and other imperfections; it is suitable when appearance is less important, such as bracing.
Industrial: The lowest grade is suitable for rough construction where strength and appearance are not primary concerns.
Other terminology you might come across with pine grades:
Wane: The presence of bark or lack of wood fiber along the edge of a piece of lumber.
Dense grades: These grades have superior density and strength properties.
Prime grades: These have the same structural properties as corresponding common grades but with fewer knots and better appearance.
NELMA (National Eastern Lumber Manufacturers Association) and SPIB (Southern Pine Inspection Bureau): They provide grading rules and standards for pine lumber.
KD19: This specification means the maximum moisture content is 19%.
A challenge: sanding pine
Pine is more difficult to sand than many other domestic species due to multiple factors:
Softness: Pine is a softwood, meaning its cells are relatively soft and less dense than those of hardwoods. This makes it prone to tearing and denting when sanding, especially with coarser grits.
Grain structure: Pine has a relatively straight grain, but it can still be prone to tearout when sanding against the grain or using excessive pressure.
Pitch: Pine contains resin (pitch) that can ooze out and make sanding difficult, causing the sandpaper to clog or become sticky.
Uneven surfaces: Older pine floors or furniture may have uneven surfaces due to renovations or wear and tear, which can make sanding more challenging.
Preserving character: Sanding pine requires care to preserve the knots and grain patterns that give it its distinctive look.
Tips for sanding pine properly
Proper technique is key! When sanding pine, it’s essential to:
Start with a fine-grit sandpaper: Use a fine-grit sandpaper (e.g., 120-grit) to avoid tearing the wood.
Sand with the grain: Always sand in the direction of the wood grain to prevent tear-out.
Use a sanding block: When hand-sanding, use a sanding block to distribute pressure evenly and prevent gouging.
Avoid excessive pressure: Apply light and even pressure when sanding. Set your drum pressure to a light setting.
Consider using a solvent: For sticky pine, use turpentine or mineral spirits to help dissolve the pitch.
Be patient: Sanding pine can take more time and effort than sanding hardwoods, so be patient and take your time.
Do not invest in expensive sandpaper, as the pine pitch will clog the paper, and you will go through more of it than when sanding other species like oak or maple.
Advice for staining pine
Except for heart pine, pine is often difficult to stain evenly because its grain has uneven density. Porous earlywood absorbs stain more readily than dense latewood, leading to blotchy or uneven results. Here are some techniques to get the best results when staining pine:
• Pre-stain conditioner: Applying a wood conditioner before staining can help to partially seal the porous earlywood, reducing its stain absorption and promoting a more even finish.
• Dyes: Water-based dyes, which penetrate both earlywood and latewood, can help achieve a more even color.
• Gel stains: Gel stains, which stay on the surface of the wood more, can be a good option for pine, as they are less likely to penetrate unevenly.
As I said, there is a lot to know about pine! One last nugget: It smells great when cutting and sanding, and we have to take pleasure when we find it.