The Problem
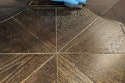
I received a call from an installer who was having problems with inconsistent, splotchy stain on a new 700-square-foot sand-and-finish red oak floor with dark stain in a living room and dining area. Around the perimeter he was getting a few areas of inconsistent shade with the dark stain. He had not yet applied finish to the floor because he knew it would just highlight the inconsistency. He had some time to do any corrective work if he needed, as the homeowners were not moving in for another month.
The Procedure
I asked him if he had worked with stains before, and he stated that he had, but not as dark as this one. They had used a fast-dry stain and even got on their hands and knees and sanded the scratch marks made from the edger to blend in with the grain direction where they saw scratches running across the grain; he knew the dark stain would show any scratch marks running across the grain. I asked more questions and found out the following:
- He started with 40 grit, followed with 60 on the edger, then used 60 on the big sander. He filled the entire floor, then finished with 100 on his big sander and 80 on his edger. There was nothing wrong in the sanding sequence that I could determine.
- He knew about the halo effect and knew he needed to blend his sanding patterns with a buffer and screen, which he did.
- He changed his paper on the big machine and the edger on a regular basis.
- At the time of installation the outside temperature was between 50 to 60 degrees Fahrenheit, and the heater was programmed off for 112 hours and then turned back on without losing much heat. The inconsistencies were not by any windows or by any heat or cold air returns; they were just randomly around the perimeter.
- The installer used the big sander, one of his crew ran the edger and the installer ran the buffer.
- The discoloration happened in boards whether they were plainsawn, rift, or quartersawn.
I had the installer check the floor with a high-intensity light, and after checking, the stain still looked splotchy.
The Cause
After gathering the information from the installer, it appeared that he did everything that he could to minimize any picture-framing or halo effect. I started thinking about his comment that he and his crew got down on their hands and knees and hand-sanded areas of scratch marks left from the edger to the grain. I called him back and asked him to explain the hand-sanding. He said that after screening the floor they checked one more time for scratch marks and hand-sanded using 100-grit abrasive in the areas with edger scratch marks.
How to Fix the Floor
After further thought, I recommended that the installer remove the existing stain by using a 100-grit abrasive and 80-grit on the edger. This time, however, instead of hand-sanding after screening, if he felt he had to hand-sand to blend the edger scratches, he should very lightly hand-sand the entire perimeter with 100-grit and then use the buffer and 100-grit screen over the entire floor. The next phone call I received from the installer was a happy one.
In the Future
When sanding, remember a belt/drum sander, edger, random orbital, buffer, and hand-sanding all leave different finish scratch profiles. When you try to mix different scratch profiles, there can be a visual difference when using stains. Avoid spot-sanding after screening.