 Having the right tools and supplies on hand helps create a great waterborne finish job.
Contractors who are used to applying oil-modified poly may initially find waterborne floor finishes a bit more challenging to apply. The first step is to use the correct applicator. A synthetic pad applicator, a roller or a T-bar are the most commonly used applicators for waterborne floor finish. The larger the floor, the more beneficial it becomes to use a T-bar. Many contractors find it to be the fastest, most efficient method of application for larger floors. When used correctly, it provides a finish free of lap marks, uneven gloss and "turn marks." The following steps show the basics of finishing with a T-bar to achieve that even appearance. (Always be sure to follow the manufacturer's directions for the product you're using.)
Before finishing, the temperature of the work area and floor should be about 65 to 70 degrees Fahrenheit, or "normal living conditions." In winter, if possible, have the basement heating ducts open so the floor is warm enough. The finish also should be at room temperature. Just before finishing, the HVAC system should be turned off to prevent an unwanted draft over the floor.
When handling finish, always wear nitrile or latex gloves. Clean your clothing and shoes well; some contractors wear dust-free finishing coveralls and booties over their shoes when finishing.
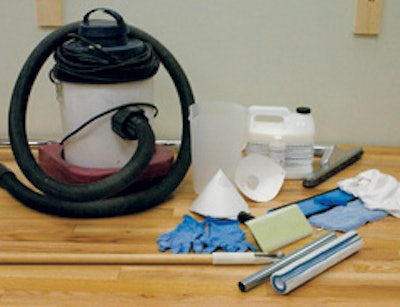
Necessary tools and supplies:
- Vacuum cleaner with crevice tool and brush attachment
- Towels/rags or microfiber dust mop
- Wood floor finish
- Filter (cone or cloth)
- Pour can
- Nitrile or latex gloves
- Cut-in pad
- Lightweight T-bar, sleeve and lightweight pole
Step 1:

After abrading the sealer coat, vacuum the floor thoroughly, and use a crevice tool to vacuum the gap along the baseboard. Don't forget dust that may fall off window/door sills, walls, and heating ducts. Then, tack the floor with clean towels, rags or a microfiber dust mop dampened with water until the floor is completely dust-free. (Never damp-tack a bare wood floor, as it will cause grain raise.)
Step 2:

Follow the finish manufacturer's directions to thoroughly mix in any flattening agent of the floor finish that may have settled. If required, add the hardener/catalyzer to the finish as recommended by the manufacturer and allow it to sit ("induction time") for approximately 10 to 15 minutes—this will also allow most air bubbles to disappear. Strain the finish through a filter in a pour can to help achieve the cleanest possible finished floor.
Step 3:

Make sure the tension nut on the swivel point of the T-bar is not too tight or too loose. The head of the T-bar should be able to be adjusted smoothly without excessive resistance.
Step 4:

Pour at least a 4-inch-wide line of finish along the starting wall in the direction of the flooring. Using a synthetic applicator, "cut in" the whole length of the starting wall and 2 to 3 feet into the room along the adjoining walls. Do not brush out the cut-in line too thin. Adjust the pressure on the pad accordingly so you achieve similar wet film thickness as you will with the T-bar.
Step 5:

Using a lightweight T-bar applicator, pull the floor finish with the applicator held at a slight angle and "snowplow" the floor finish toward the unfinished side of the floor. Always follow the direction of the grain.
Step 6:

When you reach the end of each run, rotate the T-bar in a smooth motion toward the unfinished side of the floor, moving excess floor finish away from the wall.
Step 7:

Lift and move the T-bar on a dry area adjacent (and parallel) to the pour line and gently push down and rock the applicator back and forth. This is called "padding;" it removes excess product from the applicator before feathering out the turn at the end of each run.
Step 8:

After padding, place the applicator next to the wall where you made the turn and gently pull the applicator away from the wall through the floor finish. Lift the applicator as you pull to feather out the turn mark. This turn mark can also be feathered out by using the cut-in pad and may be done by a helper/cut-in person. A second person is also helpful for spotting missed areas.
Step 9:

Before pulling the next run, make sure there is sufficient product on the floor to complete another run. Pour more product as needed, maintaining at least a 4-inch–wide pour line. Then, proceed by snowplowing the finish as described before.
Step 10:

It may get a little complicated to work yourself out of a room on your last run. Pour a small puddle of floor finish and pull it toward yourself/the doorway in a sideways/zigzag motion. "Pad out" the applicator in front of you, then reach out and gently lower the applicator while you move it toward you into the wet finish. Without any pressure, gently pull the applicator toward yourself, feathering out the zigzag. (You may repeat this feather procedure twice for an even and smooth application.)
Step 11:

At the doorway, soak up excess finish with the cut-in pad and squeeze it out into a paint pan or other container.
Step 12:

Apply the remaining finish and feather it into the rest of the finished floor with the cut-in pad. Always feather out along with the grain of the flooring.
Once the finish is dry to the touch, turn on the HVAC system or open windows in the room to ventilate the solvents out of the room.
Top Mistakes During Waterborne Finish Application
|