Some wood flooring contractors love to stain floors. They up sell their jobs by offering customers any color they desire, even without having to buy expensive exotic species.
They develop a reputation as a color specialist, and they charge appropriately for their work. Other wood flooring contractors hate staining floors, seeing it as a hassle and a common source of customer complaints. Either way, staining is a skill that all wood flooring contractors should have. Being aware of strategies for successful stain jobs can help minimize both the hassles and the complaints.
Customer Concerns
Many stain complaints don't involve problems with the stain itself or with how the stain was applied. Rather, they're caused by a difference between the color the customer expected and the color that's on the floor. While the little color samples supplied by stain manufacturers allow a general guide as to which colors a customer may like,that color on an actual wood floor can be affected by numerous factors: the wood species, the abrasive sequence, the lighting in the room, the color of the paint on the walls, whether the floor was waterpopped or not, and more. That's why many contractors have customers choose their stain color by wiping sample colors on the actual floor after the second sanding and then have the customer sign off on their color choice.
Custom stain colors usually can be created by mixing different colors of the same manufacturer's stains together, as long as the contractor carefully records the exact ratio so the color can be reproduced. Stains from two different manufacturers or two different types of stain from the same manufacturer should never be mixed together. When indoubt, check with the stain manufacturer.
Starting With Sanding
 Many species, such as this cherry floor, take on a mottled, blotchy appearance when stained.
A good stain job is only as good as the sanding job that came before it. Wood flooring contractors who have done natural floors for years without a problem often find that they need to take their sanding skills to the next level in order to get an acceptable stain job. Any imperfection left by the sander will be highlighted once the floor is stained. Everything from drum marks to edger marks to screen marks seem to come alive with added color on the floor.
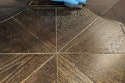
One of the most common problems caused by sanding is known as "picture-framing" or the "halo" effect. This is evident when a floor looks like one color in the field and another—lighter or darker—around the room's perimeter. The effect is caused by a difference in sanding grits and/or sanding patterns used in the field and around the edge of the room. The more open the grain, the more stain will be absorbed into the floor and the darker the floor will be. Thus, the higher the grit that is used as the final sanding, the lighter the stain will be. So, if a contractor tries to get away with sanding the field to a 100 grit but finishes with only an 80 grit on the edger, the room will likely have a dark "halo" at the perimeter. Or, if the contractor uses 100 on the field as his final cut and dutifully hand scrapes all around the edge of the room, a light halo will probably appear, because a hand-scraper leaves a slick texture that won't take much stain.
Unfortunately, there's no guarantee that just because a contractor ends with the same grits on the field and perimeter that the floor will appear the same. A buffer and edger, for example, leave significantly different scratch patterns on the floor, even with the same abrasive grit. But, with practice, most contractors are able to find a technique that works for them. Some are able to use small orbital sanders around the edge of the room to get the perimeter to blend, while others hand around the room's perimeter. The effect is caused by a difference in sanding grits and/or sanding patterns used in the field and around the edge of the room. The more open the grain, the more stain will be absorbed into the floor and the darker the floor will be. Thus, the higher the grit that is used as the final sanding,the lighter the stain will be. So, if a contractor tries to get away with sanding the field to a 100 grit but finishes with only an 80 grit on the edger, the room will scrape, then either hand-sand or use an abrasive on a sanding pole or sanding block to open the grain back up as much as necessary. Others are able to hard plate the floor uniformly to the edge. Whichever method is used, after sanding, the floor must be cleaned thoroughly before staining.
Popping the Grain
 'Popping the grain' drastically darkens the stain color, as shown on this maple floor. The star area was waterpopped, while the rest of the floor was stained without waterpopping.
One technique that can help minimize the appearance of sanding imperfections is called "popping the grain." Popping the grain is done by getting the floor wet before staining in order to open, or "pop," the grain of the wood back up after the final sanding. With the grain opened, the wood absorbs a greater amount of stain, looking darker and more uniform. Contractors use many different methods, including wiping the floor with a wet rag, sponge or towel, or spraying the floor using a pesticide sprayer.
Whatever method used, contractors must be extremely careful in several ways. First, it is vital to get the floor uniformly wet. If one area of the floor was wiped with a towel that was extremely damp and later the towel was only slightly damp, the difference in how much the grain opened will be evident as lighter and darker streaks across the floor. Second, the floor must be as dry after waterpopping as before, so moisture meter readings should be taken of the floor before and after. Third, once the grain is popped, almost anything,like hard knee pads or the toe of a boot,can knock it back down. The marks show up after staining as light areas on the floor. So, contractors must plan carefully how they'll be entering and leaving the room so as not to walk across the popped grain. While applying stain, they need to be aware of it, as well. The safest method is to travel across the wet area of the floor towards the dry area so they don't knock down the grain as they travel. Finally, contractors also should be aware that waterpopped stained floors need longer dry times due to the extra amount of stain absorbed into the floor.
Application Techniques
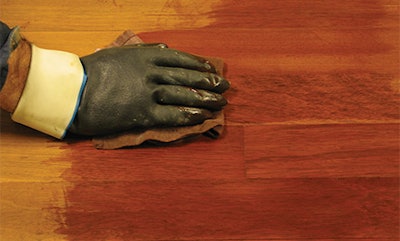
Contractors apply stain in many different ways. Some use rags, others use lambswool applicators, while still others use a carpet remnant under a buffer. Regardless, the stain should be applied uniformly in the direction of the grain. While coverage rates vary depending on species and sanding,they should fall within the guidelines in the manufacturer's directions. Too much or too little stain both can cause problems. Too little stain can result in blotchiness and uneven color, while too much stain can cause bleed back (see sidebar above).
Once the stain is evenly applied, it should be wiped off immediately, either with rags or a buffer (with a fresh carpet remnant). The easiest way to handle this is to have two people on the job—one applying the stain and one wiping it off. If a row of stain is allowed to sit too long—in a very long room, for example—the stain may show lap marks where the wet edge was allowed to sit too long and become a dry edge. A common myth is that leaving a stain to sit on the floor longer than recommended without wiping it up will make the floor take the stain darker. In fact, leaving excess stain on a floor can cause it to take on a sticky, gummy consistency that is difficult to remove without sanding. Along those lines, some contractors also try to make the floor darker by using multiple coats of stain. In reality,the wood grain can only absorb so much stain, the vast majority of which is absorbed when the first coat is applied. Second and subsequent coats of stain can actually cause bleed back,as well as finish adhesion problems.
RELATED: Step by Step: How to Apply Stain to Wood Floors
Challenging Species
The tight grain of species such as maple, cherry and birch make them take stain in a blotchy fashion. One method to minimize the blotchiness is to use a wood conditioner, also known as "stain controller," before applying the stain. The conditioner fills in the largest pores of the wood, resulting in a more even appearance. Another method to help avoid blotchiness is to pop the grain, as discussed on page 30.
With many exotic species, just as the oils in the wood may drastically extend dry times for oil-modified finishes, the same is true for most stains, so contractors must plan accordingly.
From White to Black
Recently, some areas of the country have begun to see a resurgence of the white floors that were so popular in the '80s, while other areas have a demand for floors that are nearly black. White stains, pastel stains and very dark stains all contain more pigments, which means that they usually require longer dry times than more common stain colors.
When a customer asks for a white floor, most contractors first try to talk the customer out of the idea. Difficulty with floor maintenance and the fact that seasonal shrinkage of the board screates the appearance of black lines between each board are both factors to consider. If the white floor can't be avoided, the next step is to determine what the customer means by "white." As anyone who has picked out a white paint sample can attest, the shades of white are endless. Different shades of white can be created by using different species with white stain only,white stain that is diluted with varying amounts of neutral stain, and/or by bleaching the floor. The next step for contractors new to white floors is to build a sample panel and practice. Good application technique is especially important when using white stains in order to avoid lap marks.
Some contractors still start creating a white floor by bleaching it, although this method isn't as common as it used to be. Because bleaching the floor actually damages the structure of the wood cells, thereby prematurely aging the wood, many people are firmly against it. However, those who do bleach advise using a species such as red oak or maple—never white oak,as it can turn green when bleached, and its tannic acid may chemically react with the bleach, actually creating foam on the floor. The bleach used for this process is a wood bleach that comes in two parts. Once mixed, there is a limited amount of time that the bleach can be applied, using any of the methods for waterpopping a floor,such as using a sponge or a pesticide sprayer. After the bleach is dry, the floor must be washed with a towel dampened by a mixture of water and vinegar, usually about one to two cups of vinegar per gallon of water, before stain or finish can be applied.
Whichever method is used to create a white floor, the contractor must be sure to use a non-amberizing finish. Most commonly, this will be a waterborne finish. There are some waterborne finishes that amber, so contractors should check to be surethe finish will be clear.
Slowing Down
Rushing stain dry times is probably the most common problem contractors make when doing stained floors. They'll try all sorts of things, like adding Japan drier to the stain, to attempt to make the stain dry faster. Traditional stains usually require a minimum of an overnight dry time, but some of the newer products on the market have drastically reduced this to as little as two hours.
In order for any stain to dry, there must be the right job-site conditions. As always, the job site should be at normal living conditions. Temperature and especially humidity both affect how quickly the stain dries. The more humid, the slower the dry times. Ventilation also plays a big role in stain drying. If there is no air movement or fresh air exchange—by opening windows on opposite sides of the room, for example—the solvent in the stain will essentially be trapped.
Because of all the factors that can slow down dry times, contractors cannot simply rely on the time it says on the directions to know when to start coating with finish. High humidity, a dark or pastel stain, and a waterpopped floor are all reasons to be cautious with dry times. To be sure, contractors rely on several methods. Of course, the stain should feel dry to the touch and not transfer to a hand, even after leaving the palm pressed to the floor for several minutes. Some contractors take a white rag soaked with mineral spirits and rub the floor in an inconspicuous place, such as a closet, to see if the stain transfers. Once they think the stain is dry and begin coating, experienced contractors always pay attention to the applicator. If any stain transfers onto the applicator, the floor isn't ready to be coated yet.
Lots of problems can arise when stained floors are coated before they're ready. Alligatoring, orange peel, peeling and soft finish all can be caused by finish trapping wet stain underneath. The problems may not even be evident right away. A customer may call two months later and say that her finish has begun to peel off the floor. Peelings of finish that have stain on the underside are a sure giveaway that the stain was too wet when the floor was finished.
Spontaneous Surprises
Once stain is applied, it's easy to thoughtlessly toss the rags into a garbage can or into a pile on the floor. That's why almost every wood flooring contractor knows somebody who has unwittingly started a fire with spontaneous combustion. Wet stain-soaked rags left in a pile don't need any ignition source to go up in flames, so all woodfloor companies should have a strict rule about how to handle them. Some contractors just lay them out on the driveway or sidewalk to dry, while other shave metal containers made specifically for that purpose.
Once familiar with the common staining pitfalls, most wood flooring contractors can successfully stain most floors. Armed with blue tape and a little bit of imagination, contractors can even use stain to create custom patterns or designs. With some practice—on a sample floor back in the shop, not the customer's job site—contractors usually find that staining can be an essential skill for landing more jobs and making more money.
Sanding Problems Revealed
Stain tends to highlight sanding marks that might go unnoticed on a floor left its natural color. Maple's hardness makes it more difficult to stain than a typical oak floor, and stain makes some sanding problems on this maple floor obvious. In the photo at right, a drum mark from the big machine is readily apparent, and in the photo below that, swirl marks from the screen on the buffer are easily noticeable.
|


Battling Bleedback
When stain seeps up onto the surface of the wood after the floor has been wiped down, that's known as "bleedback." It's usually caused by flooding the floor with too much stain or using multiple coats of stain. The excess stain pools between boards or in particularly large, open pores of the wood, which act as reservoirs for the stain. As the solvents evaporate out of these reservoirs, it appears that the stain is seeping back up out of the floor. Usually the wet droplets that appear can simply be rewiped; in more severe cases, they may need to be rewiped several times. If the droplets have begun to cure and are difficult to remove, buffing with a white or red pad may be necessary. |