Through many conversations with wood flooring contractors over the years, there seems to be a common thread-color is in demand. The trend comes with the challenge of creating the perfect color to satisfy the customer or the customer's team.
In the quest of creating the color match, chemistry and time are often thrown right out the window. The contractor is typically given a piece of millwork, cabinet chip or prefinished flooring to match. Never mind that the wood is a different species and the stain was a spray-applied formula developed for shop use. Now it is up to the contractor to come up with the match. To come up with that perfect match, oftentimes the contractor will mix different types of stains and different manufacturers' stains and spend countless unbilled hours doing it. Mixing different types and brands of stains is never recommended, but following are some important things to keep in mind when you find yourself in this situation.
And the Mixing Begins…
When mixing to achieve the perfect match, it is important to fully understand the materials you are working with. Not all stains are the same from a chemical, preparation or application standpoint. And not all of them should be mixed together.
RELATED: Get a Handle on Wood Floor Staining Strategies
Let's take a look at the different types of stains that can wind up on a floor.
Traditional Oil:
These type of stains are generally high in solids, colored using pigmentation and dark resins, have "long" dry times (24 hours or longer) and penetrate into the wood. Often these stains have very good open time and are thus easier to work with on large surfaces and in warmer conditions. They also typically have a mechanism for curing, but due to the chemistry of the system, the curing is not as fast as the next stain type.
Rapid-Drying Stains:
Also relatively high in total solids and colored with dark resins and pigments, these stains have "short" dry times, typically a few hours at most. These faster dry times yield less open time and therefore a more narrow range of usability. The curing mechanism in these stains comes from pre-reacted and modified resins that yield faster chemical resistance than the traditional oil chemistries. This overall faster system penetrates less deeply and performs, in a sense, as a colored "sealer."
Shop-Use Stains:
These stains tend to have low overall solids, use a wide variety of chemistries and are tinted with dyes and pigments. In many cases, they are formulated to dry but not to develop tough films. This allows very fast recoat times, just a few minutes, with spray-applied shop finishes. On wood floors, this typically means blotchy appearance, greater potential for bleed, color pull or movement when over-coated and, depending on how final color was achieved, poor or reduced overall adhesion.
Water-Based Stains:
These type of stains use water as the primary "solvent" and are made from a wide variety of resin types and are colored with dyes and pigments. Total solids tend to be low relative to oil-based alternatives. Although based on water, these stains generally have fast set times and short working or open time, with actual recoat times comparable to "rapid-dry" oil stains. Since these systems are made from a large set of varying resin options, they are not always broadly compatible with all finish types. As always, be sure to confirm what finish or finish types will be compatible with each specific stain.
Mixing Products
Given these sources, the next step is matching the desired color; most often this is accomplished by inter-mixing a variety of stains to get the end result. Considering the varying chemistry of the possible choices, this can be risky. When mixing stains, it is best to stay within a single brand of stain since different colors within the line are very likely to be the same chemistry and thus mixable without issue.
RELATED: Shades of Gray: How to Use Vinegar & Steel Wool to Darken a Floor
If it is not possible to mix from the same line of stains, you will find that at least choosing like-styles of stain (fast-dry or traditional oil) provides the next-best chance of success. When mixing the different styles, be very cautious and watch for obvious changes in the makeup of the stain. Watch for rapid settle, separation and "gooey" residues that were not present prior to mixing (see "Bad Combo" in the sidebar below). These are obvious incompatibilities between stains. This is also something to watch for when mixing like styles or mixing across different brands, as well.
To achieve a successful and stable match using an inter-mix system, it is best to consider a "worst-case" scenario, such as blending a rapid-dry stain with a traditional oil stain. Here dry time becomes the issue. This blend should be treated as if it were the slower drying traditional oil. The extended dry time will help with the adhesion of the sealer coat to the stain.
Finally, it is highly recommended that only stains specifically designed for application on floors be used. Shop-applied stains are formulated for factory use where the need for fast dry times and spray-applied finishes influence the formulation of these stains. It is advisable to avoid using this type of stain for any flooring application, even for intermixing.
Caution on Dry Times
After all the footwork is complete in choosing a color and producing the samples, now it's time to go to work. Again, it is very important to stress that custom colors may require far greater dry times versus stock wood tone colors. Contractors must stand firm in regards to dry times recommended for highly pigmented colors. Some pigmented stains may take as long as 72 hours to dry depending on color load and environmental conditions of the job site. The more pigments a stain has (typically darker and white stains), the longer the dry time. And higher humidity will lengthen dry times, as well.
Since it is a common practice for builders to prematurely cover up a floor, it is important to educate your customer and arm yourself with written notification of what can happen and how it will have to be fixed. A marginally dry stain may only pull a small amount of color when the finish is applied, but allowing it to be covered may cause the remaining latent solvents to be trapped. This may cause coating issues down the road when the covering is removed.
In every case, when developing a special color or using alternative stain options, it is imperative that a test be conducted and that the procedure developed during testing is followed when moving to the larger area. It is also important to set expectations up front by outlining the required dry times for staining and coating, as well as how the floor should be treated during and after staining and coating. Redoing a 1,000- or 20,000-square-foot floor is costly to your body, your relationship and possibly your bottom line.
Staining WoesEven when contractors don't mix different brands and types of stains, they can still run into trouble when staining on the job site. Here are some problems that can occur when staining. (All photos and descriptions courtesy of Roy Reichow of East Bethel, Minn.-based National Wood Floor Consultants.)
Edger Marks
Many contractors who are used to doing natural-colored floors run into this problem when they do a stained floor: sanding marks. They may not be obvious with a natural finish, but the stain highlights any sanding imperfections.
Shade-Coating
The installation and sanding on the floor on the above left was flawless, but the contractor couldn't get the floor as dark as the customer wanted, so his solution was to "shade-coat"-adding stain right into the finish coats. Doing this is not recommended by finish manufacturers, so if you coat this way and have a problem with the floor, don't look to your manufacturer for help. The most obvious problem with this floor was that the finish wasn't applied evenly, and you can see that the stain in the finish makes that obvious. Putting stain in finish can also compromise the finish's durability and cause peeling. In the photos at right, the shade-coated finish could be peeled off the floor; the wood flooring contractor had to bear the cost of a total resand of the floor. Water-Pop Marks
When the floor has been water-popped to open the grain and make the floor take more stain, you have to be extremely careful to not crush the grain before staining. This floor shows two marks where something dragged across the floor before staining. Typical culprits include shoe tips, stain buckets slid across the floor and hard knee pads, among others.
Sample Stain
Many contractors make stain samples for the customer right on the floor. This can be a problem with highly pigmented stains. On this job, the dark stain from the sample area on the floor would not sand out, so this flooring had to be replaced. Making sample panels can be a better option-they don't take long to make, and you have the sample later for reference if you need it. |


|
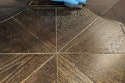
Bad ComboIf you feel you must mix different brands or types of stains, keep an eye out for rapid settle, separation and "gooey" residues like the ones shown in the photo below-all signs that the stains won't work together. |