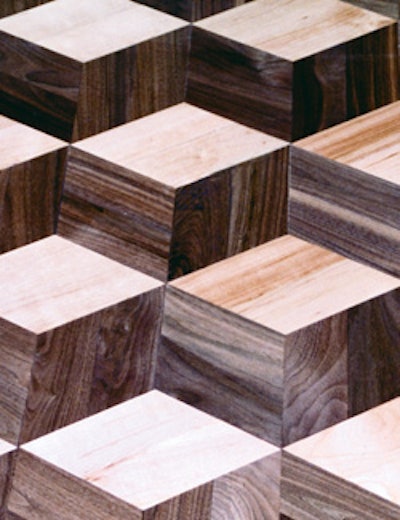
 This rhombs pattern is easy to make from scrap pieces of strip flooring.
When our early ancestors lived in primitive caves, they most likely softened their floors with sweet grasses, warm animal skins and clean sand. Such materials provided comfort and cleanliness, as well as aesthetic and tactile pleasure.
Today, flooring still performs the same functions. One of the most basic yet functional components of the house provides an astonishing variety of decorative choices. Centuries ago, parquet, or patterned, wood floors were chosen to decorate some of the most beautiful castles and palaces. Parquet's use has endured throughout history. Luckily, today's wood flooring installers don't have to endure the painstaking labor that craftsmen did hundreds of years ago.
Today, the prevalence of strip flooring means there's lots of waste material (shorts) that gets pushed around the shop or goes straight into the garbage can. This waste can easily be turned into beautiful parquet floors. Keep the shorts and sort them by size, color, species, grade and thickness. There's going to be a day when business is slow, a job gets cancelled, or you just want to give your employees another work day to complete a full week's salary. It only takes a few simple steps.
Necessary materials:
- scrap wood
- spline/slip tongue
- wooden block or jig
- masking tape or hot glue
Necessary tools:
- tape measure
- miter saw with carbide blade
- clamp or jig to make cuts
- paper and pencil or calculator
- router with a groove bit
Step 1:

For making a square block parquet, the first step is to measure the width of two or more boards, depending on the size of the pattern you are going to make.
Step 2:

Using a block and a clamp or a jig attached to the miter saw, measure the distance from the inside of the blade to the block. Double-check this measurement as often as you can, as jigs and blocks tend to move.
Step 3:

Secure the miter saw onto a stable tabletop or workbench. Make sure you use a dust mask, safety goggles and ear protection. Start cutting the pieces of your future parquet. Keep checking the size of your cut to ensure a precise fit.
Step 4:

Making a square block parquet is as easy as turning the pieces of wood sideways. To ensure a secure and tight fit, you can use a table router to groove the ends of the boards.
Step 5:

Or, you can use the same size boards to make these parquet patterns. Just measure the width of one board, make a jig or clamp a block to the miter saw, and cut different species of wood to make the inside of your pattern more interesting. Using just one smaller block of wood in the center gives a totally different look to your square block parquet.
Step 6:

It is just as simple to make a rhombs pattern parquet. Set your miter saw to 30 degrees, cut two or more boards depending on the length and size of your pattern, attach the boards and measure the length of the board you need. Then, set the jig on the miter saw.
Step 7:

Always move the small pieces of scrap wood away from the blade before making a new cut. The less clutter you have in your work space, the better.
Step 8:

By placing the cut pieces together, the pattern comes to life.
Step 9:

We are almost there. We just have to use the router to groove the ends of the boards to make a perfect fit.
Step 10:

Finally ... we have a unique, custommade parquet made out of scraps that you would have trashed or burned. Now the scraps are a floor that has three to five times the value of regular strip flooring, and a lost work day is made productive instead. Garbage has been transformed into profits.
Step 11:

A whole new look is achieved simply by incorporating different species of wood into the same pattern.
Don't be afraid to try different things and be creative. Come to one of the NWFA schools to learn more. Remember to take pictures of your creative work and show potential clients that there are many possibilities beyond plain strip flooring.