
Mixing stone or metal with your wood flooring jobs can put you way ahead of the pack and even give you single source supplier status with some high-end builders and designers. That said, unless you have years of metal or stone experience under your belt, you'd better go there slowly and cautiously lest you end up in more trouble than you were in on the last job you're still trying to forget.
Considering the growing popularity of stone (particularly slab granite), it's a sure bet you'll be asked (if you haven't been already) to mix wood flooring with areas of stone or metal. You may have already done some. With any luck, you came through unscathed.
The truth is that people have been doing these types of installations—unscathed—for centuries. In the old days, back before TV, radio and Cross Your-Heart bras, crafts folk routinely mixed solid wood and stone in some pretty significant installations—even outdoors! They understood and employed things like canvas slip sheets, mortises, tendons, spline, dados, sand (or even dirt) and countless joinery techniques we've lost the names of over the years. These methods didn't stop movement. They allowed for it. Their purpose was to serve and protect the various elements involved from coming apart over the ages from environmental shifts, settling and basic wear-and-tear.
Their methods kept the floor (or road) together over the years as it shifted up, down and around from changes in moisture and temperature and suffered the ravages of human and horse traffic. Yes, at onetime, some roads were made of wood! You question this? A close inspection of the cobbled roadbed under an old royal's bedchamber in a European chateau could raise some eyebrows.
Let's suppose for the moment you have considerable history working with wood (in particular wood flooring) and are feeling a bit cocky (or at least confident) since you haven't had a miserable failure in recent memory, even with both barrels loaded and the hammers down. Still with me? Well, let's go on.
I've had years of hands-on experience working stone, tile, and metal, both with wood flooring and without. Still, for whatever it's worth, I never get boastful about my mixed media jobs. For one thing, it's hard to boast openly with all your digits crossed. For another, the unions of all the parts and pieces of these masterpieces can rapidly fall prey to changes in humidity, temperature and all the other wild turkeys rarely foreseeable at installation time. To be perfectly candid with you, I'm a little afraid to look back at some of my "masterstrokes of genius"—especially years later.
With that caution out of the way, let me tell you that while mixed media installations are challenging, there is plenty you can control to help turn your projects into showpieces.
Talk to the pros
To help you get the right start, educate yourself about the other media you'll be working with. Bring in a veteran tile or stone setter to help you on your next project. If you really take pride in your work, try to find someone at least as skilled with stone and tile as you are with wood. I like working with "old school" mechanics who are equally expert with "full mud" or "dry sets" as they are with "thin sets."
Adopt an attitude of nosy curiosity. Talk with stone or tile setters you see on the job site. Ask if you can watch them work or visit them on other jobs. Tell them you will return the favor and allow them to visit you on another wood flooring project. The idea is to see if they do the kind of work with stone or tile that you do with wood. It's always better to find someone who makes you feel at ease. Just because they have a great reputation with suppliers or customers doesn't mean you will work well together. Look for similarities in work habits. When you meet someone who feels the same as you do about quality and production on the job, you've found the right person. Remember,you don't have to work with the first person you run into in the tile or stone trades.
If you have difficultly finding a tile or stone installer, visit wholesale stone or tile suppliers and ask to talk with a knowledgeable sales or technical person. Tell them who you are—a wood flooring contractor who is looking to do projects that incorporate tile, stone and/or metal. You're potentially a new customer for them. Ask them to recommend books, articles or other technical information to help get you started. Get names or phone numbers of small tile or stone contractors who buy from them and who they think might be interested in working with you.
If you are new to your marketplace or if you don't know anyone locally who has experience with wood, stone, tile and metal, talk with wood flooring contractors you trust in non-competing markets.
Also, learn from others' mistakes. Visit mixed-media jobs and see if you can tell how the floors were put together. Try to find the mistakes or problems in these jobs—there's almost always at least one. See if you an understand why the installer made the mistake(s), and think about what you could have done to avoid making those same mistake(s).
On the move
You're used to experts preaching about expansion and contraction caused by water and wood. If you take pride in offering your customers more than just a "taillight guarantee," you'd do well to get a handle on the expansion and contraction coefficients of all the elements you intend to mix with wood in your flooring installations. As you know, wood expands as it takes on moisture (in liquid or vapor form) and contracts as it gasses it off. In contrast, metal and stone expand and contract with shifts in temperature.
This can make things complicated. For example, take a mixed-media installation in a foyer with a skylight. Even with the HVAC system running, sooner or later, a slab stone or tile section surrounded by wood (or surrounding wood) probably will change shape (maybe rapidly) due to the solar heat penetrating through the skylight. Should your installation not allow for this, you could end up with jagged or sharp edges in the border of your wood and stone—if you're lucky.
The worst-case scenario could find you trying to figure out how to fix broken sections of slab or large tile marble, which is quite soft as stone goes. Even granite can fracture, break or chip. Ugly gaps can open up in the most obvious of places during cold and dry periods. Wood flooring boards can permanently deform in the crushing environment of a less-than adequate expansion space. The list of potential problems is endless.
So, you see what I'm getting at—always allow for expansion and contraction in both the wood and stone. Grout is not an adequate absorption medium for stone surrounded by large areas of solid wood flooring, particularly plank that is 4 inches or wider. When in doubt, leave more space.
Likewise, even when insetting smaller pieces, such as a metal band, a single strip or a small section of stone, don't be tempted into tight-setting with little or no regard for movement. Today's elastomeric urethane mastics can work magic, but not miracles. Almost anything can be made to look good glued together, at least for awhile. But in my mind, it's the test of time that reveals the true character of any installation.
To avoid potential pitfalls like the skylight example, talk to designers and architects up front, and try to convince them to avoid placement of a mixed-media installation beneath or near a skylight where intermittent sun (with high solar gain) and shade (with strong cooling) will likely impact the stone, metal or wood.
What's underfoot?
Hopefully, you're already adamant about subfloor preparation for your everyday wood flooring jobs. If you're going to tackle mixed media installations, you should be even more vigilant about the subfloors.
First, analyze the structure. Pay particular attention to the substructure of the building. Walk the subfloor or underlayment with an associate, paying particular attention to any perceptible movement from live loads (foot traffic). Your associate should be at least 150 pounds, but a 200-pound or heavier test is preferred. A finished floor is only as good as its subfloor. This is especially true of any patterned or parquet floor. A mixed media floor is almost always completely dependent on its substructure.
When working on remodels, pay close attention to changes in foundation lines. Joist systems often switch direction when additions are added to homes or other structures. New foundations move independently of existing foundations unless superhuman efforts are made to join them. This can become most apparent where two walls line up or two foundation walls meet mid-room. Concrete slab foundations are even more prone to this. I like to tie joist bays together with shear strapping (at least three bays over on each side of the foundation wall change) to help add support. This doesn't do much, but almost anything helps. I also add bridging between joists to firm up the spacing. From my experience, the spacing adjacent to rim joists can be either firm or soft. Adding strength never hurts. Further,your most obvious focal points are almost always situated over these spaces. Regardless of your efforts,expect slippage between these sections. Occasionally, I will introduce a seam or joint directly above these sections to accommodate the inevitable gap or seam that will open up overtime. Shifting and settling between the two sections must be anticipated.
When working over subfloors with wooden trusses for joists, pay particular attention to seams over or near weight-bearing points. Wooden trusses are extremely rigid. Spans between girders greater than 16 feet usually exhibit significantly greater resonance (bounce) than they do over standard joists (e.g. 2 by 12s). I find it increasingly common to see abrupt changes in the plane of the subfloor directly over or near foundation walls or other weight-bearing points. If you install over these points, you should allow for considerable vertical shifting with time and traffic.
When working directly over a single layer of subfloor or a single layer of solid wood underlayment that is firmly attached to the structure below, I usually add either a slip sheet or an additional multi-plied layer of underlayment to which smaller and thinner pieces of wood or stone can be attached. This allows for horizontal shifting of these pieces irrespective of larger adjacent boards or sections. An example of this might be a solid 3/4-inch-thick primary or field area of stone or wood surrounded by a patterned border of smaller and thinner, often delicate, pieces of stone and wood mix.
As always, steer clear of senseless pitfalls or no-control situations, such as installations directly over lightweight concrete, flex-prone substrates or below-grade slabs.
Wood selection
You're getting the idea that, as always,expansion and contraction is your main concern. So, do what you can to control variables with the wood flooring. To start, insist on quartersawn or riftsawn flooring. If that isn't possible, be careful to minimize the number of plain/flatsawn pieces installed together. Quartersawn and riftsawn pieces of wood generally move half as much as plain/flatsawn boards with changes in relative humidity.
Also, try to reduce the width of plank. More narrow pieces mean more seams in a given span of wood than wider pieces. More seams mean more spaces for the wood to expand into without twisting, cupping or curling as the humidity moves up or liquids are spilled on the floor. To that end, it' also a good idea to promote the use of a pattern in the wood flooring. Alternating the direction of the wood grain (as with most parquet patterns) help seven out the overall movement from changes in relative humidity.
Always keep in mind the relative stability of the species you'll be using,and try to promote the use of more stable wood species. Keep in mind that many wood species (especially dense tropical woods cut, dried and milled in their country of origin) that appear to be relatively stable on a chart of coefficients actually can exhibit significant movement when installed. This phenomenon is generally due to stresses formed during drying and milling or during the trees' development.
Darker colored wood species generally will look better longer than lighter colored ones for pretty obvious reasons. Show the designer and the potential homeowner how light woods or light-colored stains on wood flooring exaggerate the inevitable gaps between pieces and the dirt that can collect there, potentially taking away from the overall appearance of the project.
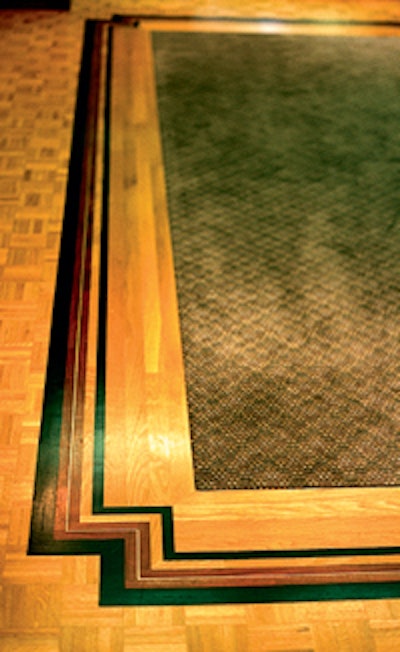
Combining stone and wood
When installing a new floor with insets tone sections or tiles (especially if they're 12-inch square or smaller), I like to fit each border or piece of wood with the specific piece or pieces that will go beside it. This is not as critical with machine-cut tiles of a specific, definite size. However, I find that just because the tiles are supposed to be 12 inches square doesn't mean they're all the same, precise shape. If the wood installer is different from the stone installer, I like them to work together on this and mark which piece of stone will go where on the back of each stone piece. These are fitted precisely to the hole in which they will eventually go and then removed for safe keeping. A temporary board (I like using MDF or particleboard) cut to the shape of the tile or piece of stone is loosely laid in the cavity. If the pieces are small or if significant time will elapse before the stone is set, you can use double-sided tape on the back or bottom of the scrap piece to hold it in place during sanding and finishing.
Sanding the wood border is similar to sanding any other border. Take care not to knock down the edges of the borders (this won't be obvious until it is too late). Carefully inspect for such problems during the finishing stages.
Remove the scrap pieces during at least one of the coats of sealer or finish. Edges (especially end-grain) of the wood border should be totally sealed from moisture. There is not a lot of moisture related to thin-setting small pieces, but there is enough to cause problems if the board edges are not sealed.
When making your finish selection,think about using a relatively flexible sealer/coating, such as penetrating oil or oil and wax. Most urethanes exhibit less elasticity over time with movement than oil or wax coatings do.
When a stone and wood border needs refinishing, it usually requires skilled scraper technicians. Some sanding can be done with small portable sanders, but great care must be taken not to damage the stone edges. Most mechanics I know prefer to scrape and hand-sand all the border work around the stone. If the stone needs resurfacing or polishing, this normally is done prior to refinishing the wood border. However, some stone polishing can be done after the finish has been applied to the refinished wood work.
The ultimate goal
Mixed-media floors that suffer significant climatic shifts, structural settling or compounded pitch and yaw forces (usually associated with houseboats, pole buildings, yachts or the like) can mature into some pretty ugly babies. Some of the most horrific-looking (and unclaimed) flooring projects I've personally witnessed seemed to impugn all the known physical limits of their components, causing their eventual defacement and occasionally a complete compromise in their structural integrity.
Don't let that happen to your mixed media floors. Ultimately we know a floor must perform its primary function—to be a sturdy and level traffic surface. Building beautiful and long lived floors ought to be our raison d'être. Everybody's made of different stuff, but my daddy always taught me to "do it the best you can—the first time" and "each time you do it, learn how to do it better the next time." Just don't expect to get paid for all the extra effort. Construction and perfectionism make warring partners, but I find doing it the best you can becomes its own reward.
|
For example ...For this installation, I used ebony, padauk, white oak and brass surrounding white oak parquet, all finished with two-component solvent-based Swedish finish. The designer in charge of the NewYork Stock Exchange's Seattle offices asked for my help in creating a main entry floor that would "radiate an air of affluent excitement within a warm and inviting atmosphere signifying confidence and strength." I selected Gaboon ebony and Andaman Island padauk to provide rich and strongly contrasting colors that would complement the more traditional look and warmth of white oak parquet. The brass, which matched the door handles, was brought into the wood floors for addedstrength and richness. I find ebony reacts more like glass or stone than wood, no doubt owing to its density. As such, I treat installations utilizing ebony as I do other mixed media compositions. I prefer musical instrument grade ebony. Although somewhat more expensive than other ebony, it assures me of a more stable product with less potential for exhibiting stress fracturing or other "hidden" movement over time. |

|
On the opener ...On this floor, black and white polished slab granite borders fields of white hickory selected and custom-graded for color. The floor was sealed and finished naturally with matte Danish finish. Theentire length of this beautiful atrium-like entry hall supports a full-length skylight above. Extremes in solar activity are reflected in the near-white wood floor as fine lines between planks. These comeand go with extended changes in the weather and are not manifested in other portions of the home. As a general rule, I shy away from stained woods taken in a framework of metal and/or stone. Thenatural feel of wood quickly turns phony or artificial with many stains or dyes, particularly in a context of stone or metal. Worse yet, resurfacing the wood in a stone/metal matrix becomes particularly difficult with stains or dyes. |

|
Tips on Metal• Most soft metals can be easily cut with carbide-tipped saw blades and sanded with quality floor sanding abrasives. Note that the polished sheen on most metals (even satin) is far more glossy than you'll be able to get with any of the papers you use for wood floor sanding. So, insist on narrow strips of metal and an overall lower sheen on the face of the metal so that you can sand them with the rest of the floor. • Most metals (especially brass) heat rapidly when cut, causing them to expand and throw fine cuts off, particularly miters. • Be careful when cutting metal. Small pieces can be thrown off your saw blade at great speed. Always wear face and hand protection, and caution others working around you.
• Some technicians clamp strips of metal between pieces of hardwood during sawing to help hold the metal in place. Another common procedure is to wax the saw blade with paraffin prior to cutting the metal. Make sure all wax residue is removed from any edges that will be glued or finished. • I like to join strips of metal to adjacent pieces of wood by using metal splines. These can be made from metal pins or nails. Another method utilizes slots cut completely through the center of the metal strips every 6 to 8 inches with biscuit jointers. This method allows the metal strips to be firmly attached to the adjacent edges of wood. I like this method for commercial installations and other job sites where the stresses on wood and metal are likely to be stretched to the limit. |


|
For example ...I created this custom pattern parquet consisting of fiddleback maple with red incienso highlights bordered by aluminum, ebony, red incienso and plank fiddleback maple for six promenade decks on aluxury liner. They were sanded and finished with four coats of matte Danish waterborne finish. I like using patterned flooring with heavily figured woods in installations likely to experience significant shifts in moisture, particularly when mixed with metal or stone surrounds or insets. I chose clear waterborne coatings to seal and finish the exotic woods, as they exhibit the woods' true colors. |