
No installer is perfect. Even the most meticulous craftsman occasionally has an area or two in the wood floor that don't meet up exactly flush. Perhaps the angle on the chop saw was a hair off, and now there's a gap in that mitered corner. Or somehow the template for an inlay was a bit off, and one side of the medallion doesn't quite meet the field perfectly. Or, the helper you left to finish installing didn't pay close enough attention. Now there a couple of areas you don't want to fill, but you also don't want to rip out the whole area and start over.
That's the perfect time to borrow a technique from the cabinetry trade and use a sliver, also known as a "Dutchman." In a short amount of time, you can fill the unsightly gaps in the floor with real wood. When installed correctly, they are nearly impossible to notice in the finished product.
Necessary materials:
- Wood glue
- Wood flooring or dimension lumber
- Table saw
- Safety glasses
- Razor blade
- Small block plane or hand-scraper
Step 1:

To make slivers, standard flooring boards such as this piece of 3/4-by-2 1/4-inch flooring may be used. Or, dimension lumber is another option. Boards that are 18 to 20 inches long are easiest to cut slivers from.
Step 2:

Apply blue tape on the table saw to prevent slivers from falling through the gaps next to the blade.
Step 3:

Set the blade height so it just comes through the top of the board.
Step 4:


Cut off both the tongue and groove sides of the board. Always use safe table saw technique—wear safety glasses and use a push stick to push the board through the blade.
Step 5:

Set the blade on a 7-degree angle and adjust its distance from the fence for the width of the board.
Step 6:

Cut a thin sliver from both sides of the board. It may take some adjustment and practice before getting the cut you want. Different species vary in density and will cut differently.
Step 7:

Adjust the blade back to 90 degrees and cut slivers from both sides of the board. As you go through the process, you'll need to adjust the distance of the blade from the fence.
Step 8:

A good-quality sliver has a fine, smooth edge. Discard slivers that have a ragged edge.
Step 9:

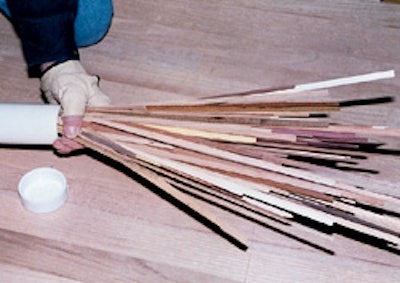
It is easiest to cut a supply of slivers back at your shop so you have them on hand when you need them at the job site. A PVC tube with caps on each end makes an easy sliver storage unit. Cut slivers of all the species you use.
Step 10:

Here, one of the oak boards against the walnut French knot was cut too short. The gap is too big for filler.
Step 11:

Use a razor knife to cut the sliver to the necessary length.
Step 12:

Apply wood glue to one side of the sliver. Use the appropriate glue—not products such as Liquid Nails. The glue must be strong enough to hold the sliver during the sanding process.
Step 13:

Insert the sliver with the narrow side down. If the gap is too narrow for the sliver to go in deep enough, a razor knife can be used to slightly expand the gap.
Step 14:

The knife can then be used to tap the sliver down. To withstand several sandings and have holding power in the floor, most of the sliver should go down into the gap.
Step 15:

With the sliver down as far as it will go, use the razor knife to score both sides of the sliver at the floor line, slicing off the excess.
Step 16:


To smooth the sliver perfectly even with the rest of the floor, you can use either a small block plane or a sharp hand-scraper.
Step 17:

Unlike a noticeable area of filler, the grain of the sliver makes it nearly indistinguishable from the rest of the floor. Now all you need to do is wait the recommended amount of time for the glue to set before sanding the floor.
Special thanks to Tom Peotter of Winneconne, Wis.-based Historic Floors of Oshkosh for his assistance with this story.