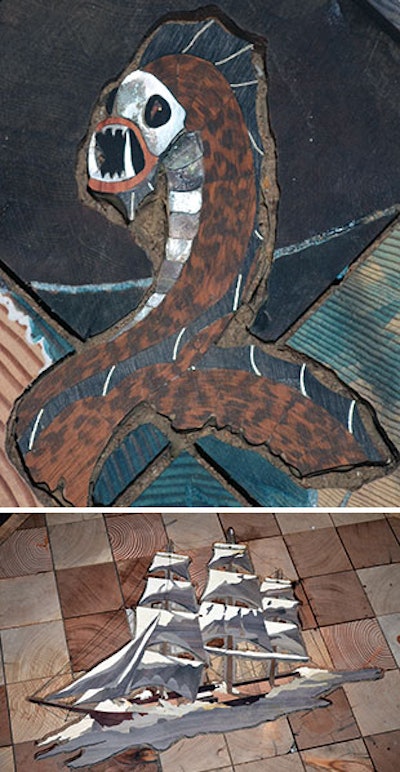
Most people, if they have a home wood shop at all, have concrete floors-maybe a leftover square of carpet or linoleum. Retired Army staff sergeant Nate Meadows, however, wanted the best. "I have always had the dream of having a nice hardwood floor in my shop. I have always felt that the place you spend your time creating, your studio, should make you feel absolutely at home, comfortable and relaxed. No demons allowed," he says, adding that wood provides the warmth and inspiration that concrete just can't. Meadows started his shop's 288-square-foot end-grain floor in 2009, when he and his wife moved to their new house in California, almost five years after he was injured by an IED in Iraq. While receiving care for his traumatic brain injury at Walter Reed Medical Center, Meadows met with some "old-timer woodworkers." They insisted he install his dream floor before moving his tools in, "Otherwise you'll never do it!" he recalls. Meadows went with end-grain for the practical reason that it would support the woodworking machines donated to him during his hospitalization. His intricate map-motif inlays, however, go back to inspiration: The sea monsters, birds and burl islands are meant to represent different parts of the mind. The floor, which is still in progress, now consists of more than 30 species of wood, accented with brass, aluminum, sterling silver, mother of pearl and even a little gold. Meadows is particularly grateful to friends and suppliers who helped him bring this dream to life: Catherine Helshoj of Laguna Tools, Peter Connor of WD Flooring and Chris and Catherine Cook.
Follow Nate's progress on his blog: http://lumberjocks.com/NateMeadows/blog.
 Staff Sgt. Nate Meadows and his service-dog-in-training, Jake.
More on Nate's story and more photos:


The floor itself is in your workshop, correct? How big is the space?
Correct. Currently, my shop resides in a detached two-car garage with an additional room built on. The floor is in the addition. The floor is approximately 16 by 18 feet.
You were a Staff Sergeant in the Army. Where and when were you deployed?
I joined the Army in March 2001 as a medic and deployed in 2003 with the 3rd Brigade 1st Stryker Combat Team out of Fort Lewis, Wash., to Iraq. I was wounded on my wife's birthday, Oct. 9, 2004, in the city of Mosul by an IED during an ambush. My injuries are primarily internal and therefore perplexing to many people. I look normal, however I have a severe head injury that impairs my balance, messes with the nerves in my hands and feet, and gives me terrible headaches that can take me out for days at a time.
It took the Army several years after my injury to recognize and accept Traumatic Brain Injuries as something real. They thought I was just making it up. After some long years, I retired in 2008.
Your profile mentions nerve problems in your hands. How does that affect your work?
At times it is difficult to feel my fingers or even control them. These days are so very frustrating.
When did you start this flooring project? Why?
I have always had the dream of having a nice hardwood floor in my shop. I have always felt that the place you spend your time creating, your studio, should make you feel absolutely at home, comfortable and relaxed; no demons allowed. I love the warmth of wood and I try to feed off of art and creativity, beauty and design. I never really liked the cold lonely feel of concrete.
When I was in Walter Reed Medical Center, I had the opportunity to meet some old-timer woodworkers. I shared my dream of my shop with them, and they said, "You better do it before you move your tools in, because otherwise you'll never do it! That's what happened to me!" That really resonated with me. It made sense. You move in and then you get caught up in life and never move out again.
So when Theresa and I bought our house here in California in February 2009, I started work on it that very spring. It has taken me three years to get this far.
Were you involved in flooring before your military career? How did you get from one to the other?
I have never done anything commercially, but my father started building my mother a 7,100-square-foot timber frame home when I was 10. By the time I was 15 I was fluent in all power tools, and before I left for the army I was helping him lay some of the floors.
My real passion for floors really did not awaken until I started focusing on my shop floor. I have to give the real credit for lighting that flame to Charles Peterson; after I read his book, "Wood Flooring: A Complete Guide to Layout, Installation & Finishing" by Taunton Press, I knew I had found the avenue of woodworking that had been whispering to my heart. I do so look forward to meeting Mr. Peterson someday and thanking him for his gift of inspiration and his book of knowledge!
Why end grain?
Some of the machines that were donated to me while I was in the hospital are extremely heavy, so I knew when I put a floor in, compression was going to be an issue. I spent several weeks doing research and discovered that not only were many of the old streets end grain but old factories were also end grain. Many of those examples still exist today! I was sold. Once I started cutting the tiles and seeing the beauty within each one, I was hooked.
What is the significance the map motif?
I like to put deeper meanings to things. My wife accuses me of being a dreamer and an over analyzer and a sentimentalist. It's all good. The map is a representation of the mind. Each island or land represents a different part of it. For example, I have a roble burl in the corner that represents the "Land of Sinister Thoughts" and an amboina burl that represents the "Land of Passion!"
Is there a point when you will consider it done, or do you intend to keep adding?
Oh no, it will definitely be done! However there is still much to be done before she is considered that way. Then the next phase of the shop floor goes down in the two-car garage, and it incorporates end grain tiles cut from beams taken from a historic railroad bridge here in our town, a "cookie" or end grain tile cut from a truly historic tree, as well as a 350-year-old 5-by-7-foot-wide "cookie" end grain tile of a local oak tree. But that is years down the road. The wood is waiting, though.
Ed. note: A few months ago, Meadows returned to his shop to find a section of roof above his floor had leaked during a rainstorm.
Is the waterlogged section going to need to be removed and redone?
As it looks right now, I think I will be able to save that section. I am so impressed with Bostik's Vapor-Loc glue. It allowed the tiles to expand and contract without losing any of its gripping power. Several of the tiles did crack further as well as start some spalting, but I think when sanding is done they will look just fine. I am keeping my fingers crossed!
I need to replace the shop roof, as its 40-year age and frequent attacks from rain and 80-plus-mph high winds have taken their toll. Time will tell if the fixes will hold.
Are your sons involved in the project at all? Do they have any interest in woodworking?
My oldest son, Brentan, helped me lay down some of the smaller tiles around the star. Both he and Kale are interested in woodworking though Kale, the youngest, shows more interest and excitement to get into the shop. Brentan is 11 and Kale is now 5.
Is there anything else you think readers should know about you, the project, your supplies, etc?
The subfloor is a concrete slab over which I ran a sheet of 6-mil plastic vapor retarder before placing 2x4 sleepers spaced out every foot. Then I weaved a loop of ¾-inch PEX pipe throughout the stringers and covered the pipe with another layer of concrete, which my brother and I mixed by hand-twelve bags of fiberglass re-enforced Quikcrete. The slab rested for over 6 months as I collected lumber. It was not until I went to put on the subfloor sheeting that I realized the whole floor was 1.5 inches out of level in two directions. I then had to resaw 2x4's into wedges and lay them out to level the floor.
I then covered the floor with another section of 6-mil plastic before screwing down two layers of ¾-inch OSB subfloor. I turned the second layer 45 degrees to the first and secured it by troweling out Titebond II and screwing it every 6 inches around the border and 12 inches across the center, using long screws to go into the sleepers in the concrete slab.
Once that was finished, I established the center of the room, and drew out my design on the floor from there, starting with the compass de rose. Because the tiles surrounded the star were going to have not expansion gaps, I cut them 5/16 inch thick and glued them down to sheets of ½-inch Baltic Birch Plywood I had already cut to fit, glued down and screwed in place to fit my design.
There are over 3,600 tiles all together, combining the large and small ones. Each where cut and squared individually. The small tiles are 3 by 3 inches, the medium ones are 5 by 5 inches and the border tiles are roughly 10 by 10 inches. All the 5-inch and smaller tiles were cut on a miter saw, then squared individually on a table saw sled. The large border tiles were sawn on a Laguna 16-inch HD band saw then squared individually on the table saw as well. Once many of the tiles were cut, both large and small, they fell apart, which required several hours of gluing.
Almost all the tiles come from my property. They are cut from old fence post, some that where put in as far back as the 1920s.
Currently there is over 30 species of wood in the floor with more to come. oak, maple, rock maple, bloodwood, purple heart, wenge, hickory, red doug fir, doug fir, juniper, black oak, camatillo, gaboon ebony, katalox, cocobolo, shedua, honey locust, blue pine, blue mahoe, cherry, holly, snakewood, buckeye burl, olivewood, catalpa, ambonia, roble burl, black walnut, claro walnut, madrone, redwood burl and cedar.
Also there is brass, aluminum, sterling silver, and $6 of gold.
Currently I am still retired though my dream is to eventually have a flooring company. My medical condition keeps me from working consistently day-to-day so it will take some thought and ingenuity. For now I take care of my boys, with the help of friends and family (which is why we moved back to California) and work in my shop on the floor and on projects that help out those friends and family.
The long-range plan is to eventually have an operation that can cut 24-inch end grain tiles from locally harvested timber and reclaimed wood, as well as have a CNC machine to assist with the inlay work.
I want to publicly thank: Catherine Helshoj of Laguna Tools for encouraging me to follow my heart and be creative and for always being there, Peter of WD Flooring not only for donating some seriously fine wood but for being a great friend and a source of knowledge when I need it, and to Chris and Catherine Cook for their wonderful resources and patience.