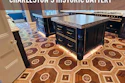
 The historic floor was so meaningful to the owners that they took photos of their daughter on the floor every year while she was growing up.
I aspire to do anything that can be done in decorative wood floors, and recently I ended up with a job that pushed me to achieve things with wood flooring I haven't done before. The historic home is owned by a couple who are in their 70s; they have lived most of their lives there and raised their daughter in that home. The showpiece of the circa-1900 house was an intricate dining room floor with a custom parquet pattern. They have always been so proud of that floor that they took photos of their daughter on the floor every year while she was growing up, from the time she was an infant until she was posing in her prom dress.
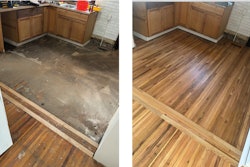
Sadly, in September 2016, there was a fire in the basement—right under that dining room floor. It burned all the floor joists and cooked that intricate floor, and when the firefighters came in, they doused the entire home, and the historic flooring buckled. The other floors in the home, including interesting floors in each of the bedrooms, were also a loss.
The insurance company wrote off the floors; their plan was to tear out all the walls and floors and rebuild. The clients were devastated at the thought of losing that dining room floor that had so much meaning for them. They talked to a lot of different wood floor pros, and no one was interested in attempting to reproduce that exact floor, but one referred them to me, telling them, "This guy's probably crazy enough to do it."
Of course, they were right. I thought this would be a great challenge and opportunity—as long as they were willing to pay for it. I gave them the price and thought, "They're never going to do that." Because their insurance policy stated they were able to have similar quality and material to the original for reconstruction, they were able to get the hardwood flooring approved, but the entire process was lengthy. I first saw the floor in October of 2016 but didn't actually start the floor until 2018.
Here's how we tackled reproducing their beautiful historic floors, from that intricate dining room floor to the different wood flooring borders in the bedrooms.
Documenting history before demo
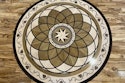
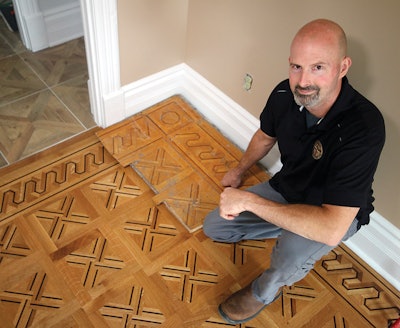
Luckily I was able to get into the house before they demolished everything, so I took a Sawzall and cut out an entire corner—about 4 square feet—from the dining room (1), subfloor and all (you can see this piece in the photo on page 37). It had the corner block (2), the border and a bit of the field, too. As we worked on the project after that, we had extensive photos and diagrams, as well as other bits and pieces of the floor I had removed (3) that we could refer to, but the most valuable information was that actual piece of the floor.


For the upstairs hallway and the three bedrooms, I didn't have sections of flooring, but we took extensive measurements and photos, and the homeowner's daughter took many photos, also, to make sure we could reproduce the flooring as closely as possible to the original.
Figuring out the existing flooring
We found some markings on the back of the dining room flooring indicating it was purchased (probably though a catalog) from T.J. Eaton & Company. The flooring was 5/16 inch thick with a mesh backing and was face-nailed over a 5/4 pine subfloor, which had been extensively damaged in the fire. The repeating pattern in the dining room consisted of a quartersawn piece of oak, then a ¼-inch pinstripe of a dark species, and then another piece of oak. For that 1/4-inch strip, the original material looked like walnut, but it hadn't faded over time like walnut would have, and it was twice as dense. I played with all different kinds of species trying to match it up, and what we ended up using was East Indian rosewood. I had to select the brown pieces from the rosewood, grading out the more purple ones.
RELATED: How I Did This Floor: a Custom Compass Rose and More
Besides the species, I had to figure out how the heck I was going to make the actual floor. From all the courses I've taken, I knew that a lot of it would be just getting on a miter saw with stops at the right measurements and cutting everything. The biggest challenge I could see was that ¼-inch pinstripe running through everything. I had a few ideas about how to handle that. To decide on a plan, I did what I often do, which is call one of the trainers I've had in a class. After talking with pro Lenny Hall of Miami-based Endurance Floor Company, I was confident we needed to laminate the rough lumber of the oak, rosewood and oak together, then rip those laminations into flooring.
Building the new flooring from lumber
We started with rough lumber. We had plainsawn 5/4 select white oak and 4/4 select East Indian rosewood (4). For the oak we were able to use plainsawn material because once we ripped it after laminating it, the face would be quartersawn, just like the original oak. The material was resawn on a band saw, then run through a planer and a thickness sander (bought just for this job) to get the precise dimension, using calipers to make sure we were getting our thickness correct.

We glued up the three pieces, then clamped them in 6-foot lengths and 3- to 4-inch widths (5). Once they were dry, we ripped ⅜-inch-thick strips on the table saw (6a) (6b); we'd get about 10 pieces until we ran through the width of our laminated sections. It was my first time laminating and ripping flooring material like that, and it really opened up a whole new world as far as the possibilities for detailed, decorative patterns.


It sounds simple enough to describe, but doing this was a ton of work. I grew up doing woodworking projects with my dad, who is retired now, and he helps me out when I need him. He spent about a month in the shop (part time) laminating and ripping it down. Once everything was ripped, we worked together to figure out the cuts for the pattern, which we ended up doing on the miter saw with stop blocks (7).

For the intricate dining room floor, there were three elements to figure out: The four corner blocks, about 60 lineal feet of the 12-inch-wide border (8), and then the 12-inch-square blocks of the field.

When it came time to assemble it, we had me, my dad, my guys and even my wife and daughter helping out (9). We assembled the 1-foot squares and put packing tape on each one to hold the pattern together. After all was done, we figured out it took about 1 hour per square foot to make this floor (10).


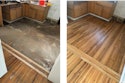
On site, we needed to build the floor up to ¾ inch, so we put down ⅜-inch Baltic birch plywood. When it came time to install the floor, I started dropping some chalk lines down, and things just weren't making sense to me. We had built the flooring to be the exact same as the existing floor, and we had carefully measured and remeasured everything, but my lines weren't matching the way they should. The contractor was there when I was doing this, and he asked me what was wrong. I told him that my measurements were a little strange. He said, "You know we added 3-by-3s with insulated drywall, right?" So the walls were thicker than they were when I measured the floor. It was a little bit of a freakout moment—a little bit of panic set in—but we figured it out. Around the entire floor there was a simple apron of white oak that was different widths for the width and length of the room; it was probably intended as a spacer for the original installers to give themselves room for error. We trimmed it down to 1½ inches and took another ¾ inch off the last row of parquet squares, and it was barely noticeable.
Something I found interesting was that in the original floor, they had trimmed down the outer squares so that they were partial squares but the border had perfect symmetry. So the original floor was not designed to perfectly fit the room; it was probably a standard creation they would make and then fit to the house.
Once we figured out how to adjust our flooring pieces, we glued the patterned floor onto the plywood with MS adhesive (11a) (11b). The floor that had taken so long to create was quick to install: It only took about four hours to glue the entire dining room down (12).


Interesting floors to recreate upstairs, too
As I mentioned, the hallway and three bedrooms in the home were also damaged in the fire, and their flooring had to be replaced. Two of them were an intensely quartersawn white oak that was 11/2 inch wide and ⅜ inch thick, and one was birch. For the sake of historical accuracy, we researched trying to find the same dimension of flooring and planned to source the materials from Knights of Meaford, but 11 months almost to the day after this house burned, the company also had a fire. Ultimately we convinced the homeowners to go with a 2¼-by-¾-inch product just to have a higher quality floor. We got samples of quartersawn material from several manufacturers before finally putting in the order for the 1,600 square feet we needed.
RELATED: How I Do These Jobs: Working on Yachts and Superyachts
Even though the dimension of the flooring changed, the homeowners did want to match the features from the original bedroom floors—each had a different style of border. One bedroom had mitered corners (13), the birch one had log-cabin corners (14) and one had something I'd never seen before. It was a really interesting sort of woven corner, so we ended up calling it a basketweave corner (15).

In addition to those borders, there was a double 1-inch feature strip running through the hallway (16a) (16b) of the same darker material that had been used downstairs, so we again used East Indian rosewood to match the original flooring.


The homeowner's daughter was passionate about making sure the flooring was recreated as closely as possible to the original, so for each room we started, I did a mockup of the border and starter row, and she asked for adjustments or approved it before the installation. With the creation of the various patterns and feature strips with a different flooring dimension than the original, the installation of the bedroom flooring and hallway took about two weeks.
Careful sanding and finishing
In anticipation of wanting to sand the patterned flooring enough, I had built the dining room flooring about 1/16 inch proud, and I began sanding the floor by cross-cutting with 40-grit and 60-grit on my big machine (since it was a patterned floor, of course basically any sanding direction is cross-cut!). Then I used my Trio with grits 60, 80, 100 and 120.
The customers wanted the floor to have a little bit of that rich, ambered appearance to try to give the floor some of the depth of their original floor, which I assumed had originally had a wax finish but over the years had immense amounts of urethane applied to it. At this point they wanted a floor that was low maintenance with a low sheen. I told them that if they wanted to restore the floor to the original type of finish I could do wax, but I also explained that there are newer products on the market that would replicate that look with less maintenance. I did samples using Loba ImpactOil that had a little bit of Kambala and a little bit of Sucupira, which they approved. We did one coat using those colors, then a coat of clear transparent oil (17a) (17b).


Completion of a meaningful project
The main person spearheading this project was the homeowners' daughter—the one in the photos taken on the original floor as she was growing up. She lives down the street now, and she was very emotionally invested in making this project happen for her parents. When she saw the completed floor, she teared up a little bit and hugged me.
For me, this project brought a lot of satisfaction and pride in what we were able to do, particularly because it was so meaningful for the homeowners. Even though it was a lot of work, in the end I found it was easier than I would have thought. I'm planning on making more patterns and hoping to get more involved in this kind of design work. I enjoyed making the sample and experimenting with this floor in my shop—it's nicer than banging in straight floors all day. I talk often about the trainers I've had over the years, but the reality is that if you keep pushing yourself, you'll start turning into one of those guys you're trying to emulate.
 Left, the upstairs hallway as we recreated it with quartersawn oak and East Indian rosewood. Center, the project also included refinishing the beautiful stairs, which I believe are flamed red birch. Right, it took many samples before we found a supplier that could provide quartersawn oak that could replicate the beautiful appearance of the original flooring.
 The corner patterns from the three bedrooms upstairs were recreated with the 21/4-inch quartersawn oak instead of the 11/2-inch width of the original flooring.
Watch the video in which Jason walks viewers through the process in his shop and at the job site: