
Log in to view the full article
The first thing you have to know about any wood flooring installation is that if you want the installation to succeed, the subfloor beneath it must be clean, dry and flat.
Beyond that, everything else is detail.
Preparing the subfloor for installation begins when the contractor first visits the jobsite prior to installation, paying particular attention to moisture conditions.
Ensuring that moisture conditions are met means the house must be roofed, walled and windowed, and the heating and air conditioning units should be operating. A flooring installation should proceed only after the interior atmospheric conditions are at normal living conditions.
Once that has been established, attention should turn to the subfloor. Among the issues to be determined:
- Is the construction on wood joists or slab?
- If it's on wood joists, what is the thickness of the subfloor? Is the subfloor approved for wood-flooring application?
- Is the subfloor clean, flat and sound?
- What is the moisture content of the subfloor and what is the relative humidity of the jobsite?
- Is the subfloor's moisture level suitable for installation? Conduct a Moisture test before installation. (See "Testing for Moisture," p. 119.)
- If the construction is on slab, is the concrete slab's moisture level suitable for installation? Conduct a moisture test before installation. (See "Testing for Moisture," p. 119.)
- Is there a 6-mil polyfilm moisture barrier or equal beneath the slab?
- How old is the concrete slab? In a new building, it must be at least 30 days old before you can consider moisture testing.
- How much further preparation will you need to do? Will you have to remove the old flooring, flatten, patch, sand and renail it, or replace or install the subfloor?
These are all questions that need to be answered before you schedule installation.
PREPARING THE SUBFLOOR
Once you've arrived at the jobsite to prepare for installation, your pre-installation checklist should include the following items:
- Checking the moisture content of the subfloor — again — and recording it on the work ticket. Follow the flooring manufacturer's recommendations for acclimation of the wood flooring, if necessary. Moisture contents of both the flooring and the subfloor must be checked and recorded before any work begins. Only after wood has acclimatized to the jobsite is the installer ready to install — and only after getting satisfactory measurements from the concrete slab, the subfloor and the wood itself.
- Grinding and sanding the slab to flat acceptability, if necessary;
- Repairing the subfloor by re-nailing the subfloor or reinforcing the joists;
- Flattening the subfloor by sanding or using recommended patching compounds and shims;
- Adding an underlayment to the existing subfloor, by installing plywood over a slab.
To protect against moisture rising through subfloors, the installer needs to make sure there is a proper moisture-vapor retarder. If a wood subfloor is laid over an existing slab, the membrane can be cemented to smooth, clean-swept concrete.
In any case, the moisture content of the wood subfloor should be within 4 percentage points of properly acclimated solid strip flooring (within 2 percentage points of solid plank flooring). That is, if the properly acclimated strip flooring is at 9 percent, the subfloor should have no less than 5 percent moisture content and no more than 13 percent. Solid strip and plank flooring require a felt paper membrane between the floor and subfloor.
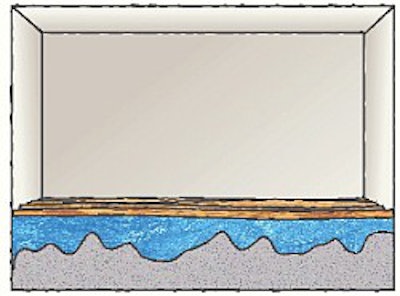
All concrete surfaces, regardless of age or grade level, will emit or conduct some degree of moisture, usually in the form of a vapor. This is a natural function of concrete. However, too much moisture emission without a proper moisture barrier has resulted in flooring failures. Therefore, all slabs should be tested for moisture before the floor's installation.
Both on-grade or below-grade slabs need time to both cure and dry out enough to handle flooring. General guidelines suggest that 60 days is sufficient for the curing to occur, and floors can be installed after this. These guidelines, however, are influenced by a number of variables, and should not be used as the sole criterion as to whether or not it is safe to install a floor. Above grade slabs poured in metal pans take significantly longer to dry and have been known to require several months to well over a year to be safe for wood flooring installation. Since drying times are influenced by many factors, it is necessary to conduct proper moisture tests, regardless of the slab age or grade level.
Because moisture can rise through concrete by capillary action, moisture-vapor barriers and moisture retarders need to be part of the installation process. Laid between the base of gravel or crushed stone and the slab, this barrier is usually in the form of heavy plastic, uninterrupted film. This film prevents the penetration of moisture through the slab to the interior surface, where it can ultimately damage hardwood floors.
Additionally, another moisture barrier or retarder should be placed on top of the slab before installation. A few choices for the barrier are:
- Low-end PVC vinyl applied over the slab in multipurpose adhesive with seams sealed and the surface prepared before spreading the wood adhesive. The use of this method requires dependence upon the water-soluble, multipurpose bond in the presence of moisture and wood adhesives that are accepted over vinyl. This may also require a vinyl blocker.
- Polyfilm — 6- or 8-mil polyethelene film in 36-inch or 48-inch-wide rolls — applied over a "skim" coat of asphalt mastic. The mastic should be troweled with a straightedge trowel to skim coat the slab, with coverage of about 80-100 square feet per gallon. After about 30 minutes, during which the solvents flash or evaporate, the polyfilm can be rolled over the mastic by walking over the film, embedding it in the mastic. Air bubbles that form under the film can be forced out toward the seams with a push broom.
- 15-pound roofing felt in asphalt mastic applied with a notched trowel at the rate of 50 square feet per gallon. A second similar coating of mastic and asphalt felt should be added, with overlaps staggered to achieve a more even thickness.
There are several other moisture barrier systems available, including two-part epoxy, rubberized elastomeric membrane, and other sealing liquids.
Some manufacturers have introduced chemical systems designed to speed the curing process and also to seal the concrete to prevent excess moisture from migrating into the subfloor and finished wood flooring.
In all cases, installers must verify acceptability of a particular system with the flooring manufacturer, and also verify adhesive compatibility when planning to glue down over any moisture barrier. If you are not familiar with the system, check with the adhesive manufacturer, the flooring manufacturer and the manufacturer of the moisture barrier system before attempting an installation.
ACCEPTABLE SUBFLOORS
Wood subfloors: The National Wood Flooring Association's Installation Guidelines specify that wood subfloors must be "flat, dry, sound, clean and free of squeaks and protruding nails/staples." The specification for flatness, as defined in the Guidelines, is a height variation of no more than 3/16-inch in 10 feet. High spots must be spot sanded, while low spots should be shimmed. The specification for dryness is a subfloor moisture content that measures within 4 percent of the properly acclimated wood flooring.
Preferred wood subflooring material includes 3/4-inch CDX-grade plywood or 23/32-inch underlayment-grade OSB. The minimum acceptable wood subfloor material, according to NWFA guidelines, is 5/8-inch CDX-grade plywood.
The 3/4-inch CDX-grade plywood and 23/32-inch underlayment-grade OSB should be installed over joists, 16 inches on center. If they are laid over joists 19.2 inches on center, NWFA guidelines require an additional layer of 1/2-inch underlayment, overlaid cross-direction, or blocking between the joists with 2x4 or wider boards every 16 inches.
Similarly, 5/8-inch CDX-grade plywood laid over 16-inch on-center joists requires an additional layer of 1/2-inch underlayment, cross-laid, or 2x4 blocking between the joists.
NWFA guidelines also accept a third type of wood underlayment — 1x6 boards laid diagonally over joists. The guidelines specify that all subfloor joints must rest on and be nailed into joists, with two 8d nails per joint.
In all cases, NWFA guidelines specify that the subfloor be moisture-tested to ensure that the moisture content of the subfloor is within specifications.
Also, while NWFA guidelines specify widely accepted practices, the association dictates that manufacturers' recommendations on subfloor preparation take precedence over NWFA guidelines.
Concrete subfloors: NWFA guidelines specify that concrete subfloors must be "flat, dry, sound, clean and free of abrupt highs and lows." The specification for flatness is defined as a height variation of no more than 3/16-inch in 10 feet. High spots should be ground down with 20-grit (#31/2) paper, while low spots should be shimmed. The specification for dryness dictates that emission of moisture vapor from the slab shall not exceed 3 pounds per 1,000 square feet per 24 hours. According to NWFA Technical Publication No. A100, Water & Wood, concrete should be a minimum of 60 days old before wood flooring is installed on top, unless moisture testing indicates acceptable moisture content before that time. The publication also notes that moisture testing should not begin until the slab is at least 30 days old.
Engineered flooring can be glued directly to concrete, but nail-down solid strip flooring must have an approved subfloor over the concrete. It cannot be nailed directly into concrete. Also, a moisture barrier is required anytime solid wood flooring is installed over concrete.
In all cases, installation over concrete requires moisture testing of the concrete slab to ensure that the concrete is dry within specifications before installation can proceed. It may also be necessary to add a moisture barrier between the concrete slab and the subfloor. As always, NWFA guidelines dictate that manufacturers' recommendations on subfloor preparation and installation take precedence. However, these are a few widely accepted subfloor systems for installation over concrete:
Subfloor-floated: This technique requires two layers of 1/2-inch CDX-grade plywood. Loose-lay the first layer over the slab (or over the moisture barrier above the slab), with 1/4-inch expansion gaps between the sheets; lay the second layer perpendicular to the first, with 1/4-inch expansion gaps between the sheets and a 3/4-inch gap at all vertical obstructions (walls and fireplace hearths, for example). Staple, nail or screw the second layer to the first layer, 12 inches on center.
Glue-down underlayment: In this system, use 5/8-inch (minimum) or 3/4-inch (preferred) CDX-grade plywood, laid in mastic over the concrete or moisture barrier. Apply the mastic with a notched trowel. Allow 1/8- to 1/4-inch gaps between the plywood sheets, and a 3/4-inch gap at all vertical obstructions.
Nail-down underlayment: Using CDX-grade plywood (5/8-inch minimum, 3/4-inch preferred), nail the subfloor into the concrete, fastened every 12 inches around the border and every 12 inches on center (32 shots per 4x8 sheet). Allow 1/4- to 1/2-inch gaps between the plywood sheets, and a 3/4-inch gap at all vertical obstructions.
Screeds: The screed system requires the use of 2x4 or 2x3 Group 1, density-pressure-treated, kiln-dried lumber, 18 to 48 inches in length. The screed should not exceed 12 percent moisture content. Set the screeds in rivers of cold-bond mastic or other approved adhesive, and offset the end joints 3 to 4 inches. Lay the screeds 12 inches on center, at right angles to the direction that you will be laying the finished floor. Leave a 3/4-inch expansion gap at all vertical obstructions. Lay 6 or 8-mil poly film over the screeds. For 5/16- and 1/2-inch solid strip flooring, you will also need to lay an approved underlayment (refer to manufacturers' recommendations) over the screeds.
TESTING FOR MOISTURE
Hand-held electronic tools, called moisture meters, should be part of the toolbox of every flooring contractor, for measuring moisture in subfloors and floors. Similarly, calcium-chloride test kits should be part of the routine for measuring moisture in concrete slabs.
Moisture meters have many purposes. They can determine if floorboards are dry enough for an installation to proceed. They can allow subfloors and concrete to be checked for high moisture levels; they can help determine when a second coat of water-based finish can be applied; they can aid in assessing water damage.
There are two main types of meters — probe and pinless.
The probe type measures electrical resistance across opposed sets of pins, which are pushed into the wood. The higher the moisture content, the lower the resistance.
Signal penetration for pinless meters is up to 1 inch for both hardwood and softwood. The meter can be moved across the surface to identify pockets of moisture in a wood block or plank.
Testing wood subfloors: Wood subfloors are actually easy to check for moisture content. Just test for moisture at several locations in the room and average the results. In most regions, a dry subfloor that is ready to work on has a moisture content of 12 percent or lower. If excessively high readings are obtained, installation should not proceed until the origin of the moisture is identified and moisture problems are remedied. During the winter, an overly moist subfloor can be dried out by running the heat for a few weeks. Air-conditioning during the summer will do the same thing.
Testing concrete: Concrete slabs must meet a moisture specification when tested in accordance with the prescribed procedures, at the time of installation of the flooring.
Rely on flooring manufacturers' recommendations for your definition of what qualifies as "acceptable moisture content," as well as for which type of moisture testing each manufacturer prefers.
Testing for moisture in concrete can be accomplished using specially designed and calibrated moisture meters, and there are also several types of physical tests that can be used. The most common types of tests are discussed below. All tests should be done at several different locations in a room — typically along exterior walls and walls with plumbing enclosures, as well as over mechanical chases.
For more details on testing concrete for moisture, see "Concrete Evidence," June/July 1998, p. 81.
OVER RADIANT HEAT
Radiant heat beneath wood flooring involves tubing in concrete, or tubing under plywood subfloors.
The most important factor in a successful wood flooring installation over radiant heat is a dry slab and a dry subfloor. The only sure way to dry a slab and subfloor system is to turn on the radiant heating system before installing the wood flooring. If this isn't done, moisture left in the slab will enter the wood flooring as soon as the heat is turned on. The result is floors that will expand, contract, shrink, crack, cup and bow excessively.
Opinions on the amount of time required vary widely. Some say the heating system should be turned on at least 72 hours before installation, with a preferred time of five to six days. That assumes that the slab has been in place for at least 60 days. If the slab is relatively new, the heating system should be turned on for 30 to 60 days before installing wood floors. As always, follow the recommendations of your wood flooring manufacturer.
BENEATH THE SURFACE
What your customer sees, of course, is the finished wood floor, so you are right to take the time and effort required to ensure that the visible surface reflects the natural beauty of wood. As a wood flooring professional, however, you know that the unseen subfloor is just as critical to the floor's long-term strength and appearance. For that reason, you invest at least as much time and effort in making sure that subfloor is everything it needs to be. And you know that beneath the surface of those simple-sounding words — "clean, dry and flat" — lies a deep foundation of detail.