Most contractors are familiar with the scenario: You've spent weeks at a job site installing wood floors throughout the whole first floor of a remodeled home. The floor has been installed, sanded, stained and finished, and it looks great. Now all you need is that check — a large check.
The problem is, you're not getting it. The home owner found one board in the middle of the living room that she doesn't like, and because of that one little board, you're not getting your money.
Now is not the time to argue. You need to fix the floor, and it would help if you could still manage to make money on this job. Patching that spot with a new board, resanding, restaining and refinishing the whole floor all over again is an unappealing option. Fortunately, you don't have to. You already have the tools to replace that annoying board and blend the new one into the rest of the floor without anyone ever knowing you were there.
What's holding up your paycheck doesn't have to be an aberrant board. Maybe your rookie installer didn't notice a red oak board that somehow slipped into a white oak floor. Perhaps the plumber dropped a wrench and dented a board. Or, your customer calls you three years later because she finds a cigarette burn in one board after her dinner party.
The key in any one of these repairs is to make sure it's just that — a repair. That means there are no top nails, even little ones covered with putty, and the stain and finish blend in with the rest of the floor. There are plenty of wood floor contractors who know how to patch a few boards, but not too many who are capable of repairs.
The following steps show how to do the repair in a way that's relatively easy and, when completed, undetectable. The steps can be used for a floor that's prefinished or unfinished, stained or not. The most important key to success may be a little patience, as rushing through the job is sure to cause a repair that spreads farther across the floor. In my next article, we'll look at how to do a stain repair on the same floor. [Also see this article about doing a board repair on a prefinished floor.]
Necessary materials:
- replacement board(s)
- two-part epoxy
- large scrap of cardboard, carpet, etc.
Necessary tools:
- chop saw
- circular saw with a thin-kerfed, sharp,carbide-tipped blade
- hammer
- nail set
- nail puller
- epoxy gun
- block plane
- sharp chisel
- utility knife
- nailer (if possible)
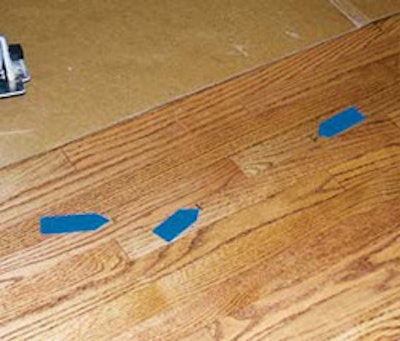
Step 1:

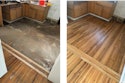
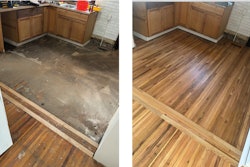
Only after this floor was stained was it damaged by several dents. Now the only option is to remove the boards and blend the repair into the rest of the floor. Identify and mark the board that is to be repaired.
Step 2:

Use a circular saw to make several cuts. Here, the correct depth of the saw blade is double-checked. Ideally, a 24-tooth saw blade is used. Note that the undamaged floor is protected by a piece of cardboard. (Old carpeting would also serve the same purpose.) To further protect the floor, the bottom of the circular saw could be covered with tape.
Step 3:

The saw is used to make two long cuts to the outer edge of each board. (Cut in 3/8 inch from each side of the board. That should be the right distance to cut the heads off any fasteners through the tongue).
Note the safe position used to cut with the circular saw — to the side of it. Kneeling directly behind it could cause dire damage if the saw kicks back.
If the floor being repaired is in a very old building, the floor may have been installed with hard case nails. Don't ever attempt to cut through them with the saw, as it will only kick back.
Step 4:

Make a diagonal cut between the two parallel cuts in each board, being careful not to cut into surrounding boards.
Step 5:

Pick out the loose board pieces, then use the chisel to carefully separate the remaining pieces from the surrounding boards. Be careful to tap away from surrounding boards to avoid causing a larger repair.
Once all the debris is cleared, either pull out or set the fasteners that were cut off by the circular saw.
Step 6:

For your replacement boards, choose boards of the same specie and similar grain pattern as the ones you removed. Examine the boards for straightness and correct milling. Measure them precisely — here, a razor knife is used to mark the cut. The tongue end of the board will be removed.
Use a chop saw to make the cut, tipping the board up on edge to cut it. That position prevents the chop saw blade from flaring out and allows for a truer cut than if the board is cut laying flat.
Step 7:


In order for the board to go in, the bottom of the groove needs to be removed. The razor knife is used to score along the bottom of the groove, which is then knocked off. Placing another board along the edge of the groove and whacking it with a hammer can help the process. As always, be careful not to damage the floor below in the process.
Step 8:

With the bottom of the groove knocked off, use a planer to finish the job. Note in the photo above, that the planer is being used over the protected area of the floor, preventing even more damage.
Step 9:

Use a chop saw to knock off the bottom on the board's grooved end.
Then, on the side where you made your original cut, make a cut at a 45-degree angle (as shown above), which will allow the board to fit in more readily. Be careful not to angle the cut too close to the top of the wear layer, or it will leave a gap when the board is sanded down to the level of the rest of the floor.
Step 10:

Each board has been dry-fit (not knocking it in quite all the way) to make sure it will go in. Once the epoxy is applied, there won't be much time to mess around with further adjustments. Where a long board has been removed, it can be easier to put in two short boards rather than one long one, as shown here. (Remember to check for joint spacing.) Also, if many boards are being removed, remove and repair only one at a time. If all are removed at once, the pressure of the floor may shrink the gap too much to do the repair.
Step 11:

Use two-part epoxy on top of the tongues and at the end matches. Epoxy has various set-up times. Here, five minute epoxy is being used, allowing enough time to do the repair but still set up fairly quickly. That allows you to return almost immediately to sand the floor. Regular wood glue can be used, but requires a wait of 24 to 48 hours before you can sand the floor.
Step 12:

The epoxy is also applied to the top of the end match. Note that the epoxy is being used to attach the boards to each other, not the subfloor. This will allow the boards to move with the rest of the floor.
Step 13:

It may be necessary to use the hammer to nudge the board into place. Use a scrap board on top of the replacement board to do this without damaging the floor. Wherever possible, nail the board to make it as secure as possible.
Step 14:

Now the boards are in — with no top-nails — and in about 20 minutes they will be ready to be sanded and stained. If this were a prefinished floor, the repair would now be complete.