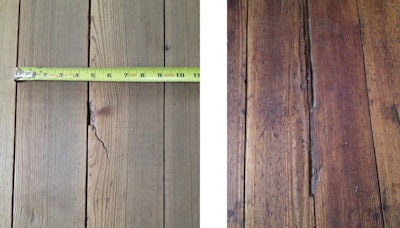
Let me be specific from the get-go about what type of flooring repair the "Dutchman" method best addresses. The Dutchman works best on specific spots of structural damage or aging issues with the wood. Splitting, checks and splintering are some of the best examples. I’m not talking about animal urine stains, long indentations or watermarks. Those fall into a different category.
The traditional method of handling the repairs I’m talking about usually involve ripping out at least one or more boards just to address the damaged spot. When you install the replacement wood, you often have to trim off the tongue and groove in order to get the piece to fit. Like it or not, this creates a weak spot because you’ve compromised the holding power of the tongue, groove and nail (or staple) holding it all in place. If the repair takes place before sanding, matching isn’t a problem. But what about doing repair work after the finish work is done? Sanding and matching that to the surrounding floor pretty much sucks all the fun out of refinishing a wood floor.
Properly executed, the Dutchman offers the following options:
• You only repair the damaged spot and don’t remove whole boards.
• It may be done before sanding, during sanding or after sanding and finishing the floors.
• Since you’re not removing any whole pieces of flooring, the structural integrity remains intact. You’re not cutting through nails or staples with a circular saw. This is a huge plus.
• If you like, you can select repair pieces that offer similar grain to help them blend in better.
• Color matching is less of a problem, as that is done before you drop in the repair piece.
• Matching the finish is easier since you’re only matching the finish on one specific piece and not trying to deal with sanding after the fact.
Anatomy of a Dutchman Repair
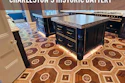
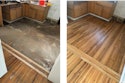
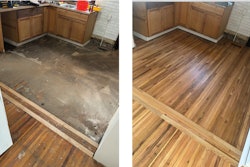
These are photos from a house built in 1788 with the original pine floors that had never been sanded and the restoration was not going to involve sanding. In the photos, you see wood that has split for a variety of reasons.

In the photo on the left, the old finish has been removed and the wood is waiting to be oiled. On the right, the old finish has been removed and the floor is oiled, so we are well into the finish process.


Treat Yourself to a Dutchman
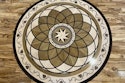
Not all damage to a wood floor will require a Dutchman, but if it is an option, I’d strongly advise you to consider it. I don’t have the skill set required for this work but I do know those do and I plan it out well in advance. Prior to starting the repairs, I make sure the replacement stock is ready to go. It can go in raw if there’s sanding afterward or completely finished if the job has been completed. With good planning and coordination, my repair guy is able to knock out six to eight a day, and we rarely need that much repair. This is a tremendous option to have and really gives me more flexibility on my projects. Let me leave you with a few other shots of Dutchman repairs on other projects.