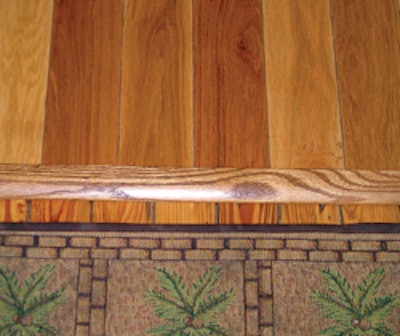
 Reducers are one of the finishing touches that complete a job.
There's more to a good wood flooring installation than just racking the floor correctly and banging it in. A good floor man also pays attention to the details, and part of those details are the transition strips that connect the wood floor to the other floor coverings in the home. One essential transition strip is the reducer, and, fortunately, it's a simple thing to make using tools you already have on hand.
Necessary tools and supplies:
- 3 1/4 -inch flooring
- table saw
- push stick
- eye protection
- clamp
- block plane
- hand-scraper
- file
- sandpaper
- tape measure
- pencil
- chop saw (optional)
- 5-minute epoxy
- 1 1/2 -inch nails
- nail gun
Step 1:

First, select a 3 1/2 -inch-wide piece of flooring to match the existing material. The board should be one foot longer than you will need for the doorway. In this example, I am working with a standard 32-inch doorway, so I need a 44-inch board.
Step 2:

Cut the tongue side off. To do this, set the saw blade to break through 1/4 inch higher than the board. This is a safety precaution—in the event your finger would come into contact with the blade, it would prevent loss of the entire finger. Always use a push stick and eye protection when working with a table saw.
Step 3:

Next, raise the blade to less than the width of the board.
Step 4:

Set the blade to 15 degrees. Move the rip fence in to within 1/4 inch of the blade. Cut the board with the flat side down, which is the side where the tongue was removed. Run the board through slowly to help prevent blade marks.
Step 5:

Plane off the sharp edges on the front of the transition strip.
Step 6:

Use a hand-scraper to eliminate any blade marks. If needed, use the file to get a sharp edge on the scraper.
Step 7:

Use 80-grit sandpaper to hand-sand the board smooth and to create a rounded front edge, as well.
Step 8:

Measure your board to the width of the doorway.
Step 9:

Cut the board to the necessary width using a table saw or chop saw. If using a table saw, be sure to adjust the height of the blade so it's only 1/4 inch above the board.
Step 10:

Here, I've stained and finished the reducer to match the existing floor, and it's ready to be installed.
Step 11:

On the job site, reducers can be installed using 5-minute epoxy and then secured with a nail gun and 1 1/2-inch nails.