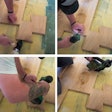

Installing a wood floor may be manual labor, but successful wood flooring installers are always using their eyes and minds as well as their hands. T
hey analyze the room shape and focal points to determine how the flooring should be laid, dutifully check moisure contents of the subfloor and wood flooring, analyze the look of the whole floor as it's being installed, and have quality tools and products that they use correctly.
ACCLIMATION
For solid products, a successful installation begins by dropping off the wood flooring at the job site and opening the bundles at least four days before the installation is to begin. (This period of time may vary from region to region.) The wood flooring should not be dropped off unless the structure is enclosed, the HVAC system has been operating for at least 48 hours, and all wet trades such as painting and plastering are completed. Otherwise, the flooring may absorb excess moisture from its environment, causing it to expand, and then shrink after the flooring is installed, leaving cracks. Before installation begins, measurements with a moisture meter should reveal that the wood flooring and subfloor are within 4 percentage points of each other.
LAYOUT
Ideally, solid strip flooring should be installed perpendicular to the joists or on a diagonal. If the flooring is to be laid parallel to the floor joists, an additional layer of plywood subfloor (with a minimum thickness of 3/8 inch) should be used. If you are going to use a moisture retarder such as 15-pound felt paper, make sure it overlaps in the correct direction so as not to hang up pieces of flooring as you slide them toward your starter board.
To determine where on the floor to begin installation, snap a chalk line through the center of the room. Do this by measuring two opposite walls and using the middle point of each as end points for this line (Line Y).
You may also want to snap lines marking where the joists are, since you will want to nail into these joists for your starter boards and nail into them as often as possible throughout the room.
RACKING OUT
Begin the racking process by nailing a straightedge onto the subfloor on Line Y. Blind-nail the first row of boards against the straightedge, with the tongues facing away from the straight edge. Then begin to rack out the rest of the floor. (Before breaking your bundle, make sure the tongues are facing the right direction — otherwise you'll have to turn every piece of flooring.) It is wise to mix flooring from different bundles, but never mix flooring from different manufacturers — the profiles maybe slightly different.
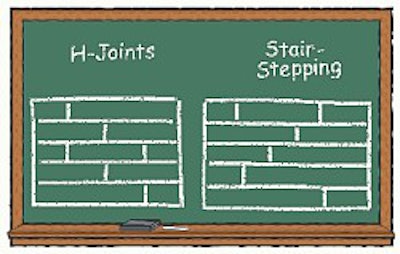
There are several important basics in racking. First, end joints in adjoining rows should typically be separated by at least 6 inches. You can use the length of your mallet head to estimate this distance. Avoid "H-joints," in which end joints separated by one row of flooring line up. "Stair-stepping," in which end joints are staggered such that they look like stairs, also should be avoided.
Remember to leave expansion space at the perimeter of the room. A good guide is to leave as much expansion space as the thickness of the flooring, i.e., a typical 3/4-inch strip floor would be surrounded by a 3/4-inch expansion space on all sides. It may be necessary to rip the last board to fit.
While racking, pay attention not only to end joints, but also to the overall appearance of the floor. A concentration of shorts in one area of the floor may stick out to the home owner. Likewise, one board that looks drastically different from the rest of the floor may need to be removed later at the customer's request, so save yourself the time and trouble now by not installing it.

FASTENING IT
With the floor racked and cut to fit, begin nailing it in. Follow the flooring manufacturer's recommendations for the nailing schedule as far as types of fasteners to use and fastener spacing. Recommendations for 3/4-inch strip usually call for nails 8 to 10 inches apart (with a minimum of two nails in shorts). (See the Nailing Schedule above.) Not using enough nails can contribute to cracks between boards, as well as squeaks and other floor noise.
If you are using a pneumatic nailer, pay careful attention to the pressure setting in your air compressor. Setting it too high can cause too much force, breaking off the tongues from the flooring. Also note that if you are installing prefinished flooring, a white mallet head, which won't mark the flooring, is necessary.
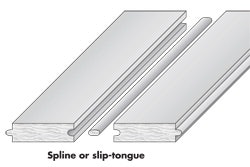
When you reach the last few runs of flooring against the wall, blind nail them through the tongue by hand. Predrilling holes may help avoid splitting the tongue. When you get too close to the wall to blindnail, you will need to top-nail them. Use an offset crowbar or lever device to tighten these last few rows of flooring while nailing them. Remember to countersink these nails before sanding. When one half of the room is done, insert a spline (also called"slip-tongue") into the starter board, glue it, nail it, and continue nailing on the other side. Because wood floors usually expand with humidity in the direction of the tongue, using this approach allows the floors to expand in two directions.
If the floor is long enough that two installers are nailing at the same time, be sure they switch sides periodically — the different force each uses can cause the floor to become unevenly spaced. Also, don't use nailers or fasteners of different types. Manual and pneumatic nailers exert different forces on the floor,and various fasteners have different holding characteristics.
Another concern with large floors — for example, those wider than 20 feet — is expansion space. If the installation has been started from one side of the room instead of in the center, you may want to add washer spacers about every 12 boards to accommodate changes in humidity.
COMPLETING THE JOB
After installation is complete, it is a good practice to wait a minimum of one week for further acclimation before sanding and finishing should begin (again, this can vary from region to region). As always, having the patience to take extra time at this step can save aggravation later down the line.
For basics on installing glue-down flooring, look for the Back to Basics article in our June/July 1999 issue.


