
 Todd Hiester
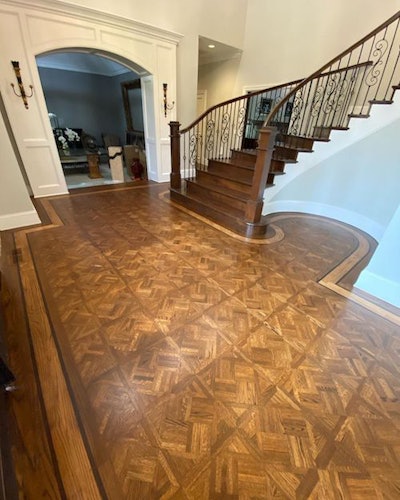
The red oak border around the parquet field, first installed in the mid-1990s, originally stopped dead in its tracks at the stairway’s curved base.
Hiester isn’t sure why the original installers didn’t continue the border, but suspects they wanted to avoid bending around the stairs. Regardless of the reason, he offered to remedy the situation, and the homeowners, who’d tapped the crew at Fresno, Calif.-based The Wood Floor Guys for a repair and refinish, agreed. “They just kind of trusted us the whole way,” Hiester says.
As Hiester began gluing strips of red oak together to bend, however, he began to understand why the original installers possibly decided just to nix it. “It's a very tight radius,” Hiester says. “So the glue-up was really, really difficult. After I got about 25% of the way through, I kind of abandoned the bending.” But he didn’t abandon the challenge; instead, he grabbed his jig saw.
"Everything is trial and error,” he says. “I just set up a little radius jig where I could draw the pattern onto the wood I was cutting and then just try to stay on the line with my jig saw."
The gambit paid off, and he cut the rest of the red oak pieces on site and dry-fit them in place with the pieces he'd been able to bend. From there, he cleaned up his lines with a disc grinder, then installed the red oak and ¾-inch walnut feature strips using nails and adhesive.
With the border complete, they did a few repairs on the rest of the 800-square-foot floor before bringing out the 12-inch drum sander. They used the big machine sparingly on the 5/16-inch parquet field, which had been raised up with an underlayment to meet the ¾-inch edges. They started with a 50-grit and ended on 120-grit.
Then they water-popped everything except the borders so they would absorb less stain and stand out even more.
The staining involved a mixture of brown with a hint of red to match with the staircase. The Wood Floor Guys applied a coat of oil-based finish, followed by two satin topcoats. They also replaced the metal vents in the house with wood vents, which Hiester modified to carry the border pattern right through. “All I did there was use a little bit of wood dye to dye a walnut-looking stripe through them,” Hiester says of the vents. “It’s a pretty easy little trick.”
RELATED: Wood Floor of the Week: Hickory Install in Mansion Mirrors the Ceiling
The project took three times longer than Hiester originally thought due to the tricky border, but, as a craftsman, he takes that in stride.
"On some of my work shirts I have a saying that goes, 'Relentless pursuit of craftsmanship,'” he says. “And I feel like you have to be pretty tenacious to want to do this kind of work, and you have to power through the difficulties. And you may lose time, and you may lose some money in the process, but what you gain is wisdom, and you're all the wiser to use that knowledge in the future."
Suppliers:
Adhesive: Titebond | Abrasives: 3M | Big machine, Buffer: American Sanders | Nailer, Saws: DeWalt
 The original installers of this floor didn't continue the border in front of the stairway. The Wood Floor Guys decided to fix that.