
If you asked 10 contractors how to run an edger, you wouldn't be surprised to get 10 different answers. That's why it's so important that you understand the basics of how and where an edger cuts, and also how to set up the edger so it works for your own edger technique. Once you understand that, you can use it to your advantage for the most efficient cut and, most importantly, for hiding your scratch pattern.
Following are some guidelines that will help you understand edger setup. I also highly recommend you watch the process at your local distributor or at one of the manufacturer- or NWFA-sponsored schools.
Keep in mind that no matter how accurately your edger is set up, it won't run well if you don't do simple maintenance. For maximum dust pick-up, always blow the dust out of the edger at the end of the day, and clean the bag thoroughly after each use. Make sure that when it isn't in use, the edger is never stored resting on its pad. Also, follow the manufacturer's directions for changing carbon brushes, bearings and lubrication. When necessary, get the edger serviced at an authorized service center.
Necessary tools and supplies:
- Edger
- New edger pad
- 100-grit sandpaper
- Wrench
- Wood dust or chalk
- Sample wood floor
Step 1:

It's important to recognize that the area of the pad that comes in contact with the floor is only about the size of a quarter (toe-kick edgers have a less aggressive cut and a slightly larger contact area). During setup, we talk about "clocking" the edger. This refers to where that contact point is. Most edgers are set up at the factory in a neutral position, or "noon" (assuming the operator is standing behind the machine).
Step 2a:

So that there is only that small contact area, edgers also must be set up to have the correct pitch—the front of the edger should sit closer to the floor than the back of the machine. If the edger pad were set up to be flat, contacting the floor everywhere, it would be uncontrollable.
Step 2b:

The first step to setting up the edger is to get this correct pitch. With no abrasive and no bolt in the edger, set the back of the machine to the correct height. This varies slightly with each manufacturer's edger, so ask for the manufacturer's suggestion. In this example, I rest the back of the machine on three pennies, then adjust the cams so the wheels put the machine at this height.
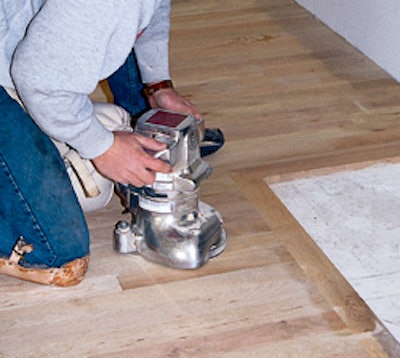
Step 3:

If your machine has a metal pad, all you need to do is clock the edger (skip ahead to Step 8), and you're done. If it has a rubber pad, you need to "dress" the pad to eliminate highs and lows that occur due to the heat during the manufacturing of the pad. Every time you replace the pad on your edger, you must "marry" the pad to the machine. To start, cover the bottom of the machine with sawdust or chalk.
Step 4:

Then, you'll need a surface covered with 100-grit sandpaper. Making sure both edger wheels are on the abrasive, briefly run the machine over the sandpaper. Move the edger as you run it to avoid overheating the pad. My goal on this pad is to have the first three rings of the rubber pad hitting the abrasive, which is about the size of the quarter I talked about earlier. As you can see, I'm not there yet.
Step 5:

To help even it out, I need to make sure I get the center of the pad. To do this, set the machine on the abrasive board with the wheels hanging over the edge, turn the machine on, and briefly set the front of the edger down on the abrasive. Turn the machine off and quickly knock out or vacuum out the rubber chunks from the pad before they harden.
Step 6:

Cover the pad with sawdust or chalk again. With the wheels back on the abrasive, run the edger on the sandpaper again, moving the machine as you go. Now, you can see I have the even three-ring cut I'm after.
Step 7:

Now I'm ready to test the machine with abrasive on our sample floor. You can see that I'm getting a perfect quarter-sized cut at the noon position. When correctly set, the machine should run so smoothly that you can run it with only one hand.
Step 8:

Different contractors prefer different clocking for their edgers. Now that the machine is set up at the neutral noon position and the pad is correctly dressed, all that's left is to clock the edger by adjusting the right caster up or down. To get closer to a one o'clock cut, the right side should be lowered. For an 11:30 position, which allows the edger to cut the closest to the wall, the right side should be raised slightly.
Edger Pad Life
Many contractors don't realize that the life of a rubber edger pad is typically only four to six months. When you can see the metal on the edge of the pad, the pad must be replaced (just adding more layers of abrasives, as some contractors do, is not a solution). Damage to the pad, such as this chunk missing due to hitting a nail, can cause chatter and other floor imperfections. Remember, every time you replace a pad, you must dress it for that specific edger. |

[For a video on how to set up the B2 edger, go to this post on the HF Contractor Blog.]