
Most contractors have been in this predicament more than once: They apply the last coat of finish, thinking the job's done and the check is on the way. Then, they get the phone call that there's a problem spot on the floor. Whether it's a footprint, a hair, or some dust that made its way onto the topcoat, the culprit needs to be removed before the homeowner writes the check.
The first thing to do is determine the severity of the problem. If it's a scratch all the way down to the wood, that's a major repair. If the problem is only in the finish, however, the repair can be relatively easy and painless as long as the correct procedures are followed.
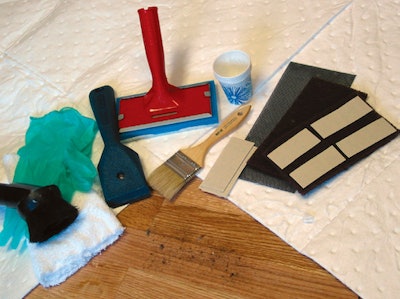
Necessary materials:
- drop cloth or cardboard (floor protection)
- clean, lint-free rag
- abrasives: pads, strips and/or screen
- finish
Necessary tools:
- hand scraper
- vacuum
- brush or applicator pad
Step 1:

Because this problem is debris on top of the last coat of finish, we'll be able to scrape it off and recoat the area. It's always a good idea to clean the area with a recommended floor cleaner. Then, scrape the finish, staying at a slight angle to the floor, working with the grain. Lightly draw the scraper toward you—never putting pressure on the scraper as it moves away from you. As you move to the edges, taper the area to help avoid a distinct line.
Step 2:

Lightly scrape until all the debris appears to be gone, being careful not to scrape all the way down to bare wood. Check visually and by hand that all the debris has been scraped off the finish.
Step 3:

Vacuum the area to remove any grit that would cause scratches during the next step—sanding. Using a brush attachment on the vacuum helps avoid scratching the floor.
Step 4:


Scraper marks tend to show through finish. To avoid that, the floor should be abraded. Use the recommended abrasive for use between coats of the finish. Abrasives typically used include either a pad-and-strip system, or a piece of a screen backed by a pad.
Step 5:


Abrade the floor. Apply light pressure with your palm, not your fingertips, which would cause small ridges and valleys in the finish. Feather out around the edges 2 to 3 inches past the scraper area.
Step 6:

Vacuum the area again, and carefully check the floor visually and by hand.
Step 7:

Now it's time to tack the floor using a lightly dampened rag. To dampen the rag, follow the finish manufacturer's recommendations—usually water for waterborne finish, and mineral spirits for oil-modified polyurethane.

Step 8:

Before applying finish, make sure the floor has dried completely. You can use fans to accelerate drying. Then, mix the finish well to evenly distribute flattening agents. Pour a small amount of finish into the center of the work area.
Here, a small paper cup is used to pour the finish. Be sure not to use cups with a wax lining, which could cause contamination.
Step 9:

Brush from the middle of the repair to the outer edge, tapering out so the finish is thinner near the edge. This helps avoid creating the appearance of a ridge or halo. (Some contractors further prevent that by carefully taping off the initial repair area at board edges and end joints, helping to camouflage finish marks.) If a large amount of finish had to be scraped off, use several thin coats of finish—don't try to use one thick coat.
Step 10:

Once the finish is dry, this repair is indistinguishable from the rest of the floor. Finish repairs on floors that had aged longer may take a little time to age and blend in completely with the rest of the floor.
And Beyond...

This same technique applies to other types of finish repairs, whether they are footprints or other blemishes in the finish. Scratches that don't go all the way down to the wood can be repaired this way, skipping the scraper step and going straight to the abrasive.
Remember to use the proper safety equipment at all times. Use gloves when necessary, especially with catalyzed products, and use respirators when recommended.