
When a new guy joins your crew, what is the first task he's usually stuck with? Besides sweeping and doing other grunt work, I'd bet it's edging. Doing your time on the edger is like an unofficial initiation into being a hardwood flooring contractor. But I would argue that sticking the new guy with the edging isn't the best choice. You can do more damage to a floor with an edger than with just about any other machine, so it's better left to someone who understands it and has had some practice.
Like all sanding equipment, the purpose of the edger is to get the floor flat. Watch 10 different contractors and you'll see 10 different techniques, from the "J" pattern to ovals. Almost any pattern can work if the contractor understands where the machine cuts and how to use that cut to get the floor flat but also blend the cut in with the direction of the grain.
Like I said, there are many different ways to edge. The following steps show one technique I've found that works.
SUPPLY LIST
- Edger
- Edger abrasives
- Pencil
Step 1

No matter how good your technique is, you'll have a bad edging job if you don't pay attention to maintenance. Before you even plug in the machine, I would suggest that on every job, you check the following. First, feel the bottom of the drive pad to make sure there aren't any gouges. Any imperfections will transfer to your floor.
Step 2

Also check that the roller guard spins easily.
Step 3

Check the wheels to make sure they spin easily and that they're clean. Some species that are softer and/or have denser grain, such as maple or Brazilian cherry, may show marks from the edger wheels; in that case, nonmarking urethane caster wheels are available.
Step 4

Simple things like making sure your abrasive is centered on the pad help make a better job.
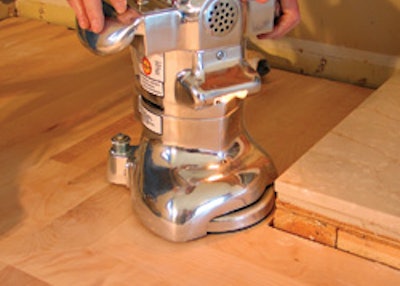
Step 5

Every time you use the edger, think about where the machine is actually cutting. The area on the pad that cuts is only about the size of a quarter, or this bolt. Machines are usually set up to cut at 12 o'clock. If the edger were cutting at the angle shown here, it would cut directly across the grain for maximum flattening, but it would create obvious scratches that need to be blended in.
Step 6

This photo shows how the edger could be clocked to cut close to the direction of the grain and blend the scratch.
Step 7

Your hands are a crucial tool for doing a good job with the edger. Before you edge, you should go over the floor to find any excessive overwood or other problem areas. Marking those areas with a pencil helps identify them while you're edging. While you're running the machine, your edger should be balanced enough that you can run it with one hand and feel the floor with the other hand.
Step 8

Along this wall line, I've marked the line where the big machine stopped. As I edge along this wall, I have three things I need to accomplish: cut down the overwood, blend the cut from the big machine and hide the scratch from the edger.
Step 9

To do this, first I'm going to start by cutting down the overwood. To get as close to the wall as possible, I put the edger at the most aggressive cut— straight across the grain—and travel down the wall line and back, keeping the edger at the same angle to the wall.
Step 10

Now, I clock the edger and follow the same path down the wall and back, moving back half the width of my cut after each pass. With my edger clocked this way (and set up to cut at 12 o'clock), I'm cutting at a 45-degree angle to the sidematch, and my most aggressive cut is going in the direction of the grain.
Step 11

I follow this same pattern until I blend in the area where the big machine stopped (some contractors start from there and work toward the wall, which also works). Since I've been careful to hide the scratch, I'll have to do less hand-scraping and less hand-sanding on this job, saving time, which contractors know translates to money.