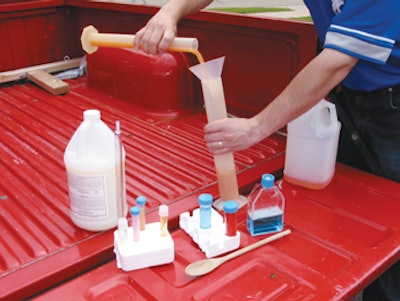

The wood flooring industry is full of amateur chemists. Some wood flooring contractors have been known to create concoctions with their stains and finishes that would make chemists in finish R&D departments cringe. Finish companies collectively have spent millions of dollars testing their products to push the limits of what the finishes can do. All of their expert research means that you don't have to experiment, but some contractors just can't resist.
Whether they're in a rush or they're just trying to save a buck, some contractors are always coming up with ways to make that finish dry faster, spread more easily or go farther. While they may get away with it, sooner or later they'll end up with a wood flooring disaster. Following are some typical scenarios involving wood flooring contractor "tailgate chemisty" and their consequences.
Situation #1: Cross-Brand Applications
After a long day of sanding a big job, you're trying to get the waterborne sealer coat applied before you go home. As you approach the last room, you realize you're going to run short of sealer. There isn't any extra sealer in the van, except for half a gallon of a different manufacturer's product. It's a 45-minute drive to your distributor, which is closed by now anyway, so you take the remaining sealer and mix it with the other half gallon from the van, then complete the sealer coat and go home.
The Consequences: Although both products are sealers, they likely have substantially different chemical compositions. The percentages of everything, from solvents to defoamers to flow and level ingredients, will be wrong, and the two products probably won't emulsify. Most likely, the combination sealer coat won't be able to cure, causing topcoat adhesion failure and possibly impeding the topcoat curing. The sealer also may show areas of cratering and crawling.
Problems result from mixing brands of any type of finish, from oil-modified polyurethane to conversion varnish to stains. Never mix different manufacturers' finishes or stains together.
Next Time: This is simply a case of laziness and poor planning. Make sure you know the square footage for every job, and err on the side of having too much finish in the van instead of too little. If you do run out of finish and there's nowhere to get more, you have no choice but to wait until you can buy more. Find the least obvious spot where you can stop coating and continue the job when you get more of the same finish.
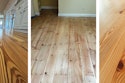
Situation #2: Staining Shortcut
Your customer wants a light brown stain on her red oak floor. You really want to get the stain and the first finish coat on today. You decide to save time by just adding the stain to the sealer coat—a two-in-one application!
The Consequences: Again, this changes the chemistry of the finish. If you attempt this with a waterborne finish, the floor won't appear as if it were stained correctly, and the finish also probably won't dry. It likely will have severe lap marks. When mixing oilbased stain with oil-based finish, the finish may take longer to dry. Once it does dry, the stain will be suspended in the finish, so as the finish wears off, so will the stain, leaving lighter paths in the high-traffic areas of the floor. Since it's difficult to get exactly the same amount of finish over the entire floor, areas with more finish may appear darker than areas with less finish. And, the durability of the finish will likely be diminished, being more prone to scuffing and scratching.
Next Time: Finish manufacturers are constantly trying to figure out ways to save contractors time. Consider this: if there were an easy way to combine stain and sealer to eliminate one entire step in the process, your finish manufacturer would probably be marketing that hot product right now. Until that happens, factor in enough time to do each step in the process correctly. If you don't take the time up front, you will be forced to waste even more time later to fix the problem.
Some water-based finish manufacturers have "amberizers" you can add to finish to make it appear darker. They are not stains, but rather are intended to give water-based finish the look of polyurethane.
Situation #3: Stretching Finish
Money is tight, and finish is expensive.
You decide to thin down your can of polyurethane with mineral spirits to help the finish go farther.
Besides, you figure, thinning it out will help it dry faster, so you can get more jobs done in less time.
The Consequences: Thinning out the finish lowers the solids content of the product, making it less durable. Using anything but virgin mineral spirits also poses a risk of contaminating the finish.
Mineral spirits is a slow-drying solvent, so adding more isn't going to make the finish dry faster. Thinning the finish with gasoline or kerosene doesn't accelerate dry times substantially, either—the mineral spirits put into the finish in the manufacturing process aren't going to dry any faster just because different, quick-drying solvents are added.
Also, by increasing the solvents in the finish, contractors are breaking the law by violating VOC regulations. Manufacturers used to recommend adding a certain amount of mineral spirits to their topcoats to make a sealer coat, but that is no longer a recommended practice.
Next Time: If you can't afford to pay for the finish, you probably should re-examine your pricing structure. When you're scheduling jobs, allow the recommended time for polyurethane to dry, typically at least eight hours.
Situation #4: Extra Water for Your Waterborne
It's the afternoon on a dry, hot day. You need to put a coat of waterborne finish on the wood floor in a beautiful vacation home that has walls of windows showing off the mountain views. You think the finish will set up too fast as you're coating, so you go to the utility sink and add a good helping of water to your finish.
The Consequences: Too much water in the finish can thin the product down so much that it wears badly and has poor chemical resistance. It may change the chemistry of the finish so much that it foams and has bubbles that won't pop and level out.
Also, dry times can be drastically lengthened. The excessive amounts of water will accentuate grain raise and may even cause board swelling.
Next Time: Some manufacturers do allow extra water to be added to their waterborne products to help the product's open time when coating in very dry, hot conditions—refer to the manufacturer of that finish for guidelines on how much can be added.
If you're having problems with the finish setting up too fast and thus creating applicator marks, first take a look at controlling job-site conditions, and examine your technique. Climate control is essential. Remember that the job site should be at normal living conditions, so both temperature and humidity should be within the recommended ranges. Both the finish and the wood floor itself should be at normal temperatures, too. If sunlight is beaming directly onto the wood floor, consider using protective film on the windows. If the job site becomes too hot with the HVAC system off while coating, plan to coat early in the morning or later in the day when the heat isn't as intense. Also, consider keeping your finish in a cooler in the van to prevent it from reaching temperature extremes; most manufacturers recommend that finish be kept between 65 and 80 degrees Fahrenheit.
There are many other reasons for quick dry times and visible lap marks.
The most common is spreading the finish too thin, so pay careful attention to recommended spread rates and the recommended applicator—using the wrong applicator can make it difficult to achieve the correct spread rate. Overworking the product encourages the solvent to evaporate, shortening dry times and usually causing bubbles in the process. Too much air movement on the floor also causes finish to set up quickly.
While coating, all air movement should be turned off. Once the surface of the finish has dried, the HVAC systems should be turned back on, circulating the air and solvents out of the building.
Situation #5: Hurried Hardening
You're going to use a two-part finish with a hardener, and you happen to have an extra container of hardener lying around. So, on your next job, you add extra hardener to the finish, figuring the finish will be even more durable.
The Consequences: A hardener helps make finish harden, but it doesn't make it harder. The finish with extra hardener is likely to set up as you apply it, guaranteeing applicator marks and worse.
Next Time: When using any kind of two-part finish, whether it has a catalyst or hardener, use everything only in the proportions recommended by the manufacturer.
Situation #6: Spirited Solution
Your customer wants a light brown stain on her dining room floor. You have extra stain in the shop that's somewhat darker, so instead of buying the color she wants, you use some mineral spirits to thin down the stain you already have.
The Consequences: Stain manufacturers have a carefully calculated pigment-to-resin ratio. Disturbing that ratio may cause the stain not to work or not to produce the color you expected.
Next Time: Most stain manufacturers offer a neutral base that can be added to stains exactly for this purpose. Depending on the manufacturer, you may be able to mix two colors of stains together to create a custom stain color. However, a problem could arise when you get toward the end of the stain job and realize you didn't mix enough, or when you have to go back on the floor to do a repair. In these situations, make sure you carefully measure and record how much you used of which color. The best and easiest option when staining is to buy the right color of stain to begin with.
Situation #7: Refreshing Old Finish
You're using a two-part finish with a catalyst. This time, you mixed it correctly, but you realize you mixed too much.
Since the open time of the product is four hours, you're going to end up with lots of wasted finish. So, when your next job is ready for finishing tomorrow, you add some fresh finish to the previous day's batch to "refresh" it.
The Consequences: Even with new finish mixed in, this finish probably will feel more viscous than normal, making it difficult to apply, and causing it to flow out poorly. Once it does dry, the finish's wear resistance may be compromised.
Next Time: Some manufacturers' finishes can be "recatalyzed," while others cannot.
Check the recommendations for each specific finish you use.
Also, no one likes to waste product and money, so carefully calculate your coverage rates for each job. Paying attention to exactly how much finish is going on an exact square footage is also a good way to double-check if you're spreading finish too thick or too thin.
Some contractors also try to revive old polyurethane by adding mineral spirits to it. When the product is too old—especially when it has been opened before—it has already begun to cure. Adding more mineral spirits may thin the product down, but it isn't going to reverse that chemical process.
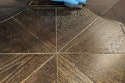
Situation #8: Less is More
Your customer chose a stain from the little sample chips, and you applied it onto his red oak floor. Now he's unhappy with the color, saying it isn't dark enough. You don't want to resand everything, so you apply another coat of stain, figuring the floor will take a little more and end up the color the customer wants. But, the floor still doesn't look dark enough, so the next day, you apply a third coat.
The Consequences: A wood floor can only absorb so much stain, so this floor is not going to get any darker with a third stain application.
Next Time: Some stain manufacturers recommend using two coats of stain, while others recommend only one. Either way, this is an example of failed customer expectations. Don't try to sell stain colors by the tiny samples. Do a large sample on actual pieces of the species and grade of wood flooring you'll be staining, and have customers sign off on their choices. The best way is to stain a sample area on the actual job site with the actual job site lighting for a final check—and have the customer sign off on that—before staining the entire job.
If you take the right precautions and your stain is still the wrong color, you must resand the floor. (Don't add stain into the first finish coat—see Situation #2: Staining Shortcut.)
Situation #9: In the Dark
Your customer wants her stained red oak floor to appear really dark.
Although most of the jobs you've done have a natural finish, you tell her it's no problem. You sand the floor like you usually do, ending with a 120-grit screen, and start applying the stain.
When you wipe off the first part, it doesn't look nearly as dark as you expected. So, you decide to leave the stain on for a whole hour, figuring it will have lots of time to absorb and darken.
The Consequences: It will be nearly impossibly to wipe off the excess pigments on this floor, making finish adhesion problems more likely.
Next Time: Getting a good result with your stain is all about surface preparation and sanding. In this case, ending with a 120-grit screen probably closed off the grain, making it harder for the stain to absorb and probably making the floor appear lighter than it should have. If a dark stain effect is desired, "popping" the grain by going over the floor with a lightly dampened, clean rag or towel, then waiting for the floor to dry, will open up the grain and allow it to absorb the stain for a darker effect.
You may be sick of hearing it, but "always follow manufacturers' directions." When you're tempted to take a shortcut or rush a job, stop to think about all the hard work and all the money that already have gone into that floor, from the wood flooring to the abrasives to your own valuable time and effort. Performing your own amateur chemistry puts all that effort at risk, usually for a minute return of time or money. Wood flooring finish chemists get paid to experiment, but you don't.
Sources for this story included: Barry Nelson, national sales manager, and Randy Wirtz, technical representative, at Glitsa American; Todd Schutte, director of training at BonaKemi USA; Brent Sorbet, national training manager at Basic Coatings; Janet Sullivan, manager—flooring division at Lenmar Inc. and Bill Costello, account manager at Dura Seal.