Stains have been a staple in the wood flooring industry for many years, but today’s wood flooring stains aren’t your daddy’s wood flooring stains. Changes in laws have led to changes in formulations, and the demand for faster dry times also prompted manufacturers to create a new generation of products. In order to use them successfully, it’s essential to understand what they are, how they work and, especially, how to avoid trouble.
What are they?
Stains are made up of four basic components:
1) Carrier: Typically a solvent such as mineral spirits and possibly other co-solvents that make the stain workable.
2) Pigments: These give the stain its color. Throughout history, pigments such as ocher, umber, etc., came from the ground and are commonly referred to as “earth pigments” or “organic pigments.” Today, there are also synthetic pigments, which are finely ground, have better clarity, and are more resistant to color fading. White stains use synthetically created titanium dioxide as a pigment. Most stains today are a mix of organic and synthetic pigments.
3) Binder: Various resins that secure the stain pigment particles to the wood so that the pigment isn’t pulled off while the floor is being coated. These resins also seal the wood to some degree, which is the reason some stains are referred to as a combination stain/sealer. Traditionally the resin in wood flooring stain has had an alkyd resin base with linseed or tung oil formulations, although that has changed for newer stains (more on that later).
4) Drying agents: Stains traditionally dry by reacting with oxygen in the air, transforming the resin binders from a liquid to a solid. Additional drying agents accelerate the reaction of the stain with oxygen. Historically, lead-based dryers were used in stain; but since lead was removed from coatings in 1978, metallic oxides such as copper, cobalt and manganese are used in today’s formulations.
In less-than-ideal drying conditions, some pros may add Japan driers, which are a mix of different drying agents, to attempt to accelerate the drying process. Pros have to be careful about using them, however, as adding too much causes stain to skin over in the container over time and become gel-like; and they can’t be used in all manufacturers’ products. No matter what stain is used, with or without driers, adding air flow directly across the wood floor once the stain is applied helps get the solvent vapors off the surface to speed up the oxidative drying/curing process.
Traditional oil-based stains
Traditional oil-based stains contain a lot of solvents, making them easy to spread and allowing them to penetrate well into the wood. With today’s concerns about VOCs, most traditional stains have had to be reformulated to reduce the amount of solvents and increase the solids—everything that is left behind in the wood after the carrier evaporates. This means today’s traditional stains (not the quick-drying varieties) have more resins and/or oils, and as a result, drying times increase, too. Those stains also may appear to be slightly less deep in color compared with the stains of old.
Stain VOC limitsToday’s national VOC limit in the United States for stains is less than 550 grams/liter. States and regions that are in OTC, LADCO, CARB and SCAQMD areas have implemented a VOC limit of less than 250 g/L with a small-container exemption for stains sold in containers smaller than 1 liter. If sold in a small container, the VOC limit reverts to the national limit of 550 g/L. Canada follows the same VOC limit as the OTC, LADCO, CARB and SCAQMD areas: less than 250 g/L VOC for large containers and less than 550 g/L VOC for containers smaller than 1 liter. |
To facilitate good drying and curing, today’s oil-based stains should be applied keeping in mind that you must avoid leaving too much stain on the wood. If there is too much stain left on the wood, you can experience extended dry times, even when conditions are favorable to drying. In fact, when these new formulations were first on the market, contractors frequently encountered adhesion and drying problems due to coating over stains that weren’t actually dry enough to be coated over safely.
Another essential point with these stains is to not let them sit on the floor for an extended period of time. Wiping them up quickly reduces the chances of them penetrating down into the open areas of the floor, such as gaps between boards, or in the open grain of porous species such as red oak, where they may not be able to dry and can cause bleedback and potential finish peeling (see more on that later). Remember, you want stain on the surface of the wood, not way down into the seams and deep in the grain. If it gets into spots where it isn’t visible, that’s when trouble begins. Also, if the stain is left to sit on the floor for an extended period of time, the carrier will begin to evaporate off and the drying/curing process will begin. The stain will start to thicken up, and it becomes more arduous to remove the excess and achieve an even color.
Quick-drying stains
Traditional stains rely on oxygen as the sole catalyst—meaning they must have exposure to oxygen to dry, and they have relatively slow dry times; typically eight–12 hours for medium brown tones and up to 72 hours for whites or pastels in ideal drying conditions. Today’s quick-drying stains typically consist of oil-modified urethane resins and/or urethane alkyd resins. These use both a drying reaction (with oxygen) and a chemical curing reaction for faster and more consistent dry times compared with traditional linseed oil stains. These quick-drying stains have drastically reduced dry times compared with traditional stains, with typical recommendations of two hours for brown tones and six to eight hours for whites and pastels in good drying conditions. Of course, even with quick-drying stains, it’s always best to err on the side of caution when it comes to dry times, especially when conditions are outside the recommended temperature (60-80°F) and relative humidity (35-75% RH). It’s always a good idea to add extra air flow, too.
Double-staining: Just don’t do itOver the years many wood flooring pros have tried to double-stain a floor when it didn’t turn out dark enough. In the cabinet and millwork industry, where different types of stain products are used, this is done with success … but no one is walking on their cabinets and millwork. With wood flooring products, this is not a good idea, because doing so leaves loose pigments on the floor (this is called “pigment loading”), which can create issues with finish adhesion or color-pull. |
To help avoid wet stain puddling on the floor, as well as to save physical strain and time, many pros now buff their stain on and off (quick-drying formulations are particularly well-adapted for this). The buff on/off method increases spread rates and minimizes excess stain in seams, end joints and soft grain when compared with older methods such as using a lambswool applicator, ragging it on/off, or even T-barring the stain. (For more on buffing on stain, see the sidebar below.)
Water-based stains
Traditional oil-based stains are limited to wood tones and colors from black to white, but water-based stains, with their clear resins that don’t yellow over time, offer a much wider range of brighter colors. The tradeoff is that they can be tricky to apply, with short dry times that may be prone to lap marks for pros who have never worked with them. Pros may find that taping off the floor into manageable sections can help reduce application problems like lap marks.
Dyes
Dyes aren’t stains at all, but they are typically used in conjunction with stains.
Dyes and pigments in stain both color the wood, but the color particles in dyes are many times finer than the pigments in stains, meaning they can penetrate even the densest wood species. Dyes completely dissolve in a carrier to form what is called a solution (in a traditional pigmented stain, the pigment particles do not dissolve in the carrier, but upon stirring form what is called a suspension). Dyes can be made from either organic materials, which are more sensitive to fading, or synthetic, or metallic complex materials that are much more color-fast. Dyes are typically used to create a deeper or more vibrant color beyond what a stain alone can provide.
The dyes used for wood flooring are typically a powder dissolved in a carrier, usually alcohol; an alcohol/water mix; or just water (there are also dyes meant to be dissolved in a solvent or oil, although these are uncommon in the wood flooring industry). Nothing binds the color to the wood, so coating over a dye can dissolve the dye and pull the color when waterborne finishes are applied. To prevent this, dyes are usually coated over with a stain to lock the color onto the wood floor. Because dyes can tend to fade with light exposure, applying stain over a dye helps reduce color fading.
Anecdotally, it seems contractors are talking less about using dyes today than they were even five years ago. One reason may be the multitude of color options offered by all the penetrating oil finish products on the market today. However, contractors still find dyes are a useful option to create colors not possible with stain alone.
Water-popping
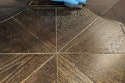
 Wood floors that are stained after water-popping but before the wood has had a chance to completely dry can take on a blotchy look like the appearance of this floor.
In cases where the stain needs to be darker, using a dye (as mentioned earlier) is an option, but many contractors choose instead to water-pop the floor. Water-popping simply means using moisture to open up the grain of the wood, allowing it to accept more stain more evenly; especially across the hard grain. Contractors find that water-popping also can help make the stain appear more consistent and camouflage sanding marks.
Debunking the alcohol water-popping mythMany wood flooring pros add denatured alcohol to their water when water-popping, thinking that will accelerate drying, but that is simply a myth, most experts say. Alcohol will, indeed, evaporate faster than water, but it won’t cause the water in the floor to evaporate any faster. The alcohol doesn’t pop the wood grain (try to pop a wood floor with straight alcohol and see if that works), so adding it to a water-popping mixture offers zero benefit. In fact, when diluting the water with alcohol, you are reducing the amount of water being applied to the floor and essentially thus minimizing the effect of the water-popping. |
Techniques for water-popping run the gamut from using a garden sprayer to sponges; some people spray the floor and then go over each section with a T-bar to ensure uniform wetting of the wood.
The key when water-popping is to let the floor dry completely. Overnight should be enough time in all but the most extreme, high-humidity conditions. (One caution with letting the floor sit overnight: Be sure no one has access to the floor during that time so there is no risk of someone crushing the grain you just popped.) When the surface of the floor is dry to the touch, the fibers just below the surface are most likely still wet, so the best practice, if you can’t wait to let the floor dry overnight, is to take a pinless moisture meter reading of the floor before water-popping to achieve a baseline moisture content, then wait to stain the floor until you get the same moisture content reading after water-popping.
If the floor is coated before it’s completely dry, the stain can come out blotchy from the solvents in the stain reacting with the water (see the photo on page 39). It can also cause extended stain dry times since the water vapor is still trying to evaporate out of the wood through the stain barrier.
Other potential trouble with water-popping can come from areas where the popped grain was crushed before it was stained, leaving marks on the floor. Anything that might do that—hard knee pads, stain cans, buffer wheels, boot toes—should be avoided, because they may show up as lighter areas of stain. Sweat drips coming off your body or footprints from damp socks can also be visible (whether the floor is water-popped or not).
Another note of caution when water-popping: Because those floors accept more stain, they also need more time to dry, even when a quick-drying stain is used. You can help the drying process by adding air flow. Even a box fan or two set up in the doorways to blow directly across the stained areas will help.
Bleedback and other trouble
 Porous woods such as this red oak floor are particularly susceptible to bleedback. Interestingly, this bleedback happened a full two weeks after the floor was stained. “This job was a resand after the homeowner didn’t like the stain color,” says Joshua Crossman of PTL Hardwoods in Yelm, Wash. “The floor was sanded about two weeks later and we still got bleedback.”
As mentioned before, stains need to react with oxygen in order to dry. If stain migrates into places where it isn’t exposed to the air, it can stay wet for a long time. When too much stain is applied and pools in the seams and soft grain, it can sometimes migrate back to the surface after the excess is wiped off, creating a problem called “bleedback.” This can particularly tend to happen in warmer areas of the floor, such as where sunlight streams in through a window.
The good thing with bleedback, if there is one, is that it typically shows up right away—within hours or the next day. It’s important to wipe up bleedback before it has a chance to dry on the floor’s surface, in which case it becomes globs of color that are challenging to remove and require a tricky stain repair after scraping and/or sanding (the quick-dry stains tend to be self-dissolving and may be easier to repair). After the bleedback is removed from the surface, extended dry time is necessary to allow any liquid/uncured stain still trapped in the wood to off-gas. Ensure there is as much air movement as possible to help get solvents out of the floor and the building. Some contractors use vacuums or even air compressors to try to remove excess stain from down within the floor (of course, if you attempt this with an air compressor, be sure to protect everything around the floor from potential splatters!).
Unlike bleedback, other excess stain problems may lurk for weeks or even months before they show up.
When seams between boards are close enough that finish bridges over them, and there is stain trapped between them, stain solvents trying to escape can eat into the bottom of the sealer and finish. Some manufacturers say this is actually the biggest cause of what is known in the trade as White Line Syndrome (for a deeper look into WLS and all its potential causes, see “What Is Really Causing White Line Syndrome”).
Those solvents can cause other problems even months after a job seemed to be completed without issues. The finish may begin to turn white, or start peeling, or begin chipping. The finish may simply be softer, with less scratch resistance and less chemical resistance. At that point the job is a complete resand, with the homeowners displaced again—a major ordeal and expense.
Sources and reviewers for this article included: Johannes Boonstra, Rubio Monocoat; Tom Kinlin, PoloPlaz; Robert McNamara, Basic Coatings; Todd Schutte, Bona US; and Janet Sullivan, Lenmar Inc.
Mixing stain into finish: yea or nay?
 Sports specialists have a wider range of options available for adding color to finish because they can tape off areas where they don’t want color and pull straight onto them, eliminating the need for feathering at turns. On this court multiple thin applications of Bona’s SuperSport Paint and SuperSport DTS Sealer Hybrid Mix resulted in this purple color. (Photos courtesy of Bona US)

Contractors have been mixing stain into their finish for years, although doing so has always fallen into the “tailgate chemistry” category—never recommended by the manufacturers of those products. Today, some manufacturers do officially approve of adding a certain amount of their stain or paint to their sealers or finishes, but that comes with a caveat: You must be excellent at applying an even mil thickness of finish with a masterful feathering technique. If you don’t, any heavy areas of finish will be magnified by the added color. When coating with these products, it’s essential to do everything possible, like turning off any air movement, to help the finish flow and level before it dries.
Contractors adding color to their finish should note that too much stain in the finish could lead to issues as the coated floor goes through its normal life cycle. A wear pattern on the high traffic areas will be more obvious and will show as a lighter color compared with the rest of the floor. To help avoid this scenario, the final coat of finish should not contain any color, so as the floor gradually wears, it will not appear lighter in the high traffic areas.
In the sport court business, adding paint to sealer coats has become commonplace, but those experts have an advantage in their application methods: They don’t need to make turns with their applicators. They simply tape off and cover the adjacent areas where they don’t want the color with plastic so that when they make a run with the applicator, they keep going onto the taped-off area. Then they start a new run—no feathering with the applicator required (see the photos at right). They often apply multiple thin layers until the desired tone and depth of color is reached.
As always, no matter which product you’re using, which technique you’re trying or what bootleg product you’re adding, it’s always best to check with the stain and finish manufacturers first. They might have a suggestion that will make your life easier without the risk that comes with performing tailgate chemistry.
Stain hides no sanding sins: best DIY fails
At Pete’s Hardwood Floors in St. Paul, Minn., the company offers both conventional contracting work and DIY rental services, and it works hard to convince customers to not stain their floors themselves. In fact, they even have a page on their website entitled, “Let me talk you out of staining your floor.”
“The number one challenge we deal with is homeowners insisting on staining their floors and their entrenched belief that it will easy as pie,” says Kadee Macey, the “sander rental goddess” at Pete’s. “They all know to be wary of drum sanders, but they simply will not accept that stain will cause any problems ... People can get pretty salty about it, which makes me laugh, because I am talking them OUT of buying something!”
To help the cause, Macey includes “horrifying” stain photos on her website and agreed to share some of the worst disasters with our readers. “It’s an effective tool that gets people thinking about problems without my having to work so hard to convince them with my words,” Macey notes. Here’s what she had to say about these floors:
 “On this floor the customer first used a Square Buff in the field (all the grits, one after the other, on one day). Then, on a separate day, he used a belt sander to sand what the Square Buff missed, but because he didn’t alternate with the machine that did the field, each “edge” pass came out a little further than the last one. By the time he was done, he was halfway into the floor. And he clearly was leaning hard on that belt sander, because it left more porosity in the wood, and his stain penetrated more deeply on that edge. Best picture frame eva!”
 “This customer used a wet string mop, back and forth against the grain, to mop off all the sanding dust before staining—but the wet mop water-popped the grain, and evidence of his graceful, sweeping strokes were revealed when the stain was applied.”
 “This one still confounds me. I think the customer inherited an old rug line that didn’t sand out and was not hidden by the stain. I also think that the original layer of finish was not quite fully sanded off, which prevented even absorption of the new stain coat.”
 “The actual creator of this horror did not rent from us, but the job was done edger-only, with a poorly dressed edger that was difficult to control. The customer had no inkling that those deeper edger scars would accept more stain than the surrounding floor and make them stand out like that.”
 Jason Bennett of Nature’s Flooring Group in Charlotte, N.C., is a pro who always buffs on stains. “I used to mop on and wipe off stain with rags, but buffing it on uses A LOT less stain, and tons of stain doesn’t end up in the cracks and seams of the floor, which can cause bleedback,” he says. “We pour a little stain in the center of a carpet and buff it on until we see that it needs more. Then we take a clean carpet and clean up excess stain. I like to use a rag under the cleanup carpet.” On this job Bennett is staining 5-inch red oak with DuraSeal’s Dark Walnut stain.
Still applying stain by hand? After buffing it on, some pros swear they will never get down on their hands and knees again to apply stain, while others still prefer the up-close-and-personal approach of ragging on and off. If you are going to stain with a buffer, here are some things to keep in mind:
- Most pros who buff stain on and off use cut-out circles of new, clean carpeting or thin white driver pads; each is used under a maroon pad. Individual preferences abound as to whether to use a white pad or a piece of carpeting.
- Most pros pour a circle of stain directly onto the carpeting or pad they are using, then flip it over —although some manage to pour it directly onto the floor and immediately start buffing without leaving a darker area on the floor (if you do this, try to not pour the stain into an area of the floor with gaps).
- Some pros who use carpeting are choosy about the type and thickness of carpeting they prefer, noting that some last longer; absorb and release the stain better; and are better about not slinging excess stain.
- Some pros save money by cutting the circles out of carpeting they have had to demo, but this always runs the risk of contamination.
- You may want to consider buffing on the stain before cutting in at the walls. The buffer can get close to the walls—maybe 1 to 1½ inches—so there isn’t much area that needs to be cut in. If people cut in first, they tend to apply much further out into the floor, and because their cut-in application rate and wipe off process is so different from using the buffer, they can end up picture-framing the job. If there is a problem, it’s much easier to fix 1 inch of floor as opposed to 4–6 inches.