Talk about changing the color of a wood floor, and most wood flooring professionals immediately think about applying dyes. And when combining dyes with bleach and stains, a multitude of effects can be achieved.
Using dyes isn't for the faint-hearted. Using them correctly requires a flawless sand job and a well-honed application technique. But once mastered, dyes can open the door to a whole new clientele—designers, architects, and anybody else willing to pay a premium for a unique look that comes with expertise.
The Case for Dyes
Why use dyes instead of tried-and-true stains? As one contractor puts it, "Your color options go from 15 to endless." With the right combination of products, you can make a white oak floor look like ipé, or make the same floor look like it's been installed in a castle for 500 years. If a designer hands you a random piece of wood that's been sitting in a window for 15 years and asks if you can match it, you can. If a homeowner hates the existing floors in a house they just bought, instead of ripping them out you can make them look completely different. And because dyes color the wood without obscuring the grain, they have a different, more natural look when compared with a typical oil-modified stain, say contractors who use them.
 Aniline dyes were used with and without bleach to color the pieces of this whimsical garden inlaid into a field of maple. (Photo courtesy of Rob Zehnder at Norcross, Ga.-based CBA Sport Floors.)
Creating these effects isn't easy and it isn't quick, so these jobs need to be priced accordingly. And, if something goes wrong and you have to back up and redo a few steps, those steps are extremely time-consuming, so contractors who use dyes suggest pricing these jobs with a comfortable cushion, including even more time than what's expected.
A positive is that the customers asking for these floors are often more concerned with style than budget, and if they are confident you can deliver the colors they want, you've got your foot in the door to some lucrative jobs. As another contractor puts it, "They want exact color matches. Whether it costs $3 or $23 a square foot, that's the least of their concerns."
Being this picky about color can mean many rounds of creating samples. It isn't unheard of to spend 50 hours just creating different samples until the color is just right. That's why, if they aren't working for a regular customer or aren't sure they're getting the job, many contractors charge a fee per sample ($200 or more per sample is typical) that is credited to the job if the contractor ends up doing the work. Of course, keeping meticulous notes on color ratios is essential. It's easy to lose track of what was used for what sample when you're combining different amounts of many different dyes to achieve one perfect color.
Five Facts to Know About Dyes1. Your sanding job must be close to perfect. 2. It's essential to practice, practice, and practice dye application before trying it on a customer's floor. 3. Working as quickly as possible and taping off areas at board lines during application helps avoid lap lines. 4. The floor will keep getting darker every time you apply the dye. 5. You must keep meticulous track of exact dye ratios when mixing your dye. |
Dye Application Tricks & Techniques
Dyeing a floor and staining a floor have a few things in common. Both involve applying a color to the floor and wiping it off. Both of them will instantly highlight any sanding flaws left on the floor. And both require that you keep careful track of the ratios used to create a certain color. But dyeing takes everything tricky about staining and ratchets up the difficulty.
 The dyeing job in progress in this commercial store shows a common technique for dyeing: taping off rows of boards from end-to-end. The people dying the floor can then dye one section, walk in the next, dye the next and so on so they are dyeing every other row at one time. Once the dye is dry the tape lines are moved and the people dyeing the floor can walk on the already dyed areas, apply dye on the next, etc. (Photo courtesy of Daniel Boone at Jacksonville, Fla.-based Daniel Boone WFT Inc.)
The dyes typically used on wood floors are called aniline dyes, and they come in either a powder or liquid concentrate. Depending on the product and the contractor using them, they can be mixed with water, alcohol or oil. Of these, water is probably the most common because people consider it to be the easiest to apply (although all of them are notorious for being tricky). Dyes mixed with oil have a reputation for separating out easily and going down unevenly; dyes with alcohol or oil have the advantage of not popping the grain as much as water.
When people call dyes "tricky," they are referring to their tendency to leave lap lines. If you overlap a spot, it will look twice as dark. Three times? Three times as dark. Wood can absorb only so much stain—a fact that makes double-staining pointless, despite many people trying it—but wood will keep absorbing dye and getting darker each time dye touches the wood.
That being the case, different people have developed their own tricks and techniques for applying dyes without lap lines. A common one is working in sections, taping them off carefully—adhering the tape as tightly as possible down in the side match—at board sides. The sections must go all the way wall-to-wall so there are no stops in the middle of board runs, which would be impossible to hide. Some people go so far as to cut an applicator so its width is a multiple of the board width.
Some people feel that doing two coats of the dye makes it easier to avoid lap lines. With this technique, the first coat is applied with a lighter color, and a second darker color is applied once the first coat is dried. The second coat can help re-dissolve the dye in areas that were uneven from the first coat and make it appear more uniform. Contractors warn that the dye may look uniform when applied, then look less uniform as it dries. And unlike stain jobs, where if you notice a sanding mark you can just grab a piece of sandpaper, rub it out and reapply the stain, spot repairs here and there on dye jobs are extremely difficult. Likewise, because you are usually working with water, dyes can tend to splash and leave drips, which are also difficult to remove.
Whatever technique is used, people agree that when applying the dye, it's an absolute must to work as quickly as possible. One person puts down the dye with the applicator—typically one like a cut-in pad—and another comes right behind wiping it up. The faster the application, the better chance there is of having wet dye edges and avoiding lap lines.
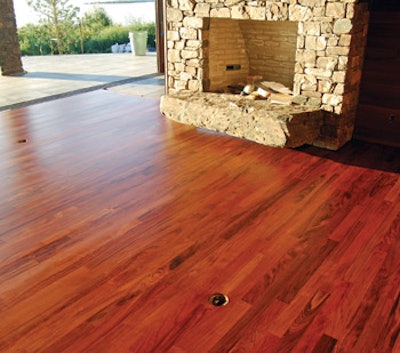
 This reclaimed oak floor was dyed light brown, had one coat of clear quick-dry oil-modified stain and then two coats of a satin water-based finish. (Photo courtesy of John Christopherson at Olympia, Wash.-based Christopherson Wood Floors.)
The species used will influence how difficult it is to prevent lap lines. Some species seem to absorb the dye and dry almost immediately, making dye application extremely difficult, even for experienced contractors, while other species are more forgiving. Species that are difficult to stain without blotching—like maple and cherry—will also tend to look blotchy with dyes, although darker dyes can help disguise the blotchiness.
Popping the Grain, For Better or Worse
Just as with stain, popping the grain beforehand will make the floor take the dye darker. Some people also think that popping the grain and applying the dye before the wood has completely dried from the water-popping makes the floor take the dye more evenly. Of course, you need to think about how much grain raise is acceptable. In some cases—for example, when hand-scraping a dyed floor—you may actually want some grain raise, which can help create depth for the hand-scraping. But typically, most people think of grain raise as something to avoid.
That being the case, when working with water-based dyes, pay careful attention to the temperature and humidity on the job site. The more humid the job site, the longer it will take the dye to dry. And the longer that water sits on the floor, the more it's going to pop the grain. Some people use fans over the floor to aid in quick drying.
 Intense colors can be achieved with dyes, such as this black floor (the photo is from an NWFA technical school in New York City last August; courtesy of Daniel Boone at Jacksonville, Fla.-based Daniel Boone WFT Inc.).
A Common Step: Bleaching
Dyes are often used in conjunction with bleaching the wood floor. Bleaching once or more before dyeing can strip the natural color of the wood away, adding yet another method to create another look for the same wood floor. Some species are greatly affected by the bleach—it can remove the red tones from red oak, for example—while others won't look much different after bleaching (a cumaru floor is still going to look pretty much like cumaru, even after it's bleached).
Using bleach before dye is often done to achieve a weathered, aged look. Done correctly, it can give the floor a patina that is difficult to achieve otherwise on a brand-new floor. Although some contractors successfully use household bleach, most recommend using an actual wood bleach, which comes in two parts. It's applied with a finish applicator and then usually has to be neutralized with an application of whatever is recommended (usually water or a water/vinegar mix). The floor then needs to dry overnight before being dyed.
Some notes of caution about using bleach: If you scuff or mar the surface of the wood after bleaching, you'll reveal the real color of the wood, so be careful with the floor before the dye application. Also, be aware that bleaching the floor does degrade the structure of the wood—an effect that is more severe for some species than others.
 This 10-inch white oak floor was triple bleached (it was screened with 120 after being neutralized from the first coat of bleach), double dyed, stained with a light oil-based stain and is being finished with three coats of a natural oil finish. (Photo courtesy of John Christopherson at Olympia, Wash.-based Christopherson Wood Floors.)
The Final Step
Once the floor is successfully dyed, there are seemingly endless options as to what to do next, except for two things: coating directly over water-based dyes with water-based finish or coating directly over an oil-based dye with an oil-based finish. In both cases the finish will reactivate the dye and pull the color.
For people who want to go directly from the dye to a sealer or finish coat, waterborne or otherwise, a common method is to use a universal sealer as the first coat. The shellac-based product goes on in a super-thin layer and dries extremely quickly, allowing other finishes to go over it without abrading.
Because of the custom nature of dyed floors, including those with hand-scraped or aged effects, many contractors opt for one of the many hardwax or natural oil products that are now available. Many of these products are available in different colors, which further adds to the spectrum of looks that can be achieved. Be sure to test the finish first, as some of those products may reactivate some dyes.
Very frequently, before any finish goes on the floor, contractors choose to use a traditional wood floor stain, neutral or otherwise, directly over the dye. The conventional wisdom is that dyes aren't colorfast, and the oil-based stain helps protect the dye from fading. Stains are also used to help the dye appear more uniform. Contractors also use finishes with UV inhibitors to help protect the dyes from fading.
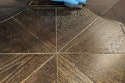
 Dyes will highlight any sanding imperfections or errors with dye application; the semicircular shapes visible on this floor happened when the contractor carelessly dragged a dye rag back over the floor.
Regardless of what the dye is mixed with, whether it has bleach or not, has stain or not, or what it's coated with in the end, one thing is certain: You must test all the products you are going to use extensively. If you aren't experienced at applying dyes, practice at your shop or in your house until you're comfortable. Then practice creating the floor you want with every single step and every single product you intend to use on a real job. On a big job, one thing going wrong at the end of the process could literally erase weeks of work, so go into the job with enough practice and experience (and money) to make you feel confident you'll be successful and create a gorgeous custom wood floor.
Sources for this article included: Daniel Boone, Daniel Boone WFT Inc.; John Christopherson, Christopherson Wood Floors; Frank Kroupa, National Wood Flooring Association; and Michael Kordash, Independent HWF's & Inspection Services.
Photos of more dyed floors:
RELATED: Shades of Gray: How to Use Vinegar & Steel Wool to Darken a Floor
 Five-inch-wide Brazilian cherry plank was dyed to 'pre-darken' it.
 Reclaimed oak was dyed brown, then was coated with a light oil stain and two coats of a waterborne finish.