Perfectly finishing a hardwood floor without any swirl marks is a challenge. The dreaded swirl marks happen when we are buffing; they are scratches that appear in a circular pattern in the wood or finish. Sometimes they are only visible with intense light, such as under can (sometimes called "high hat") lights or in front of patio doors. Once the stain and finish are applied, removing swirl marks in the wood is impossible without removing everything down to bare wood and starting over. If the swirl marks are in the finish topcoats, the finish can be scuffed and recoated. Either way, re-doing tasks is never on a project to-do list, and it wastes precious time and money, so it's well worth it to make sure you avoid swirl marks in the first place by taking the time to do it correctly.
How Swirl Marks Happen
One of the most common questions we are asked is: "Why do swirl marks happen on one project and not on the next?" Some reasons for this are:
- A grit that is too aggressive
- Screening too fast
- A damaged screen
- Particles or debris caught under the screen
- A machine that is not balanced or an abrasive not centered on the pad
- Finish that is not cured
- A wood floor that is not flat
- Finish that is not clean.
Reaffirming the accepted buffing techniques used by floor mechanics for the past 70 years and combining them with some of the new abrasive and machine technologies should eliminate visually apparent swirl marks. Here are some tips and techniques that we've found work well for the wood floors in our part of the country.
Buffer Technique Tips
It is important to know that you are putting scratches in the wood for a very specific reason: to achieve a flat, uniform surface for even absorption of the stain or finish, and to promote a good mechanical bond for finish adhesion.
The goal is to make sure the final scratches are not apparent on the wood or in the finish. Our aim is to provide techniques to avoid "visually apparent" swirl marks. You should first stand in a natural way on the floor and look at it. Then follow these tips:
1) Be concise in your approach. Buff with great purpose-that is, be systematic and uniform in your approach. (For extensive information on buffer techniques, see the articles "Taming the Buffer, Part I" from the June/July 2003 issue of Hardwood Floors and "Taming the Buffer, Part II" from the February/March 2006 issue; both are available online at woodfloorbusiness.com.)
Quickly prep your screen or sandpaper by rubbing two pieces together, making certain that the "mineral" is all attached. When buffing raw wood, start along the baseboards or perimeter at the farthest corner from the entrance into the room, then use a side-to-side motion across the room, cutting with the grain as much as possible. Always finish with the grain. Your overlap and pacing should be consistent so you get a uniform result. Shadows, non-uniform color and swirls will all appear if you do not buff with great purpose.
You must know how many square feet you are preparing and be certain to use a similarly sharp abrasive on the entire project. To put it simply, use the appropriate amount of screens or sandpaper. Most manufacturers have a general specification for their abrasive. The common rule has been 500 to 700 square feet per screen for silicon carbide abrasive (black). So if that's your specification, flip the screen when you've screened between 250 to 350 square feet.
2) Clean the floor before screening. Leaving grit from previous cuts or any other dirt on the floor when you are buffing is just asking for trouble. We also believe that attaching a vacuum setup to your buffer is extremely important. Vacuuming will help to significantly reduce the potential for dirt or grit to cause that irregular depth of cut that causes the dreaded swirl. Tacking the floor after vacuuming is also a good idea.
3) Go slow and steady. Pace and balance with the machine definitely matter. Realize that you shouldn't have to drive the buffer too hard or lean into the buffer. Oftentimes guys will try to use the buffer to correct their sanding flaws. This leads to multiple problems-as they try to dig out the problem, they create more swirls.
4) Use a quality drive block and drive pad. Over the years, we have seen some contractors so frugal that they will not throw away the first buffer pad they ever bought. If your pad has chunks missing from it, your buffer will not be balanced when it spins at the recommended 175 RPMs. Most contractors know that a thick white pad will remove less wood than a thick red pad. The new thin, dense white pads are ideal backup pads for screening raw wood and uniform stock removal. The newer no-load hook-and-loop sandpaper does an excellent job creating a flat substrate and prepping the floor for stain. Achieving a flat substrate without undulation on woods with hard and soft grain is possible with a stiffer backup pad rather than a softer one.
5) "Clock" the buffer. Make sure you clock the buffer to buff with the grain using the front of the buffer from 12 o'clock to 3 o'clock. The idea is to buff slowly, overlapping approximately 4 to 6 inches of your previous path each pass.
6) Water-pop before staining. When you are prepping for stain on raw wood, particularly very hard and dense woods, consider water-popping your floor. This will produce an even depth of color in both the hard and soft grain. In addition, the water-popping will help expand the fibers of the wood in those fine scratches and help reduce the potential for swirl marks. We also use this technique when working with extremely soft woods such as white pine. Popping the grain when prepping white pine significantly reduces visually apparent scratches. If you are doing a very dark or black floor, consider not using a buffer.
7) Be aware of new abrasives. Pay close attention to changes in abrasive technology, and don't be afraid to try something new. For example, we find that the newer ceramic-fired alumina mineral screens are great for very dense woods such as ipé, cumaru, Brazilian cherry, maple and hickory because they will sand and not polish, and they will also cut longer on harder woods like the above mentioned species. However, we would not recommend these screens on pine, American cherry or American walnut. We also recommend these screens (regardless of the species) when preparing aluminum oxide prefinished floors for a recoat. The aluminum oxide mineral used in prefinished floors finish is extremely hard, but the ceramic-fired alumina mineral of the these screens is more durable and will prepare these finishes more uniformly, maintaining a similarly sharp abrasive longer than other screen mineral compositions.
8) Do not use damaged screens. This seems like an obvious statement, but to avoid major problems, it is important to not use damaged screens. If your screen or the abrasive pad strips are torn, frayed, folded and creased, the potential for swirls increases dramatically. Be mindful of floor vents, sockets, and transitions, and be sure to check your abrasive if you think you may have hit anything that could damage the abrasive.
9) Consider your equipment for final prep. Consider using an orbital sander attached to a vacuum for your final prep. When you have to abrade between coats and the floor isn't completely flat, think about using a sander designed for between-coat abrasion or recoats.
Final Steps
Screening is usually the final step when preparing the wood for finish or stain. The purpose of this final step is to blend the edges (which is done using an edger), and the field (done with the big machine). Some very talented professionals with incredible ability can sand, edge and hand-sand without a final screening and manage to obtain a uniform color and sheen void of any sanding marks. But we suggest that even the most skilled floor mechanics should screen floors or sand with an orbital sander before applying stain or their sealer coat.
Swirl marks are sometimes missed, even by the best! Quality assurance is important, and it requires examining the floor carefully before applying stain or finish. If an occasional swirl mark or an edger mark appears while you are staining, you can wet-sand the scratch using the stain and 100- or 80-grit sandpaper to remove the mark. If you realize swirl marks are present throughout the floor, though, there is no magic that will make them disappear. You must rescreen using a better technique and a finer grit; your goal is to make the scratch pattern even tighter. This makes the previous circular scratch non-evident. For example, if you used 100-grit, you should consider 120- or 150-grit for the next pass. You must make certain that when doing this, you are sanding, not polishing. Polishing can occur when you use an abrasive for too long and go too fast.
Between Coats
To obtain optimal finish adhesion, screening is also the technique to prepare one coat of finish for the next coat. New products like the abrasive pads or the ceramic-fired alumina mineral pads are great on certain finishes in their early stages of cure. Adhesion is the most critical part of finishing a hardwood floor, so abrading the floor is essential. Yet, this also creates the potential for swirl marks, so it's important to keep good buffing technique in mind.
No one wants to have to start sanding a floor all over again, so it pays to always be trying to improve your buffing technique. Of all our buffing advice, the two most critical recommendations are to always buff using a vacuum assist on your buffer and to final-prep the floor using an orbital sander. Take the time to buff the floor correctly the first time so you don't end up wasting time, money and effort to fix a swirly mess.
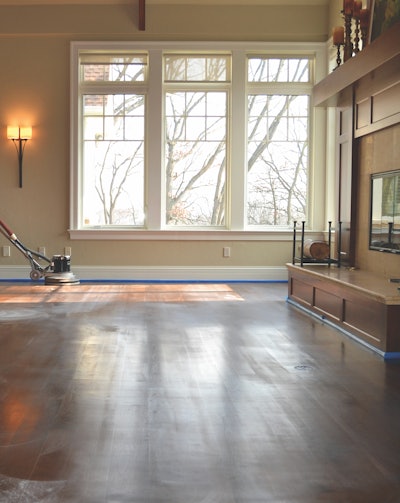
 This floor was just screened for abrasion between coats of waterborne finish. A careful look at the floor in the light reveals a striped pattern of shinier and duller areas every few rows, indicating there wasn't enough overlap between passes with the buffer.
 As the finish dries on this stained floor, multiple problems are apparent. Swirl marks are obvious in the bottom right of the window reflection, and the scalloped pattern was not consistent along the wall. Buffing the perimeter of the room first would prevent the scallop pattern.