|
|
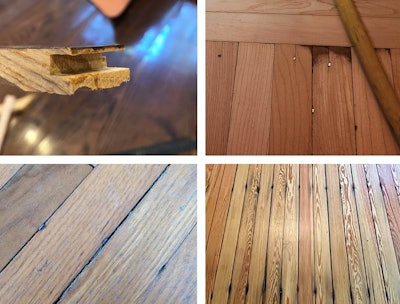
There is a ton of misinformation about how much wear layer is “enough” to sand and finish—and the thickness of what’s left after years of use and previous sanding. I recently read an article written by an “expert” (who shall go unnamed) who stated one should expect 12 to 13 sandings out of a solid ¾-inch floor. Wow! Did the author not understand that the wear layer on a ¾-inch tongue and groove solid wood floor is typically ¼ inch (6.35 mm)? And before the wear surface is sanded to nothing, you are going to hit the fasteners, rendering the floor useless. Be careful about what you read.
So, really: How much thickness do you need to sand a floor confidently?
For solid wood:
• The most important factor is the skill of the person doing the work.
• How good is the equipment being used? Is a multi-head machine available?
• Is the floor flat? Remember, a drum/belt sander is not a planer; the drum will follow nuances and undulations in the floor to an extent. If the floor has peaks and valleys that exceed the wear layer, there is a very good chance you will sand through the face to the fasteners. Before beginning, use a feeler gauge in multiple places to determine how much wear layer is left. If there is 3 mm (1/8 inch) or more and the floor is relatively flat, sand away. Keep in mind this rule of thumb: Start with the finest grit that will get the job done and only skip one grit in the sanding progression.
• Think about the finish you will use. If too much wood is removed and a water-based finish is being used, there is a good chance the reaction to the water will curl the edges (top of the grooves). In those cases, consider using an oil-modified or solvent-based product with less reaction.
For engineered wood:
• As per above, check to see how much wear layer is available. Ideally, 3 mm or more shouldn’t be a problem. Still, use caution and focus on removing as little wood as possible.
• 2 mm is the bare minimum, and it would have to be very flat with either no bevels or micro-bevels. This scenario is best left to that small percentage of technicians with the skill to try. See if there is any attic stock before agreeing to do the work, as there is a chance you may burn through the face in some areas.
• Speaking of beveled edges: Educate your client about the fact that the sanding process will remove some, if not all, of the bevels.
• Consider using a multi-head sander when working on a floor with a 2- to 3-mm face. It will be slower but less prone to digging in and burning through the face.
There are other factors, such as the finish on the floor. Removing aluminum oxide or ceramic finish isn’t easy to begin with. Add this fact to the mix when deciding to do the work and how to price it out. Again, you can’t simply put on a 24- or 36-grit belt and sand away. It comes down to knowing how to eat an elephant: one bite at a time.