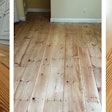
The Problem
While working on a customer's red oak 2 1/4-inch floor, the contractor noticed a repeating pattern of marks across the floor, apparently from the big machine.
The Procedure
He drum-sanded with the big machine, edged and screened the floor. He applied one coat of finish and only then did he notice the imperfections. He attempted to resand the floor again, only to get the same results.
The Cause
The pattern he noticed was chatter — marks that are no more than 1 1/2 inches apart and can be as tight as 1/4 inch. The drum causes 90 percent of all chatter. Drums that are not balanced, are out of round, contain hard spots, have incorrect paper installation or have compressed rubber can all be the culprits. A belt sander can have some of the same problems, but it also has twice the working parts — an upper roller, a guide roller and more bearings. The other 10 percent of factors that cause chatter can be difficult to find. Poor seams on the abrasive belt, drive belts and fan belts, worn pulleys and bad bearings in the fan housing also can cause chatter and imperfections in the floor.
Contractors often confuse chatter with wave. Wave is a repeat of the first imperfection that runs repeatedly over the floor and is typically more than 1 1/2 inches apart. It looks like a stone that was dropped in water with the ripples flowing out. Wave imperfections stop a few feet from the walls.
Improper electrical hookup — whether it's voltage that is too high or low, or an insufficient ground —can cause chatter and wave. These problems labor the motor, which transfers to problems on the floor. Using a voltage meter to check voltage and a power booster for low-voltage situations prevents these types of electrical imperfections.
How to Fix the Floor
The best way to remove chatter is with a hard plate, paper disc or multi-disc sander. A sanding screen only highlights the chatter and causes the floor to dish out. Use a disc sander and hard plate while working from right to left, traveling down and back in the same path and working the disc sander at slight angles for the best cut of the unit. Repeat the same procedure, dropping back one half the size of the first disc.
If using the multi-disc sander, walk slowly with the grain with a slight sweep or shuffle from side to side, always overlapping the unit as you move from right to left. This blends in the floor and prevents deep scratches.
In the Future
Cutting at a slight angle — seven to 15 degrees —with the big machine helps prevent wave and flattens the floor. The angle works much like a 45 degree angle but with less abuse to the grain of the wood. This also removes the sanding scratch from the last grit. For the last cut with the big machine, cut straight with the grain but at a slower pace. This prevents the contact drum from making any dishout in the soft grain and removes the scratches from the first cuts. Be sure to never skip too many grits. An example for a three cut would be 40, 60 and 100. If the floor has very little over- or underwood, then a two-cut of 60 and 100 can be sufficient.
Preventive maintenance on the big machine is key. Working with an approved, knowledgeable and trustworthy service center can make or break big jobs. Ideally, all floor technicians should attend training programs and service schools offered by the manufacturer. The more the floor technician knows about the big machine, the easier it is to find the problem.
Correct storage and transportation when handling the big machine saves time and money and helps prevent wave and chatter. Any time the unit is stored for long periods of time, keep the wheels off the ground. Potholes, railroad tracks and speed bumps all can cause abuse to the drum and wheels. Many manufacturers offer a storage base that protects the wheels and the contact drum (or you can make your own base). This prevents flat spots on the wheels and contact drum. If the wheels are out of round or have flat spots, they transfer as imperfections on the wood.
Transporting the unit loose in the van or under the wood you picked up that day can also cause a number of problems, including damage to the frame, control rods and control handle. If any of these parts are bent, they can cause the drum to not rotate correctly. Finally, when taking the unit from the truck into the job site, be aware that rolling it over stones, sidewalks and grit can destroy the wheels and contact drum.
A quick way to tell if the imperfection is from the contact drum or the other problems is to remove the fan belt and test the unit on the floor. If the imperfection is gone, then the drum sander is in good condition and the hunt is on. If the chatter is not gone, then the contact drum or the front of the unit is where the trouble lies.


